Canon PowerShot A40 Software Starter Guide DC SD Ver.8 - Page 89
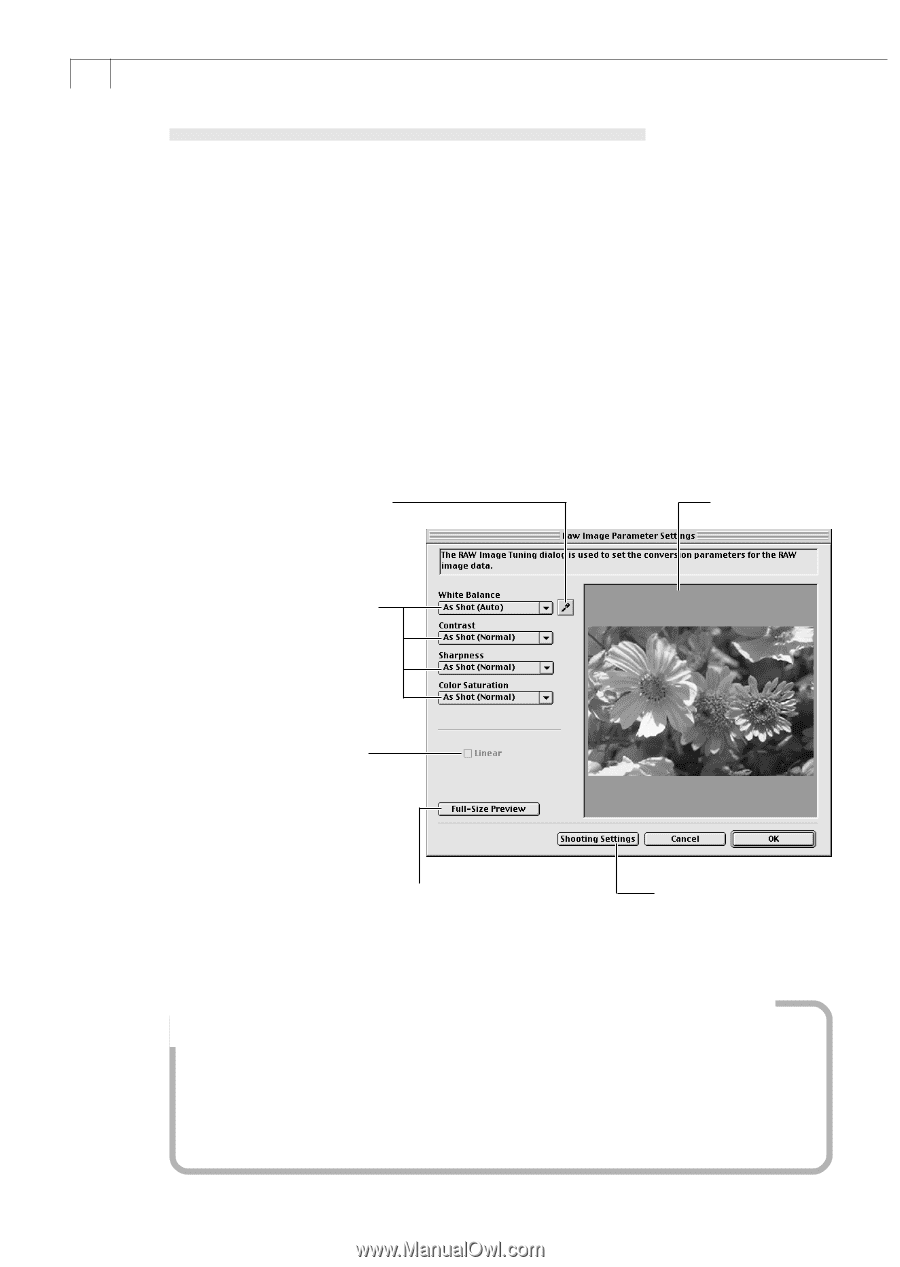
Select a RAW image., Click the [File] menu and select [Convert RAW Images with User Defined,
 |
View all Canon PowerShot A40 manuals
Add to My Manuals
Save this manual to your list of manuals |
Page 89 highlights
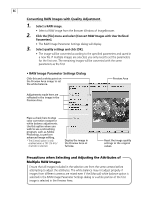
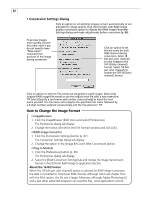
86 Converting RAW Images with Quality Adjustment 1. Select a RAW image. • Select a RAW image from the Browser Window of ImageBrowser. 2. Click the [File] menu and select [Convert RAW Images with User Defined Parameters]. • The RAW Image Parameter Settings dialog will display. 3. Select quality settings and click [OK]. • The image will be converted according to the specified parameters and saved in a new file. If multiple images are selected, you only need to set the parameters for the first one. The remaining images will be converted with the same parameters as the first. • RAW Image Parameter Settings Dialog Click this and a white point on the Preview Area image to set the white balance. Preview Area Adjustments made here are reflected in the image in the Preview Area. Place a check here to stop color correction except for white balance adjustments. Use this option when you wish to use a retouching program, such as Adobe Photoshop, to perform advanced image editing. * The [Linear] option is only enabled when a TIFF (16 bits/ channel) is selected. Display the image in the Preview Area at full size. Reset the image quality settings to the original values. Precautions when Selecting and Adjusting the Attributes of Multiple RAW Images Ensure that all images included in the selection are from the same camera before attempting to adjust the attributes. The white balance may not adjust properly if images from different cameras are mixed even if the [Manual] white balance option is selected in the RAW Image Parameter Settings dialog or a white portion of the first image is selected in the Preview Area.
-
 1
1 -
2
-
3
-
4
-
5
-
6
-
7
-
8
-
9
-
10
-
11
-
12
-
13
-
14
-
15
-
16
-
17
-
18
-
19
-
20
-
21
-
22
-
23
-
24
-
25
-
26
-
27
-
28
-
29
-
30
-
31
-
32
-
33
-
34
-
35
-
36
-
37
-
38
-
39
-
40
-
41
-
42
-
43
-
44
-
45
-
46
-
47
-
48
-
49
-
50
-
51
-
52
-
53
-
54
-
55
-
56
-
57
-
58
-
59
-
60
-
61
-
62
-
63
-
64
-
65
-
66
-
67
-
68
-
69
-
70
-
71
-
72
-
73
-
74
-
75
-
76
-
77
-
78
-
79
-
80
-
81
-
82
-
83
-
 84
84 -
 85
85 -
 86
86 -
 87
87 -
 88
88 -
 89
89 -
 90
90 -
 91
91 -
 92
92 -
 93
93 -
 94
94 -
95
-
96
-
97
-
98
-
99
-
100
-
101
-
102
-
103
-
104
-
105
-
106
-
107
-
108
-
109
-
110
-
111
-
112
-
113
-
114
-
115
-
116
-
117
 |
 |