Canon PowerShot A40 Software Starter Guide DC SD Ver.8 - Page 87
Click [OK] to start printing.
 |
View all Canon PowerShot A40 manuals
Add to My Manuals
Save this manual to your list of manuals |
Page 87 highlights
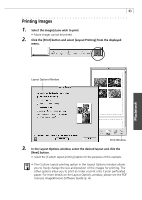
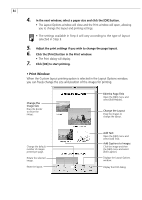
84 4. In the next window, select a paper size and click the [OK] button. • The Layout Options window will close and the Print window will open, allowing you to change the layout and printing settings. • The settings available in Step 4 will vary according to the type of layout selected in Step 3. 5. Adjust the print settings if you wish to change the page layout. 6. Click the [Print] button in the Print window. • The Print dialog will display. 7. Click [OK] to start printing. • Print Window When the Custom layout printing option is selected in the Layout Options window, you can freely change the size and position of the images for printing. Change the Image Size Drag the border to resize the image. Edit the Page Title Open the [Edit] menu and select [Edit Header]. Change the Layout Drag the images to change the layout. Change the default number of images printed per page. Rotate the selected image. Reset the layout. Add Text Open the [Edit] menu and select [Add Text]. Add Captions to Images Click the image and then the [Edit] menu and select [Edit Caption]. Displays the Layout Options window. Display the Print dialog.
-
 1
1 -
2
-
3
-
4
-
5
-
6
-
7
-
8
-
9
-
10
-
11
-
12
-
13
-
14
-
15
-
16
-
17
-
18
-
19
-
20
-
21
-
22
-
23
-
24
-
25
-
26
-
27
-
28
-
29
-
30
-
31
-
32
-
33
-
34
-
35
-
36
-
37
-
38
-
39
-
40
-
41
-
42
-
43
-
44
-
45
-
46
-
47
-
48
-
49
-
50
-
51
-
52
-
53
-
54
-
55
-
56
-
57
-
58
-
59
-
60
-
61
-
62
-
63
-
64
-
65
-
66
-
67
-
68
-
69
-
70
-
71
-
72
-
73
-
74
-
75
-
76
-
77
-
78
-
79
-
80
-
81
-
 82
82 -
 83
83 -
 84
84 -
 85
85 -
 86
86 -
 87
87 -
 88
88 -
 89
89 -
 90
90 -
 91
91 -
 92
92 -
93
-
94
-
95
-
96
-
97
-
98
-
99
-
100
-
101
-
102
-
103
-
104
-
105
-
106
-
107
-
108
-
109
-
110
-
111
-
112
-
113
-
114
-
115
-
116
-
117
 |
 |
