Canon PowerShot A40 Software Starter Guide DC SD Ver.8 - Page 65
Check Mark On/Off Button
 |
View all Canon PowerShot A40 manuals
Add to My Manuals
Save this manual to your list of manuals |
Page 65 highlights
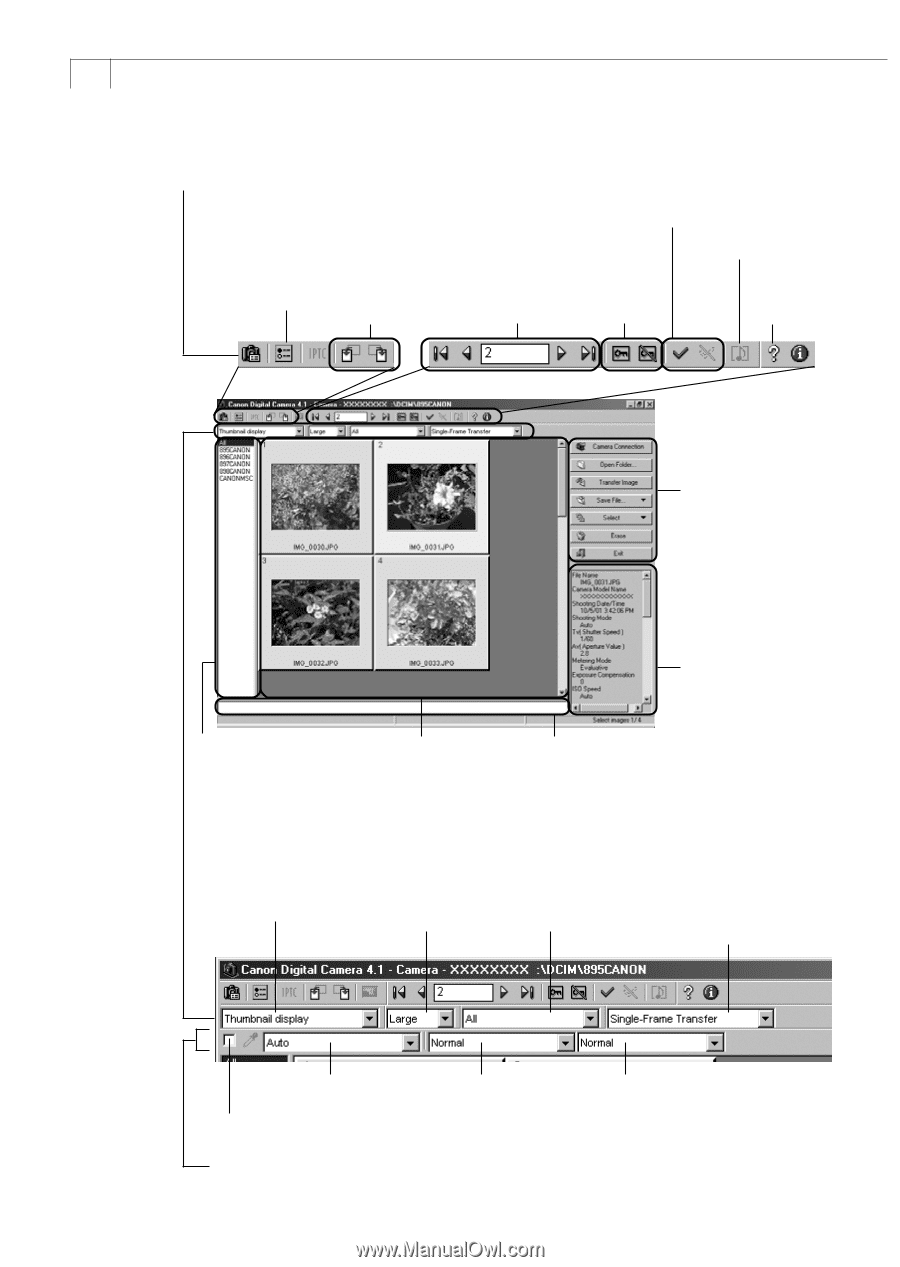
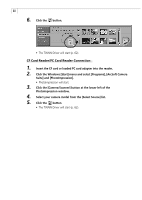
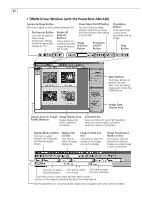
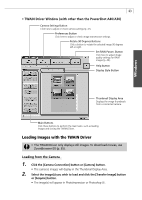
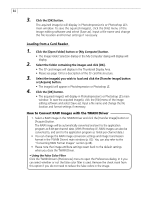
62 • TWAIN Driver Window (with the PowerShot A40/A30) Camera Settings Button Click here to adjust or check camera settings (p. 41). Preferences Button Click here to adjust or check image transmission settings or RAW image quality settings (p. 51). Rotate 90 Degrees Buttons Click a button to rotate the selected image 90 degrees left or right. Check Mark On/Off Button You can choose an image selection method if you press the [Select] button after adding a check mark. Image Selection Button Protection On/Off Button Play Memo Button Click here to play a voice memo associated with an image. Help Button Main Buttons Click these buttons to perform the main tasks, such as loading images and closing the TWAIN Driver. Image Data Display Area Display Area for Image Image Display Area Folder Selection Images display here when a camera is connected. Comment Box Input a comment of up to 120 characters here. (You cannot input a comment while the camera is connected.) Display Mode List Box Click here to select between the Thumbnail and Preview display modes. Display Size List Box Click here to select an image display size. Image Format List Box Click here to select the format of the images you wish to display. Image Transmission Mode List Box Click here to select to transmit the selected images as a single image or as an index sheet. Click here to adjust Click here to adjust Click here to adjust the white balance. the contrast. the color saturation. Click here to insert a check mark and then select a white portion of the image to automatically adjust the white balance. Sets the parameters for converting RAW images (may not appear with some camera models).
-
 1
1 -
2
-
3
-
4
-
5
-
6
-
7
-
8
-
9
-
10
-
11
-
12
-
13
-
14
-
15
-
16
-
17
-
18
-
19
-
20
-
21
-
22
-
23
-
24
-
25
-
26
-
27
-
28
-
29
-
30
-
31
-
32
-
33
-
34
-
35
-
36
-
37
-
38
-
39
-
40
-
41
-
42
-
43
-
44
-
45
-
46
-
47
-
48
-
49
-
50
-
51
-
52
-
53
-
54
-
55
-
56
-
57
-
58
-
59
-
 60
60 -
 61
61 -
 62
62 -
 63
63 -
 64
64 -
 65
65 -
 66
66 -
 67
67 -
 68
68 -
 69
69 -
 70
70 -
71
-
72
-
73
-
74
-
75
-
76
-
77
-
78
-
79
-
80
-
81
-
82
-
83
-
84
-
85
-
86
-
87
-
88
-
89
-
90
-
91
-
92
-
93
-
94
-
95
-
96
-
97
-
98
-
99
-
100
-
101
-
102
-
103
-
104
-
105
-
106
-
107
-
108
-
109
-
110
-
111
-
112
-
113
-
114
-
115
-
116
-
117
 |
 |