Cisco PVC300 Administration Guide - Page 33
Network Settings, Configuration Type, IP address, Subnet mask, Gateway, Primary DNS, Secondary DNS - setup
 |
UPC - 745883584505
View all Cisco PVC300 manuals
Add to My Manuals
Save this manual to your list of manuals |
Page 33 highlights
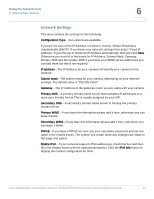
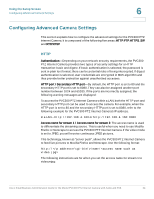
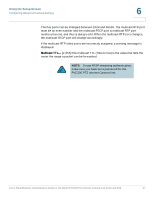
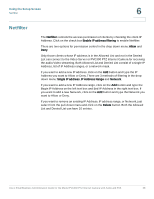
Using the Setup Screen Configuring Basic Settings 6 Network Settings This area contains the settings for the following: Configuration Type-Two options are available. If you are not sure of the IP Address it is best to choose "Obtain IP Address Automatically (DHCP)". If you know your network settings then select "Fixed IP Address". If you choose to obtain an IP Address automatically, then just click Save. Otherwise you must fill in the boxes for IP Address, Subnet Mask, Gateway, Primary DNS and Secondary DNS. If you know your WINS server addresses you can add them but this is not required. IP address-The IP Address for your camera will identify your camera on the network. Subnet mask-The subnet mask for your camera, depending on your network settings. The default value is "255.255.255.0". Gateway-The IP Address of the gateway router you are using with your camera. Primary DNS-A primary domain name server that translates IP addresses to a more user-friendly format This is usually assigned by your ISP. Secondary DNS-A secondary domain name server to backup the primary domain server. Primary WINS-If you have this information please add it here, otherwise you can leave it blank. Secondary WINS-If you have this information please add it here, otherwise you can leave it blank. PPPoE-If you have a PPPoE account, put your username, password and service name in the related boxes. The system will restart when any changes are made to this page and saved. Enable IPv6-If your network supports IPv6 addressing, check this box and then fill in the related boxes with the optional information. Click the IPv6 Info button to display the current configuration for IPv6. Cisco Small Business Administration Guide for the Model PVC300 PTZ Internet Camera with Audio and PoE 33
-
 1
1 -
2
-
3
-
4
-
5
-
6
-
7
-
8
-
9
-
10
-
11
-
12
-
13
-
14
-
15
-
16
-
17
-
18
-
19
-
20
-
21
-
22
-
23
-
24
-
25
-
26
-
27
-
 28
28 -
 29
29 -
 30
30 -
 31
31 -
 32
32 -
 33
33 -
 34
34 -
 35
35 -
 36
36 -
 37
37 -
 38
38 -
39
-
40
-
41
-
42
-
43
-
44
-
45
-
46
-
47
-
48
-
49
-
50
-
51
-
52
-
53
-
54
-
55
-
56
-
57
-
58
-
59
-
60
-
61
-
62
-
63
-
64
-
65
-
66
-
67
-
68
-
69
 |
 |