Dell 5330dn User Guide
Dell 5330dn - Workgroup Laser Printer B/W Manual
 |
UPC - 884116002406
View all Dell 5330dn manuals
Add to My Manuals
Save this manual to your list of manuals |
Dell 5330dn manual content summary:
- Dell 5330dn | User Guide - Page 1
Dell™ 5330dn Mono Laser Printer User's Guide Contacting Dell NOTE: If you do not have an active Internet connection, you can find contact information on your purchase invoice, packing slip, bill, or Dell product catalog. Dell provides several online and telephone-based support and service options. - Dell 5330dn | User Guide - Page 2
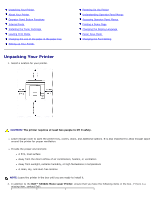
Printer About Your Printer Operator Panel Button Functions Internal Fonts Installing the Toner Cartridge Loading Print Media Changing the size of the paper in the paper tray Setting up Your Printer Unpacking Your Printer 1. Select a location for your printer. Powering On the Printer - Dell 5330dn | User Guide - Page 3
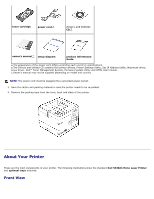
each country's specifications. b.The Drivers and Utilities CD contains Dell printer drivers, Printer Settings Utility, Set IP Address Utility, Macintosh driver, Linux driver, Dell™ Toner Management System, Firmware Update Utility and HTML User's Guide. c.Owner's manual may not be supplied depending - Dell 5330dn | User Guide - Page 4
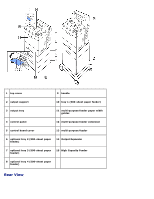
1 top cover 9 handle 2 output support 10 tray 1 (500-sheet paper feeder) 3 output tray 11 multi-purpose feeder paper width guides 4 control panel 12 multi-purpose feeder extension 5 control board cover 13 multi-purpose feeder 6 optional tray 2 (500-sheet paper feeder) 14 Output Expander - Dell 5330dn | User Guide - Page 5
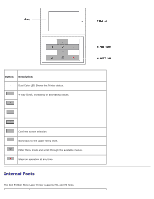
1 rear door 2 duplex unit 3 power receptacle 4 network port 5 parallel port 6 USB port 7 power switch Operator Panel Button Functions - Dell 5330dn | User Guide - Page 6
LED Shows the Printer status. 4-way Scroll, increasing or decreasing values. Confirms screen selection. Goes back to the upper menu level. Enter Menu mode and scroll through the available menus. Stops an operation at any time. Internal Fonts The Dell 5330dn Mono Laser Printer supports PCL and PS - Dell 5330dn | User Guide - Page 7
( ). 4. PCL Font list pages print out. Printing the PS Font Dell sales team in your region for further details. Installing the Toner Cartridge CAUTION: Do not touch the green underside of the toner cartridge. Use the handle on the cartridge to avoid touching this area. 1. Remove the toner cartridge - Dell 5330dn | User Guide - Page 8
tape at the end of the toner cartridge. Carefully pull the tape completely out of the cartridge and discard it. NOTE: The sealing tape should be longer than 60 cm when correctly removed. NOTE: Holding the toner cartridge, pull the sealing tape straight to remove it from the cartridge. Be careful not - Dell 5330dn | User Guide - Page 9
6. Hold the toner cartridge by the handle and slowly insert the cartridge into the printer opening. Tabs on the sides of the cartridge and corresponding grooves within the printer guide the cartridge into the correct position until it locks firmly into place. NOTE: Do not use excessive force when - Dell 5330dn | User Guide - Page 10
To load a stack of A4 or Letter-sized paper: 1. Pull open tray 1 and remove from the printer. 2. Squeeze the paper width guide and slide it to the desired paper size marked at the bottom of the tray. 3. Squeeze the paper length guide and slide it to the desired paper size marked at the bottom of the - Dell 5330dn | User Guide - Page 11
be facing up with an uncurled edge at the top side. If you experience problems with the paper feed, turn the paper around. NOTE: You need to adjust the paper guides when loading paper of a different size. Refer to "Setting the Paper Type" and "For standard, Optional 500 Sheet Tray and HCF Setting - Dell 5330dn | User Guide - Page 12
adjustment of paper guides can result in paper jams. 7. Insert and slide tray 1 back into the printer. 8. Set the paper type and size. See "Setting the Paper Type" and "For standard, Optional 500 Sheet Tray and HCF Setting Paper Size". Changing the size of the paper in the paper tray The tray - Dell 5330dn | User Guide - Page 13
the tray. Improper adjustment of paper guides could result in paper jams. 4. Load paper with the print side down. For details, see "Loading Print Media". Setting up Your Printer Connecting the Printer Cable Connecting the Printer Locally A local printer is a printer connected to your computer using - Dell 5330dn | User Guide - Page 14
on the cable plug. 3. Connect the other end of the cable to the parallel interface port on your computer and tighten the screws. If you need help, please refer to your computer's User's Guide. Connecting the Printer to the Network 1. Ensure the printer, computer, and any other attached devices are - Dell 5330dn | User Guide - Page 15
hub and the other end into the Ethernet network port at the back of the printer. The printer automatically adjusts to the network speed . NOTE: After connecting the printer, you need to configure the network parameters on the operator panel. See "Printing a Network Information Page". Powering On the - Dell 5330dn | User Guide - Page 16
Panel Menus A number of menus are available to assist in changing printer settings. The diagram below shows the menus and items available in each menu. NOTE: Some menus may not appear in the display depending on options or models. If so, it is not applicable to your machine. Dell 5330dn Mono Laser - Dell 5330dn | User Guide - Page 17
sources. Any sources containing the same type and size of paper are automatically linked by the printer if you have set the Paper Size and the Paper Type to the correct values. MPF Size Select the paper size currently loaded in the multi-purpose feeder. Letter (US) Legal Oficio Folio A4 (non - Dell 5330dn | User Guide - Page 18
the width and length of the custom media. Menu selection: Purpose: Values: Units Switches measurements between millimeters and inches. INCH Millimeters INCH: displays paper width and length in inches. Millimeters: displays paper width and length in millimeters. Tray Width Set the - Dell 5330dn | User Guide - Page 19
Identifies the default paper source. Tray MP Feeder If you loaded the same size and type of paper in two paper sources (and the Paper Size and Paper Type menu items are correctly set), the trays are automatically linked. When one paper source is empty, paper automatically feeds from the - Dell 5330dn | User Guide - Page 20
PCL Font List PS Font List Error History After selecting each item, the page will print, and the printer will return to Ready. Menu Map: Shows the layout and current settings of the control panel menu items. Configuration: Shows the printer's current configuration. Demo page: Allows you to check if - Dell 5330dn | User Guide - Page 21
support the entire range of values.) The factory default Power Save setting depends on your printer model. Print the menu settings page to determine the current Power Save setting. When the printer is in Power Save mode, it is still ready to receive print jobs. Select a high value if your printer - Dell 5330dn | User Guide - Page 22
mismatch occurs, an error message remains on the display, and the printer remains off-line until you insert the correct paper. Jam Recovery On Off Specifies whether the printer reprints jammed pages. On: Printer reprints jammed pages. Off: Printer does not reprint jammed pages. Auto CR Allows - Dell 5330dn | User Guide - Page 23
page by changing the toner density setting. The Normal setting usually produces the best result. Use the Light toner density setting to save toner. Finishing Use this menu selection to define how the printer delivers the printed output. Menu selection: Purpose: Values: Copies Set the default - Dell 5330dn | User Guide - Page 24
on the short edge. Select Off to print on one side of the paper. Duplex Margin Set the margins for double-sided printing. Increase or decrease the to 2 and send three pages to print, the printer prints page 1, page 2, page 3, page 1, page 2, page 3. Off: Prints each page of a job the number - Dell 5330dn | User Guide - Page 25
. Double Form: Prints the front page using the first form and the back page using the second form. Menu selection: Purpose: Select Form See "Printing using the (Only if HDD is form files". installed) Values: 1st Form 2nd Form Factory Defaults 1st Form: Displays the stored form list. 2nd Form - Dell 5330dn | User Guide - Page 26
Factory Defaults Returns printer settings to the factory default values. Do Not Restore Restore Now Do not Restore: User-defined settings remain. Restore Now: All menu items are returned to the factory-default values except: Display Language All settings in the Parallel Menu, Serial Menu, Network - Dell 5330dn | User Guide - Page 27
Prints are deleted. 5.Network I/O Ports This menu lets you configure the network interface installed in your printer. You can reset the network interface and print a configuration page. Ethernet Speed Menu selection: Purpose: Values: Ethernet Speed Allows selection of ethernet Auto speed - Dell 5330dn | User Guide - Page 28
Deactivates the IPv4. View Host name Displays the Host name. View only Set IP Address Allows you to manually set the TCP/IP addresses or receive the addresses from the network. Manual IP Address You can enter IP Address, Subnet Mask, and Gateway manually. Subnet Mask Gateway DHCP The DHCP - Dell 5330dn | User Guide - Page 29
Activates the Netware feature. Off: Deactivates the Netware feature. Auto: Set the printer to select the frame type automatically. 802.2: Select this value to use the Activates or deactivates the On Netware feature. Off View Name Displays the assigned AppleTalk name. USB View only On: Activates - Dell 5330dn | User Guide - Page 30
the following: Excellent, Very Good, Good, Low, Very Low and Disconnected. Clear Settings Menu selection: Purpose: Values: Clear Settings Performs a simple reset Yes and restores the factory- default settings for the No network configuration. Requires restarting printer to take effect. - Dell 5330dn | User Guide - Page 31
Drum Clean Fuser If printouts are blurred, faded, or smeared, correct the problem by printing a cleaning sheet provided with your printer. Printing... Printing... Supplies Life Allows you to check how many pages have been printed and how much toner is left in the cartridge. Total Displays the - Dell 5330dn | User Guide - Page 32
symbol type, lines per PCL1 ~ PCL56 page, and font size. PCL1~PCL7's interval use. Pitch 0.44 ~ 99.99 (0.01 unit) By selecting between PCL1 and PCL7 from the default value 10 is the best size. Lines 5 ~ 128 Set vertical spacing from 5 to 128 lines for the default paper size. The default - Dell 5330dn | User Guide - Page 33
up your printer, print a demo page to ensure that the printer is operating correctly. 1. Press Menu ( ). 2. Press Scroll ( to ) to highlight Reports and press Select ( ). 3. Press Scroll ( to ) to highlight Demo Page and press Select ( ). 4. A demo page prints out. Changing the Display Language - Dell 5330dn | User Guide - Page 34
To change the displayed language that the operator panel displays, follow display the time settings you want. The available options are 5, 10, 15, 30, 60 and 120(minutes). 6. Press Select ( ) to save the selection. 7. Press Cancel ( ) to return to Standby mode. Changing the Font Setting Your printer - Dell 5330dn | User Guide - Page 35
7. Press Cancel ( ) to return to Standby mode. - Dell 5330dn | User Guide - Page 36
instructions in your Owner's Manual prior to setting up and operating your printer. How to set up Setup diagram my printer? Safety Information Warranty Information Product Information Guide Troubleshooting Troubleshooting: Guide Clearing Jams in the Paper Tray Understanding display messages - Dell 5330dn | User Guide - Page 37
available in all countries. Latest drivers for my printer Answers to technical service and support questions Documentation for my printer Dell Support Website The Dell Support Website provides several online tools, including: Solutions - Troubleshooting hints and tips, articles from technicians - Dell 5330dn | User Guide - Page 38
Module (DIMM). The Dell 5330dn Mono Laser Printer has 256 MB of memory. It can be expanded to 768 MB. NOTE: Your printer supports only Dell DIMMs. Order Dell DIMMs online at www.dell.com. 1. Power the printer off and unplug all cables from the printer. 2. Grasp the control board cover and remove it. - Dell 5330dn | User Guide - Page 39
at the DIMM slot, holding the DIMM by its edges. 5. Push the DIMM into the printer until it snaps into place. Ensure that the latches fit over the notches located on either side of the DIMM. 6. Close the control board cover by aligning the groove on it with the notch on the - Dell 5330dn | User Guide - Page 40
. Dell 5330dn Mono Laser Printer PS 1. Ensure the PostScript printer driver is installed on your computer. For details about installing the PS printer driver, see "Installing Software in Windows". 2. Click the Windows Start menu. 3. For Windows 2000, select Settings and then Printers. For Windows XP - Dell 5330dn | User Guide - Page 41
Please contact Dell sales team in your region for the USB font card. 1. Remove the new USB Font Card from its package, as shown in the following figure. 2. Power the printer off and unplug all cables from the printer. 3. Grasp the control board cover and remove it. 4. Insert a USB Font Card into the - Dell 5330dn | User Guide - Page 42
power cord and printer cable, and turn the printer on. Installing Optional Tray You can increase the paper handling capacity of your printer by installing optional trays. Each tray holds 500 sheets of paper. 1. Power the printer off and unplug all cables from the printer. 2. Remove the packing tape - Dell 5330dn | User Guide - Page 43
, select Control Panel Hardware and Sound Printers. For Windows 7, select Control Panel Hardware and Sound Devices and Printers. For Windows Server 2008 R2, select Control Panel Hardware Devices and Printers. 3. Select the Dell 5330dn Mono Laser Printer. 4. Right-click the printer icon and select - Dell 5330dn | User Guide - Page 44
Printers and Faxes. For Windows Vista/Server 2008 , select Control Panel Hardware and Sound Printers. For Windows 7, select Control Panel Hardware and Sound Devices and Printers. For Windows Server 2008 R2, select Control Panel Hardware Devices and Printers. 3. Select Dell 5330dn Mono Laser Printer - Dell 5330dn | User Guide - Page 45
cord and cables, then power on the printer. When you print a document on paper loaded in the High Capacity Feeder, you must configure the properties of the printer driver. To access the properties of the printer driver: 1. Click the Windows Start button. 2. For Windows 2000, select Settings and then - Dell 5330dn | User Guide - Page 46
Hardware and Sound Devices and Printers. For Windows Server 2008 R2, select Control Panel Hardware Devices and Printers. 3. Select Dell 5330dn Mono Laser Printer PS. 4. Right-click the printer icon and select Properties. 5. Click the Device Settings tab and select High Capacity from the Tray 2 drop - Dell 5330dn | User Guide - Page 47
storing a job in the hard disk, proofing a job, and printing private documents. Installing the Hard Disk 1. Turn the printer power off and unplug the power cord and printer cable from the printer. 2. Grasp the control board cover and remove it. 3. If electric lines are drooped, push them inside the - Dell 5330dn | User Guide - Page 48
disk with the connector on the control board. Push the hard disk in until it is locked into place. 5. Fasten the three screws supplied with your new hard disk. 6. Close the control board cover by aligning the groove on it with the notch on the printer and sliding it. 7. Reconnect the power cord - Dell 5330dn | User Guide - Page 49
the printer driver: Dell 5330dn Mono Laser Printer 1. Click the Windows Start button. 2. For Windows 2000, select Settings and then Printers. For Windows XP/Server 2003, select Printers and Faxes. For Windows Vista/Server 2008 , select Control Panel Hardware and Sound Printers. For Windows 7, select - Dell 5330dn | User Guide - Page 50
the correct End date using Scroll ( to ) or Scroll ( to ) and press Select ( ). 8. Press Cancel ( ) to return to Standby mode. Storing a job You can store jobs in the installed hard disk. 1. Open the file you want to store. 2. Select Print from the File menu. The Print window displays. 3. Click - Dell 5330dn | User Guide - Page 51
Confidential: stores the files, securing them with a password. Proof: prints the first file, and after 6. Enter the User ID and Job Name. 7. Click OK until the print window is displayed. 8. Click First, you need to create a form file using the printer driver. 1. Press Menu ( ). 2. Press Scroll ( to - Dell 5330dn | User Guide - Page 52
output capacity of your printer, install an Output Expander. An Output Expander holds 600 sheets of plain paper. 1. Power off the printer off and unplug all cables from the printer. 2. Face the back of the printer as shown, grasp the dummy cover,and remove it. 3. Remove the packing tape from the - Dell 5330dn | User Guide - Page 53
5. Grasp the Output Expander stacker as shown. 6. Locate the slots on the Output Expander where the stacker will be inserted. 7. Align the stacker, as shown. - Dell 5330dn | User Guide - Page 54
8. Slide the stacker into the slots on the Output Expander. For easy insertion, ensure there is contact between the rib on the stacker and the top edge of the Output Expander. 9. Flip the Output Expander stacker down. 10. Reconnect the power cord and cables to the printer and power on the printer. - Dell 5330dn | User Guide - Page 55
, select Control Panel Hardware and Sound Printers. For Windows 7, select Control Panel Hardware and Sound Devices and Printers. For Windows Server 2008 R2, select Control Panel Hardware Devices and Printers. 3. Select the Dell 5330dn Mono Laser Printer. 4. Right-click the printer icon and select - Dell 5330dn | User Guide - Page 56
Printers and Faxes. For Windows Vista/Server 2008 , select Control Panel Hardware and Sound Printers. For Windows 7, select Control Panel Hardware and Sound Devices and Printers. For Windows Server 2008 R2, select Control Panel Hardware Devices and Printers. 3. Select Dell 5330dn Mono Laser Printer - Dell 5330dn | User Guide - Page 57
Started Installing the Printer Driver Using the Configurator Configuring Printer Properties Printing a Document Unix Getting Started The supplied Drivers and Utilities CD provides you with Dell's printer driver package for use with a Linux-based computer. Dell's printer driver package - Dell 5330dn | User Guide - Page 58
(32/64bit) Installing the Printer Driver 1. Ensure that you connect your printer to your computer. Turn both the computer and the printer on. 2. When the Administrator Login window appears, type in root in the Login field and enter the system password. NOTE: To install the printer software, you - Dell 5330dn | User Guide - Page 59
starts. When the installation is almost complete, the Add printer wizard appears automatically. Click Next. 5. If you connect your printer using the USB cable, the following window appears. Select your printer from the dropdown list and click Next. OR If you connect your printer using the network - Dell 5330dn | User Guide - Page 60
your printer from the drop-down list. Click Next. 6. If you connect your printer using the USB cable, choose a port you will use with your printer. After choosing the port, click Next. OR If you connect your printer using the network cable, skip to the next step. 7. Select the driver and click - Dell 5330dn | User Guide - Page 61
8. Enter your printer's name, location, and description. Click Next. 9. To complete installation, click Finish. 10. When the following window appears, click Finish. - Dell 5330dn | User Guide - Page 62
help available through your system menu or from the driver package windows applications. Uninstalling the Printer Driver 1. When the Administrator Login window appears, type root in the Login field and enter the system password. NOTE: To install the printer software, you must log in as a super - Dell 5330dn | User Guide - Page 63
via a single I/O channel. After installing the printer driver, the Configurator icon will automatically be created on your desktop. Opening the Configurator 1. Double-click Configurator on the desktop. You can also click the Startup Menu icon, select Dell printer, and then Configurator. 2. Press - Dell 5330dn | User Guide - Page 64
a new printer. Remove Printer: removes the selected printer. Set as Default: sets the current printer as a default printer. Stop/Start: stops/starts the printer. Test: allows you to print a test page to check if the machine is working properly. Properties: allows you to view and change the printer - Dell 5330dn | User Guide - Page 65
Refresh: renews the classes list. Add Class...: allows you to add a new printer class. Remove Class: removes the selected printer class. Ports Configuration In this window, you can view the list of available MFP ports, check the status of each port, and release a port that is stalled in a busy state - Dell 5330dn | User Guide - Page 66
list and click Properties. 3. The Printer Properties window opens. The following five tabs display at the top of the window: General: allows you to change the printer location and name. The name entered in this tab displays on the printer list in Printers configuration. Connection: allows you to - Dell 5330dn | User Guide - Page 67
. 4. Change the printer and print job properties. The following four tabs display at the top of the window. General: allows you to change the paper size, paper type, and orientation of the documents, enables the duplex feature, adds start and end banners, and changes the number of pages per sheet - Dell 5330dn | User Guide - Page 68
and click Open. 2. In the Dell LPR window, select your printer from the list and change the printer and print job properties. For details about the properties window, see "Printing a Document". 3. Click OK to start printing. Unix Printer driver packages and installation instructions are available - Dell 5330dn | User Guide - Page 69
printer. 2. Insert the printer's Drivers and Utilities CD into the CD-ROM drive. 3. Double-click the CD-ROM icon that appears on your Macintosh desktop. 4. Double-click the MAC_Installer folder. 5. Double-click the MAC_Printer folder. 6. For Mac OS 8.6 ~ 9.2, double-click the Dell 5330dn Installer - Dell 5330dn | User Guide - Page 70
DELL 5330dn Mono Laser Printer, and click OK. 4. When the setup is completed, your printer icon is created as a desktop printer. 5. Close Chooser. 6. When a message window appears telling you that you have changed your current printer, click OK. Mac OS 10.1 or higher 1. Follow the instructions - Dell 5330dn | User Guide - Page 71
Select PPD and choose DELL 5330dn Mono Laser Printer. 8. When the setup is completed, click Create. 9. Click Save. Mac OS 10.1 or higher 1. Follow the instructions on "Installing Software for Macintosh" to install the PPD and Filter files on your computer. 2. Open the Applications folder Utilities - Dell 5330dn | User Guide - Page 72
"+" icon; a display window appears. 4. For MAC OS 10.3, select the USB tab. For MAC OS 10.4, click Default Browser and find the USB connection. For MAC OS 10.5~10.6, click Default and find the USB connection. 5. For MAC OS 10.3, if Auto Select does not work properly, select Dell in Printer Model and - Dell 5330dn | User Guide - Page 73
down list to access the following features. For details, see "Printing Multiple Pages on One Sheet of the Paper" and "Duplex Printing". Printing Multiple Pages on One Sheet of Paper You can print more than one page on a single sheet of paper. This feature provides a cost-effective way to print draft - Dell 5330dn | User Guide - Page 74
option you want from the Border drop-down list. 5. Click Print. The printer prints the selected number of pages on one side of each page. Duplex Printing You can print on both sides of the paper. Before printing in the duplex mode, decide on which edge you will be binding your finished document. The - Dell 5330dn | User Guide - Page 75
provides options for selecting the paper type and adjusting print quality. Select Printer Features from the Presets drop-down list to access the following features: Reverse Duplex Printing Allows you to select general print order compared to duplex print order. Fit to Page Allows you to scale your - Dell 5330dn | User Guide - Page 76
Output Bin If you install the Optional Output Bin 1, you can choose the exit bin for the printed document. Paper Type Ensure that Paper Type is set to Printer Default. If you load a different type of print material, select the corresponding paper type. Resolution You can select the printing - Dell 5330dn | User Guide - Page 77
Maintenance Clearing the Setting and Restoring Setting to Factory Default Cleaning Your Printer Maintaining the Toner Cartridge Replacement parts Ordering Supplies Clearing the Setting and Restoring Setting to Factory Default To restore the printer's factory default settings: 1. Press Menu - Dell 5330dn | User Guide - Page 78
While cleaning the inside of the printer, be careful not to touch the transfer roller located underneath the toner cartridge. Oil from your fingers can cause print quailty problems. 4. Gently swab the long strip of glass (Laser Scanning Unit) inside the top of the cartridge cavity and check for dirt - Dell 5330dn | User Guide - Page 79
is hard to locate. 5. Locate the PTL lens by flipping up the feed guide and gently swab the lens with a cotton swab. 6. Clean the feed sensor with a cotton swab. 7. Reinsert the toner cartridge and close the top cover. 8. Plug in the power cord and turn the printer on. Printing a cleaning sheet - Dell 5330dn | User Guide - Page 80
toner cartridge. Fuser cleaning sheet: cleans the fuser unit inside the printer. This process will produce a page with toner debris, which should be discarded. 1. Ensure that the printer is turned on with paper loaded in the tray. 2. Press Menu ( ). 3. Press Scroll ( to ) to highlight Maintenance - Dell 5330dn | User Guide - Page 81
Maintenance and press Select ( ). 3. Press Scroll ( to ) to highlight Supplies Life and press Select ( ). 4. Press Scroll ( to ) to highlight Toner Remains and press Select ( ). The display shows the percentage of the remaining toner. Redistributing Toner When the toner cartridge is near the end - Dell 5330dn | User Guide - Page 82
prints satisfactorily. See "Ordering Supplies" to order toner cartridges. NOTE: For best results, use Dell toner cartridge. If you do not use Dell supplies, Dell does not guarantee print quality and printer reliability. To replace the toner cartridge: 1. Remove the new toner cartridge from its bag. - Dell 5330dn | User Guide - Page 83
tape at the end of the toner cartridge. Carefully pull the tape completely out of the cartridge and discard it. NOTE: The sealing tape should be longer than 60 cm when correctly removed. NOTE: Holding the toner cartridge, pull the sealing tape straight to remove it from the cartridge. Be careful not - Dell 5330dn | User Guide - Page 84
Supplies" to order toner cartridges. CAUTION: To avoid burns, do not replace the fuser immediately after printing; as the fuser gets very hot during this the printing process. 1. Turn off the printer and wait 30 minutes for the fuser to cool down before removal. 2. Open the rear door by pulling it - Dell 5330dn | User Guide - Page 85
5. Pull the duplex unit out of the printer. 6. Push both the levers of the fuser and downward both levers of the fuser. 7. Pull the Fuser unit straight out. - Dell 5330dn | User Guide - Page 86
8. Take out the new Fuser unit from its bag, and then remove the tape. 9. Insert Fuser unit completely into the printer. If Fuser unit is not completely inserted, the printer will not operate. Make sure that both levers of the fuser are securely latched onto the printer. - Dell 5330dn | User Guide - Page 87
strap to the printer. 12. Close the rear door. 13. Reconnect the power cord and printer cable, and turn the printer on. Replacement parts From time to time, you need to replace the rollers and fuser unit to maintain top performance and to avoid print quality and paper feed problems resulting from - Dell 5330dn | User Guide - Page 88
roller Rubber pad Yield (Average) Approx. 150,000 pages Approx. 150,000 pages Approx. 150,000 pages Approx. 150,000 pages To purchase replacement parts, contact your Dell dealer or the retailer where you bought your printer. We strongly recommend that these items be installed by a trained service - Dell 5330dn | User Guide - Page 89
Dell Printer Configuration Web Tool and click the supplies link. NOTE: Refer to the following table to order toner cartridges. Toner cartridge Part number Dell Standard Capacity Toner Cartridge (10,000 pages*a) NY312 Dell High Capacity Toner Cartridge (20,000 pages*a) NY313 a. Page coverage - Dell 5330dn | User Guide - Page 90
Embedded Web Service please refer to the chapter, "Dell Printer Configuration Web tool." SetIP Address: A utility program allowing you to select a network interface card and manually configure the addresses for use with the TCP/IP protocol. See "Set IP Address Utility". Via the Operator Panel You - Dell 5330dn | User Guide - Page 91
Windows: 2000/XP(32/64bits)/Vista(32/64bits)/2003 Server(32/64bits)/2008 Server(32/64bits)/7/Server 2008 R2 Netware OS: 5.x, 6.x (NDS, Bindery Mode), iPrint Support Mac Information Page The Network Information page shows how the network interface card on your printer is configured. The default - Dell 5330dn | User Guide - Page 92
TCP/IP Static Addressing: TCP/IP address is assigned manually by the system administrator. Dynamic Addressing BOOTP/DHCP(default): TCP/IP address is assigned automatically by a DHCP or BOOTP server on your network. Setting TCP/IP To enter the TCP/IP address from your printer's operator panel, take - Dell 5330dn | User Guide - Page 93
(Optional wireless network card) To use the Dell 5330dn Mono Laser Printer in both wired and wireless network environments, you can install an optional wireless network card. For details of Wireless setup, please refer to "Quick Install Guide" for the wireless network interface card. Sharing - Dell 5330dn | User Guide - Page 94
that are installed with the Drivers and Utilities CD. NOTE: Windows 2000, Windows XP, Windows Server 2003, Windows Vista, Windows Server 2008, Windows 7, and Windows Server 2008 R2 require administrative access to share a printer. Share the Printer 1. In Windows XP/Server 2003 (default Start menu - Dell 5330dn | User Guide - Page 95
page to verify print installation. When a test page prints successfully, printer installation is complete. To print a test page: 1. In Windows XP/Server 2003 (default Start menu): a. Click Start Control Panel. b. Double-click Printers and Other Hardware. c. Click Printers and Faxes. In Windows XP - Dell 5330dn | User Guide - Page 96
to available drivers. 6. Select whether you want this printer to be the default printer for the client, and then click Finish. 7. Print a test page to verify printer installation. When a test page prints successfully, printer installation is complete. To print a test page: 1. In Windows XP/Server - Dell 5330dn | User Guide - Page 97
Panel. b. Double-click Printers and Other Hardware. c. Click Printers and Faxes. In Windows XP/Server 2003 (Classic Start menu): Click Start Settings In Windows Vista/Server 2008 (Classic Start menu), Windows 2000: Click Start Settings Printers. In Windows Vista/Server 2008 (default display SERVICES - Dell 5330dn | User Guide - Page 98
notices in the code are not to be removed. If this package is used in a product software must display the following 4. If you include any Windows specific code (or a derivative , PROCUREMENT OF SUBSTITUTE GOODS OR SERVICES; LOSS OF USE, DATA, OR cannot be changed. i.e. this code cannot - Dell 5330dn | User Guide - Page 99
20 lb bond) long grain paper. For duplex printing, use 60 to 120 g/m2 (16 to 32 lb bond) paper. Curl Curl is the tendency of print media to curve at its edges. Excessive curl can cause paper feeding problems. Curl usually occurs after the paper passes through the printer, where it is exposed to high - Dell 5330dn | User Guide - Page 100
with a high degree of stability resulting in fewer paper feeding problems and better print quality. Paper containing fibers, such as cotton, possess characteristics that can result in degraded paper handling. Recommended Paper To ensure the best print quality and feed reliability, use 75 g/m2 (20 lb - Dell 5330dn | User Guide - Page 101
the same source. Mixing results in jams. Do not use coated papers. Remember to change the paper size setting when using a source that does not support auto size sensing. Do not remove trays while a job is printing or Busy is displayed on the operator panel. Ensure the paper is properly loaded in the - Dell 5330dn | User Guide - Page 102
of prepunched paper. Paper should be punched at the paper manufacturer and not drilled into paper already packaged in a ream. Drilled paper can cause jams when multiple sheets feed through the printer. Prepunched paper could include more paper dust than standard paper. Your printer may require - Dell 5330dn | User Guide - Page 103
Multi-purpose Feeder" for instructions on loading an envelope. When printing on envelopes: To achieve the best possible print quality, use only high-quality envelopes that are designed for use in laser printers. For best performance, use envelopes made from 75 g/m2 (20 lb bond) paper. You can use up - Dell 5330dn | User Guide - Page 104
the print quality causing print media handling or jamming problems. Avoid using card stock that may release hazardous emissions when heated. Do not use preprinted card stock manufactured with chemicals that may contaminate the printer. Preprinting introduces semi-liquid and volatile components into - Dell 5330dn | User Guide - Page 105
Tray includes Standard Tray, 500-sheet Optional Tray, and High Capacity Feeder. High Capacity Feeder supports only A4, Letter, Legal and Folio. Legend Dimensions Paper Tray Y- indicates Support Multipurpose Feeder Duplex printing Capacity Print Media Size 8.27 x 11.69 Y Y Y A4 in. (210 - Dell 5330dn | User Guide - Page 106
of 75 g/m2 (20 lb) in the multi-purpose feeder. Envelope DL 4.33 x 8.66 in. - (110 x 220 mm) Y - Envelope C5 6.38 x 9.02 in. - (162 x 229 mm) Y - Envelope C6 4.49 x 6.38 in. - (114 x 162 mm) Y - Custom 3x 5 in. to 8.5 x 14 in. NOTE: Paper Tray supports custom paper from A5 to Legal - Dell 5330dn | User Guide - Page 107
Print Media Supported Print Media Paper Tray Multi-purpose feeder Standard output tray Y Y Y Paper - Y Y Card Stock - Y - Transparencies - Y Y Labels - Y Y Envelopes NOTE: To use recycled paper, click "paper" tab then select recycled paper in driver's paper tab. Print Media - Dell 5330dn | User Guide - Page 108
Cover - Laser printer - Transparencies Paper - Labels - maximum Dual-web paper - Polyester - Vinyl - Pressure-sensitive area - Integrated Forms (must enter the printer first) Paper base (long - grain) Sulfite, wood-free or - Envelopes 25% Cotton up to 25% cotton Content - Dell 5330dn | User Guide - Page 109
tray, ensure that the rear door is closed. To use the rear door, open it. NOTE: If paper coming out of the output tray has problems, such as excessive curl, try printing to the rear door. NOTE: To avoid paper jams, do not open or close the rear door while the printer is printing. Printing to the - Dell 5330dn | User Guide - Page 110
door: Open the rear door by pulling it down. CAUTION: The fuser area inside the rear door of your printer becomes very hot when in use. Use caution when accessing this area. Printing to the Optional Output Expander (face down) You can increase the paper output capacity of your printer by installing - Dell 5330dn | User Guide - Page 111
Optional Tray" for installation instructions. To use many different types and sizes of paper, see "Identifying Print Media Sources and Specifications". To load print media into tray 1 or optional trays (both are loaded the same way), follow these instructions . 1. Pull open the paper tray and load - Dell 5330dn | User Guide - Page 112
16 lb - 56 lb. CAUTION: Ensure the rear door is open when printing on transparencies. If not, the transparencies may tear when exiting the machine. NOTE: To avoid paper jams and print quality problems, load only print media listed"Paper Specifications". NOTE: Flatten any curl on postcards, envelopes - Dell 5330dn | User Guide - Page 113
buckle resulting in a paper jam or skew. 5. After loading paper, set the paper type and size for the Multi-purpose Feeder. See "Setting the Paper Type". NOTE: The printer driver settings override the settings on the operator panel. 6. After printing, return the multi-purpose feeder extension back to - Dell 5330dn | User Guide - Page 114
path. Open rear door of printer when printing on transparencies. If not, they may tear when exiting the machine. Using the High Capacity Feeder To increase the paper handling capacity of your printer, install a High Capacity Feeder. A High Capacity Feeder can hold up to 2100 sheets of 75 g/m2 (20 lb - Dell 5330dn | User Guide - Page 115
3. Flex the sheets back and forth to loosen them, and fan them out. Do not fold or crease the print media. Align the edges on a level surface. 4. Insert the paper stack into the High Capacity Feeder with the print side facing down. 5. Close the High Capacity Feeder completely. - Dell 5330dn | User Guide - Page 116
front. If you experience problems with paper feed, turn the paper around. Note that the print quality is not guaranteed. For Standard, Optional 500 Sheet Tray and HCF Setting Paper Size Standard, Optional 500-sheet trays, and High Capacity Feeder: Standard paper sizes are automatically detected if - Dell 5330dn | User Guide - Page 117
printer can substitute another paper size when the requested paper size is not available in any of the input trays. The Printer paper size and there is no A4 paper in any of the input source, then the printer will print on Letter size paper Panel. Bypass Mode In this mode, the printer pulls the paper - Dell 5330dn | User Guide - Page 118
Control Language (PCL) or Postscript (PS) printer driver. When you install the Dell software, your printer automatically installs the PCL and PS printer drivers. See "Installing Dell Software for Local Printing". The drivers provided with your printer allow a wide variety of options. Use the - Dell 5330dn | User Guide - Page 119
depending on the application program being used. Refer to software application's User's Guide for the exact printing procedure. 1. Open the document you want to print. 2. Select Print from the File menu. The Print window displays. It may look slightly different depending on your application. The - Dell 5330dn | User Guide - Page 120
. For details about selecting a printer driver, see "Printing a Document". The User's Guide shows the Printing Preferences window of the printer driver on Windows XP. NOTE: Most Windows applications override settings you specified in the printer driver. First change all the print settings available - Dell 5330dn | User Guide - Page 121
Sound and Devices and Printers. For Windows Server 2008 R2, select Control Panel and Hardware and Devices and Printers. c. Point to the Dell 5330dn Mono Laser Printer. d. Right-click on the printer icon. e. Click Print Setup or Properties and point to Printing Preferences. f. Change the settings on - Dell 5330dn | User Guide - Page 122
Multiple Pages on One Sheet of the Paper" , "Printing Posters" and "Printing Booklets". Doublesided Printing Double-sided Printing allows you to print on both sides of paper. For details, see "Printing on Both Sides of Paper". Paper Tab To set the paper handling needs when accessing the printer - Dell 5330dn | User Guide - Page 123
Type is set to Printer Default. If you load a different type of print material, select the corresponding paper type. For more information about print materials, refer to "Print Media Guidelines". First Page This property allows you to print the first page using a different paper type from the rest - Dell 5330dn | User Guide - Page 124
Download as Outline: When this option is selected, the driver will download any TrueType fonts used in your document but not already stored(resident) on your printer option is selected, the driver downloads any fonts as graphics. When printing documents with high graphic content and relatively few - Dell 5330dn | User Guide - Page 125
) driver. Overlay Overlays are often used to take the place of preprinted forms and letterhead paper. See "Using Overlays". Output Option Print Subset: You can set the sequence for the pages to print. Select the print order from the drop-down list. Normal (1, 2, 3): Your printer prints all pages - Dell 5330dn | User Guide - Page 126
NOTE: For more information about Job type, click Help. The Job type window opens and allows you to view onscreen help supplied on the Job type. About Tab Use the About tab to display the copyright notice and version number of the driver. If you have an Internet browser, connect to the Internet by - Dell 5330dn | User Guide - Page 127
Help button in the printer's properties window. These help screens give detailed information about the printer features provided by the printer driver. You can also click from the upper right-hand corner, and then click on any setting. Printing Multiple Pages on One Sheet of the Paper You can select - Dell 5330dn | User Guide - Page 128
print the document. Printing a Reduced or Enlarged Document You can scale your print job on a page. 1. To change the print settings from your software application, go to printer properties. 2. From the Paper tab, select Reduce/Enlarge on the Output size drop-down list. 3. Enter the scaling rate in - Dell 5330dn | User Guide - Page 129
document size. This can be useful when you want to check fine details on a small document. 1. To change the print settings from your software application, go to printer properties. 2. From the Paper tab, select Fit to Page on the Output size drop-down list. 3. Select the correct size from the Fit to - Dell 5330dn | User Guide - Page 130
To form one poster-size document, you can print a single-page document onto 4, 9, or 16 sheets of paper, then paste the sheets together. 1. To change the print settings from your software application, go to printer properties. 2. From the Layout tab, select Poster Printing on the Layout Type drop- - Dell 5330dn | User Guide - Page 131
print your document on both sides of the paper and arranges the pages so that the paper can be folded in half after printing to produce a booklet. 1. To change the print settings from your software application, go to printer properties. See "Printer Settings". 2. From the Layout tab, choose Booklet - Dell 5330dn | User Guide - Page 132
paper. Damage to the printer and paper jamming might result. NOTE: To use the double-sided printing, use only the following paper size: A4, Letter, Legal, Folio and Oficio. 1. To change first page or all pages of a document. There are several predefined watermarks that come with your printer. They - Dell 5330dn | User Guide - Page 133
1. To change the print settings from your software application, go to printer properties. 2. Click the Other Options tab and click Edit in the Watermark section. The Edit Watermarks window appears. 3. Enter the text message you want to print in the Watermark Message box. The message displays in the - Dell 5330dn | User Guide - Page 134
options. 4. To save the changes, Click Update. 5. Click OK. Deleting a Watermark 1. To change the print settings from your software application, go to printer properties. 2. From the Other Options tab, click Edit in the Watermark section. The Edit Watermarks window appears. 3. Select the watermark - Dell 5330dn | User Guide - Page 135
, click Create Overlay. 5. In the Create Overlay window, type a name of up to eight characters in the File name box. Select the destination path, if necessary. (The default is C:\FormOver). 6. Click Save. You can see the name in the Overlay List. 7. Click OK or Yes until you complete creating. The - Dell 5330dn | User Guide - Page 136
be the same as the resolution of the document that will print with the overlay. 1. Create or open the document you want to print. 2. To change the print settings from your software application, go to printer properties. 3. Click the Other Options tab. 4. Select the overlay you want to print from the - Dell 5330dn | User Guide - Page 137
the Print window. Printing Confidential and Stored Jobs When you send a job to the printer, you can specify in the driver if you want the printer to hold the job in memory or hard disk. When you are ready to print the job, you must go to the printer and use the operator panel menus to - Dell 5330dn | User Guide - Page 138
displays "Stored Job Press Select ( )" on the operator panel. 1. Press Select ( ) to access the confidential and stored Job at the printer. 2. Press Scroll ( to ) to highlight your user ) which you can choose from the driver. NOTE: Delayed and Stored Print are supported only with Hard disk options. - Dell 5330dn | User Guide - Page 139
The Dell Toner Management System™ window also displays the level of toner remaining and allows you to order replacement toner cartridges. User's Guide - HTML documentation provides detailed information about using the printer. Firmware Update Utility - updates your printer's firmware. Set IP Address - Dell 5330dn | User Guide - Page 140
Windows XP/Server 2003/Server 2008/Vista: Pentium III 933 MHZ or higher Windows 7: Pentium IV 1 GHz 32 bit or 64 bit processor or higher Windows Server 2008 R2: Pentium IV 1 GHz (x86) or 1.4 GHz (x64) processors (2 GHz or faster) Required software: Internet Explorer 5.0 or higher Installing Dell - Dell 5330dn | User Guide - Page 141
screen appears. Follow the instructions to install the software. 4. Select Typical Installation to install the User's Guide and the printer drivers as the default settings. If you select Custom Installation, select the components to be installed. You can also change the destination folder. Click - Dell 5330dn | User Guide - Page 142
Set IP Address. The list of printers available on the network is displayed. 4. Select the printer requiring an IP address. The printer's default IP address is located on the printer's Configuration page. 5. When you finish setting the IP address for the printer, click Exit. Installing Dell Software - Dell 5330dn | User Guide - Page 143
, Windows XP, Windows Server 2003, Windows Vista, Windows Server 2008, Windows 7, Windows Server 2008 R2. NOTE: The server computer should be able to resolve the client computer name into an IP address. 6. The list of printers available on the network appears. Select the printer you want to install - Dell 5330dn | User Guide - Page 144
software. 1. From the Start menu, select Programs Printer Software Uninstall. DELL DELL Printers DELL 5330dn Mono Laser Printer Dell 2. Select the software you want to remove. Click Next. The selected driver and all of its components are removed from your computer. 3. After the software is - Dell 5330dn | User Guide - Page 145
displays the current status of the printer. Toner Level: View the level of toner remaining in the toner cartridge. Order Supplies: Click to order replacement toner cartridges online. See "Ordering Supplies". User's Guide: Allows you to view the DELL 5330dn Mono Laser Printer User's Guide. Printer - Dell 5330dn | User Guide - Page 146
DELL DELL Printers DELL 5330dn Mono Laser Printer Firmware Update The Firmware Update Utility window opens. Follow the on-screen instructions to complete the firmware update. Dell Toner Re-order application To order replacement toner cartridges or supplies from Dell: 1. Double-click the Dell - Dell 5330dn | User Guide - Page 147
OR Click Start Reorder. Programs DELL DELL Printers 2. The Dell 5330dn Toner Reorder window opens. DELL 5330dn Mono Laser Printer Dell 5330dn Toner Set IP Address Utility This program is for the network IP setting using the MAC address which is the hardware serial number of the network - Dell 5330dn | User Guide - Page 148
4. Click in the SetIP Address window to open the TCP/IP configuration window. 5. Enter the network card's MAC address, IP address, subnet mask, default gateway, and then click Apply. NOTE: when you enter the MAC address, enter it without colon(:). 6. Click OK. 7. Click Exit to close the SetIP - Dell 5330dn | User Guide - Page 149
down) Paper type Paper tray: Plain paper (75-90 g/m2, 20-24 lb) Multi-purpose Feeder: Plain paper, Transparencies, Labels, Card stock(105-216 g/m2, 28-56 lb), Envelopes (60-105 g/m2, 16-28 lb) Duplex printing: Plain paper (60-120 g/m2, 16-32 lb) Consumables 1-piece toner cartridge system Power - Dell 5330dn | User Guide - Page 150
4-line Graphic LCD (FSTN White Back-light) Standard cartridge: 10,000 pages Toner cartridge High-yield cartridge: 20,000 pages life*b Printer dimension (W x D x H) 16.3 x 18.7 x 14.8 in. (415 x 476 x 377 mm) Random Access Dell 5330dn Mono Laser Printer: 256 MB (Max. 768 MB) Memory (RAM) Weight - Dell 5330dn | User Guide - Page 151
. Properties, such as weight, composition, grain, and moisture content are important factors affecting the printer's performance and the output quality. Paper that does not meet the guidelines outlined in this User's Guide can cause the following problems: Poor print quality Increased paper jams - Dell 5330dn | User Guide - Page 152
Premature wear on the printer CAUTION: Using paper that does not meet these specifications may cause problems requiring repairs. These repairs are not covered by the Dell warranty or service agreements. NOTE: Some paper may meet all of the guidelines in this guide and still not produce satisfactory - Dell 5330dn | User Guide - Page 153
Use the rear door. Use long-grain paper. Jamming, damage to printer Cutouts or perforations Do not use paper with cutouts or perforations. Problems with feeding Ragged edges Use good quality paper. NOTE: Do not use letterhead paper printed with low-temperature inks, such as those - Dell 5330dn | User Guide - Page 154
Down) 250 sheets of 75 g/m2 bond (20 lb) paper Rear door (Face Up) 100 sheets of 75 g/m2 bond (20 lb) paper Printer and Paper Storage Environment Paper storage environmental conditions directly affect the feed operation. Ideally, the printer and paper storage environment should be at or near - Dell 5330dn | User Guide - Page 155
condense on the sheets. Heating systems and air conditioners remove most of the humidity from a room. As paper is opened and used, it loses paper jams. Care should be taken not to purchase more paper than can be used in a short time (about 3 months). Paper stored for long periods may experience heat - Dell 5330dn | User Guide - Page 156
Panel Message Paper Jam 0 Open/Close Door MP Tray Paper Jam 0 Tray [x] Paper Jam 0 Paper Jam 1 Open/Close Door Paper Jam 2 Check Inside Duplex Jam 0 Check Inside Duplex Jam 1 Open/Close Door Location of Jam Go to Around the toner cartridge "Around the toner area cartridge". In the feeding - Dell 5330dn | User Guide - Page 157
fuser area. For more information, see "Around the toner cartridge". 3. Insert paper tray 1 into the printer until it snaps into place. Printing automatically resumes. Paper Feed Jam (optional trays) 1. Pull optional tray open. 2. Remove the jammed paper from the printer. If you cannot see the paper - Dell 5330dn | User Guide - Page 158
Feeder Jam 1. If the paper is not feeding properly, pull the paper out of the printer. 2. Open and close the top cover to resume printing. Around the Toner Cartridge NOTES: The fuser area is hot. Take care when removing paper from the printer. 1. Open the top cover and pull the toner cartridge out - Dell 5330dn | User Guide - Page 159
. CAUTION: Do not touch the green underside of the toner cartridge. Use the handle on the cartridge to avoid touching this area. 2. Carefully lift up the feed guide. 3. Remove the jammed paper by gently pulling it straight out. If you cannot see the paper in this area or if there is any resistance - Dell 5330dn | User Guide - Page 160
. NOTE: If it is difficult to reinstall the toner cartridge, ensure that the feed guide has been flipped back down into position. In the Paper Exit Area 1. Open and close the top cover. The paper is automatically ejected from the printer. 2. Gently pull the paper out of the output tray. 3. If you - Dell 5330dn | User Guide - Page 161
If you still do not see the paper, go to the next step. 6. Pull the rear door strap. 7. While pushing the fuser lever to the right, open the fuser door. 8. Pull the jammed paper out. - Dell 5330dn | User Guide - Page 162
door. Printing automatically resumes. In the Duplex Unit Area If the the duplex unit is not inserted correctly, paper jam may occur. Ensure that the duplex unit is inserted correctly. Duplex jam 0 1. Pull the duplex unit out of the printer. 2. Locate the paper and remove it. 3. Insert the duplex - Dell 5330dn | User Guide - Page 163
. Duplex jam 1 1. Open the rear door. 2. Gently pull the jammed paper straight up. 3. Close the rear door. 4. Open and close the top cover. The printer will resume printing. Tips for Avoiding Paper Jams By selecting the correct paper types, most paper jams can be avoided. When a paper jam occurs - Dell 5330dn | User Guide - Page 164
Rear Door For Duplex job Printer receives duplex job, close the rear door to continue See graphical error message displayed with text error job. message. Replace Toner Scenarios Printer detects toner cartridge replace errors. Paper Jam 0 Paper has jammed in the feeding area of the paper tray - Dell 5330dn | User Guide - Page 165
Load the correct paper in the printer properties does not tray. match the paper being loading. Paper Jam 0 Check Toner Cover Paper has jammed around the Clear the jam. See "Around the toner cartridge area. toner cartridge". MP Tray Check MPF Door Paper has jammed in the feeding area of the - Dell 5330dn | User Guide - Page 166
the paper is removed from the output expander, the printer resumes printing. Open Heat Open Heat Error Power Cycle There is a problem in the fuser Unplug the power cord and unit. plug it back in. If the problem persists, please call for service. Low Heat/ Low heat Error There is a problem in - Dell 5330dn | User Guide - Page 167
for this machine The toner cartridge you have installed is not for your printer. Install a genuine Dell toner cartridge designed for your printer. IP Conflict/ IP Address conflict The network IP address you have set is being used by someone else. Check the IP address and reset it, if necessary - Dell 5330dn | User Guide - Page 168
stick together in Use only transparencies specifically designed for the paper exit. a laser printer. Remove each transparency as it exits the printer. Envelopes skew or fail to feed correctly. Ensure that the paper guides are securely in place on both sides of the envelopes. Printing Problems - Dell 5330dn | User Guide - Page 169
default printer. Select DELL 5330dn Mono Laser Printer as your default printer in Windows. Check the printer for the following: The front or rear door is not closed. Paper is jammed. No paper is loaded. The toner cartridge is not installed. If a printer system error occurs, contact your service - Dell 5330dn | User Guide - Page 170
is malfunctioning. Exit Windows and reboot the computer. Power the printer off and then back on again. Pages print, but The toner cartridge is are blank. defective or out of toner. Thoroughly shake the toner. See "Redistributing Toner". If necessary, replace the toner cartridge. The file may - Dell 5330dn | User Guide - Page 171
the problems, contact a service representative. If black vertical streaks appear on the page, the drum inside the toner cartridge has probably been scratched. Install a new toner cartridge. See "Replacing the Toner Cartridge". If white vertical streaks appear on the page, the surface of the LSU part - Dell 5330dn | User Guide - Page 172
; very dry (low humidity) or high humidity (higher than 80% RH) conditions can increase the amount of background shading. Remove the old toner cartridge and install a new one. See "Replacing the Toner Cartridge". Clean the inside of the printer. See "Cleaning the Interior". Check the paper type and - Dell 5330dn | User Guide - Page 173
the paper tray. Try printing to the rear door. Back of printouts are dirty Check for leaks in the toner. Clean the inside of the printer. See "Cleaning the Interior". Black pages Loose toner The toner cartridge may not be installed properly. Remove the cartridge and reinsert. The toner cartridge - Dell 5330dn | User Guide - Page 174
the toner cartridge and reinsert. The toner cartridge may be defective. Install a new toner cartridge. See "Replacing the Toner Cartridge". If the problem persists, the printer may require repair. Contact a service representative. Curl If the printed paper is curled or the paper does not feed into - Dell 5330dn | User Guide - Page 175
Windows 2000/XP User's Guide that came with your PC for further information on Windows error messages. Common Postscript (PS) Problems The following situations are PS language specific and may occur when several printer languages are being used. NOTE: To receive a printed or screen displayed - Dell 5330dn | User Guide - Page 176
the OK button. Normal operation of the printer should then be restored. The "stopped" status might be activated when some problems in printing occurred. I encounter error "Unable to open mfp port device file!" when printing a document. Please avoid changing print job parameters (via LPR GUI, for - Dell 5330dn | User Guide - Page 177
time to order replacement toner cartridges, click the Dell supplies link on your Web browser. NOTE: The Dell Printer Configuration Web Tool is only available when the printer is connected to a network. To launch the Dell Printer Configuration Web Tool, type your network printer's IP address in your - Dell 5330dn | User Guide - Page 178
Get immediate feedback on printer supply status. When toner is running low, click the toner supplies link on the first screen to order additional toner cartridges. Printer Settings Change printer settings, view the operator panel remotely, and update the print server firmware. Print Server Settings - Dell 5330dn | User Guide - Page 179
such as paper usage and types of jobs being printed. Set Password Dell Printer Web configuration Tool (EWS) can be locked by setting a password. When any of the printer settings are changed using this tool, it will prompt for Username and Password. The Username is "admin" and default password is - Dell 5330dn | User Guide - Page 180
Wireless can be setup using the Dell Web configuration tool. Click on the Wireless link to change the settings. For details of Wireless setup, please refer to Quick Install Guide for the wireless network interface card. Online Help Click Help to visit the Dell website for printer troubleshooting.
-
 1
1 -
 2
2 -
 3
3 -
 4
4 -
 5
5 -
 6
6 -
 7
7 -
8
-
9
-
10
-
11
-
12
-
13
-
14
-
15
-
16
-
17
-
18
-
19
-
20
-
21
-
22
-
23
-
24
-
25
-
26
-
27
-
28
-
29
-
30
-
31
-
32
-
33
-
34
-
35
-
36
-
37
-
38
-
39
-
40
-
41
-
42
-
43
-
44
-
45
-
46
-
47
-
48
-
49
-
50
-
51
-
52
-
53
-
54
-
55
-
56
-
57
-
58
-
59
-
60
-
61
-
62
-
63
-
64
-
65
-
66
-
67
-
68
-
69
-
70
-
71
-
72
-
73
-
74
-
75
-
76
-
77
-
78
-
79
-
80
-
81
-
82
-
83
-
84
-
85
-
86
-
87
-
88
-
89
-
90
-
91
-
92
-
93
-
94
-
95
-
96
-
97
-
98
-
99
-
100
-
101
-
102
-
103
-
104
-
105
-
106
-
107
-
108
-
109
-
110
-
111
-
112
-
113
-
114
-
115
-
116
-
117
-
118
-
119
-
120
-
121
-
122
-
123
-
124
-
125
-
126
-
127
-
128
-
129
-
130
-
131
-
132
-
133
-
134
-
135
-
136
-
137
-
138
-
139
-
140
-
141
-
142
-
143
-
144
-
145
-
146
-
147
-
148
-
149
-
150
-
151
-
152
-
153
-
154
-
155
-
156
-
157
-
158
-
159
-
160
-
161
-
162
-
163
-
164
-
165
-
166
-
167
-
168
-
169
-
170
-
171
-
172
-
173
-
174
-
175
-
176
-
177
-
178
-
179
-
180
 |
 |
Dell
™
5330dn Mono Laser Printer User's Guide
Contacting Dell
NOTE:
If you do not have an active Internet connection, you can find contact information on your purchase
invoice, packing slip, bill, or Dell product catalog. Dell provides several online and telephone-based support and
service options. Availability varies by country and product, and some services may not be available in your area. To
contact Dell for sales, technical support, or customer service issues:
1. Visit www.support.dell.com.
2. Verify your country or region in the choose A Country/Region drop-down menu at the bottom of the page.
3. Click Contact Us on the left side of the page.
4. Select the appropriate service or support link based on your need.
5. Choose the method of contacting Dell that is convenient for you.
NOTE:
A
NOTE
indicates important information that helps you make better use of your printerprinter.
NOTICE:
A
NOTICE
indicates either potential damage to hardware or loss of data and tells you how to avoid the
problem.
CAUTION:
A CAUTION indicates a potential for property damage, personal injury, or death.
Information in this document is subject to change without notice.
2008
Dell
Inc. All rights reserved.
Reproduction in any manner whatsoever without the written permission of Dell Inc. is strictly forbidden.
Trademarks used in this text:
Dell
, the
DELL
logo and
Dell Toner Management System
are trademarks of Dell Inc.;
Microsoft, Windows, Windows Vista, Windows Server 2008, Windows 7
and
Windows Server 2008 R2
are either
trademarks or registered trademarks of Microsoft Corporation;
Macintosh, MacOS, EtherTalk
and
TrueType
are trademarks
of Apple Inc., registered in the U.S. and other countries;
Linux
is a trademark or registered trademark of Linus Torvalds in
the United States and other countries;
The Common UNIX Printing System, CUPS,
and the
CUPS
logo are the trademarks
of Easy Software Products;
ENERGY STAR
is a registered trademark of the U.S. Environmental Protection Agency. As an
ENERGY STAR Partner, Dell Inc. has determined that this product meets the ENERGY STAR guidelines for energy
efficiency.
PCL is US registered trademark of Hewlett-Packard Company.
Sun
,
Sun
Microsystems
,
Solaris
, and the
Solaris
logo are trademarks or registered trademarks of Sun Microsystems, Inc.
in the U.S. and other countries, and are under license.
SUSE
is a registered trademark of Novell, Inc. in the United States and other countries.
Red Hat
is a registered trademark of Red Hat, Inc. in the United States and other countires.
Adobe and PhotoShop are registered trademarks of Adobe Systems Incorporated.
Other trademarks and trade names may be used in this document to refer to either the entities claiming the marks and
names of their products. Dell Inc. disclaims any proprietary interest in trademarks and trade names other than its own.