Dell 5330dn User Guide - Page 15
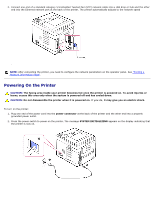
Powering On the Printer, SYSTEM INITIALIZING
 |
UPC - 884116002406
View all Dell 5330dn manuals
Add to My Manuals
Save this manual to your list of manuals |
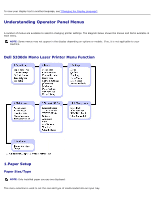
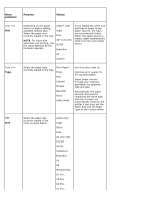
Page 15 highlights
2. Connect one end of a standard category 5 Unshielded Twisted Pair (UTP) network cable into a LAN drop or hub and the other end into the Ethernet network port at the back of the printer. The printer automatically adjusts to the network speed . NOTE: After connecting the printer, you need to configure the network parameters on the operator panel. See "Printing a Network Information Page". Powering On the Printer CAUTION: The fusing area inside your printer becomes hot once the printer is powered on. To avoid injuries or burns, access this area only when the system is powered off and has cooled down. CAUTION: Do not disassemble the printer when it is powered on. If you do, it may give you an electric shock. To turn on the printer: 1. Plug one end of the power cord into the power connector at the back of the printer and the other end into a properly grounded power outlet. 2. Press the power switch to power on the printer. The message SYSTEM INITIALIZING appears on the display indicating that the printer is now on.
-
 1
1 -
2
-
3
-
4
-
5
-
6
-
7
-
8
-
9
-
 10
10 -
 11
11 -
 12
12 -
 13
13 -
 14
14 -
 15
15 -
 16
16 -
 17
17 -
 18
18 -
 19
19 -
 20
20 -
21
-
22
-
23
-
24
-
25
-
26
-
27
-
28
-
29
-
30
-
31
-
32
-
33
-
34
-
35
-
36
-
37
-
38
-
39
-
40
-
41
-
42
-
43
-
44
-
45
-
46
-
47
-
48
-
49
-
50
-
51
-
52
-
53
-
54
-
55
-
56
-
57
-
58
-
59
-
60
-
61
-
62
-
63
-
64
-
65
-
66
-
67
-
68
-
69
-
70
-
71
-
72
-
73
-
74
-
75
-
76
-
77
-
78
-
79
-
80
-
81
-
82
-
83
-
84
-
85
-
86
-
87
-
88
-
89
-
90
-
91
-
92
-
93
-
94
-
95
-
96
-
97
-
98
-
99
-
100
-
101
-
102
-
103
-
104
-
105
-
106
-
107
-
108
-
109
-
110
-
111
-
112
-
113
-
114
-
115
-
116
-
117
-
118
-
119
-
120
-
121
-
122
-
123
-
124
-
125
-
126
-
127
-
128
-
129
-
130
-
131
-
132
-
133
-
134
-
135
-
136
-
137
-
138
-
139
-
140
-
141
-
142
-
143
-
144
-
145
-
146
-
147
-
148
-
149
-
150
-
151
-
152
-
153
-
154
-
155
-
156
-
157
-
158
-
159
-
160
-
161
-
162
-
163
-
164
-
165
-
166
-
167
-
168
-
169
-
170
-
171
-
172
-
173
-
174
-
175
-
176
-
177
-
178
-
179
-
180
 |
 |
