Dell 5330dn User Guide - Page 134
Using Overlays, Editing a Watermark, What is an Overlay?, Creating a New Overlay
 |
UPC - 884116002406
View all Dell 5330dn manuals
Add to My Manuals
Save this manual to your list of manuals |
Page 134 highlights
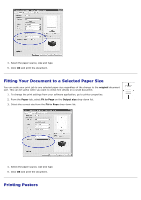
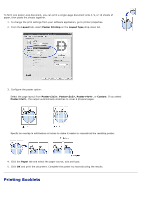
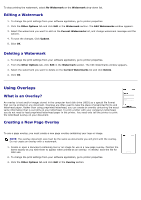
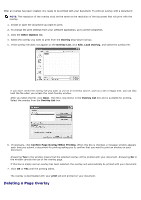
To stop printing the watermark, select No Watermark on the Watermark drop-down list. Editing a Watermark 1. To change the print settings from your software application, go to printer properties. 2. Click the Other Options tab and click Edit in the Watermark section. The Edit Watermarks window appears. 3. Select the watermark you want to edit on the Current Watermarks list, and change watermark message and the options. 4. To save the changes, Click Update. 5. Click OK. Deleting a Watermark 1. To change the print settings from your software application, go to printer properties. 2. From the Other Options tab, click Edit in the Watermark section. The Edit Watermarks window appears. 3. Select the watermark you want to delete on the Current Watermarks list and click Delete. 4. Click OK. Using Overlays What is an Overlay? An overlay is text and/or images stored in the computer hard disk drive (HDD) as a special file format that can be printed on any document. Overlays are often used to take the place of preprinted forms and letterhead paper. Rather than using preprinted letterhead, you can create an overlay containing the exact same information that is currently on your letterhead. To print a letter with your company's letterhead, you do not need to load preprinted letterhead paper in the printer. You need only tell the printer to print the letterhead overlay on your document. Creating a New Page Overlay To use a page overlay, you must create a new page overlay containing your logo or image. NOTE: The overlay document size must be the same as documents you will print with the overlay. Do not create an overlay with a watermark. 1. Create or open a document containing text or an image for use in a new page overlay. Position the items exactly as you wish them to appear when printed as an overlay. If needed, save the file for later use. 2. To change the print settings from your software application, go to printer properties. 3. Click the Other Options tab and click Edit in the Overlay section.
-
 1
1 -
2
-
3
-
4
-
5
-
6
-
7
-
8
-
9
-
10
-
11
-
12
-
13
-
14
-
15
-
16
-
17
-
18
-
19
-
20
-
21
-
22
-
23
-
24
-
25
-
26
-
27
-
28
-
29
-
30
-
31
-
32
-
33
-
34
-
35
-
36
-
37
-
38
-
39
-
40
-
41
-
42
-
43
-
44
-
45
-
46
-
47
-
48
-
49
-
50
-
51
-
52
-
53
-
54
-
55
-
56
-
57
-
58
-
59
-
60
-
61
-
62
-
63
-
64
-
65
-
66
-
67
-
68
-
69
-
70
-
71
-
72
-
73
-
74
-
75
-
76
-
77
-
78
-
79
-
80
-
81
-
82
-
83
-
84
-
85
-
86
-
87
-
88
-
89
-
90
-
91
-
92
-
93
-
94
-
95
-
96
-
97
-
98
-
99
-
100
-
101
-
102
-
103
-
104
-
105
-
106
-
107
-
108
-
109
-
110
-
111
-
112
-
113
-
114
-
115
-
116
-
117
-
118
-
119
-
120
-
121
-
122
-
123
-
124
-
125
-
126
-
127
-
128
-
 129
129 -
 130
130 -
 131
131 -
 132
132 -
 133
133 -
 134
134 -
 135
135 -
 136
136 -
 137
137 -
 138
138 -
 139
139 -
140
-
141
-
142
-
143
-
144
-
145
-
146
-
147
-
148
-
149
-
150
-
151
-
152
-
153
-
154
-
155
-
156
-
157
-
158
-
159
-
160
-
161
-
162
-
163
-
164
-
165
-
166
-
167
-
168
-
169
-
170
-
171
-
172
-
173
-
174
-
175
-
176
-
177
-
178
-
179
-
180
 |
 |
