Dell 5330dn User Guide - Page 84
Replacing the Fuser unit, toner cartridge
 |
UPC - 884116002406
View all Dell 5330dn manuals
Add to My Manuals
Save this manual to your list of manuals |
Page 84 highlights
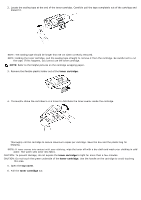
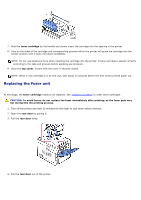
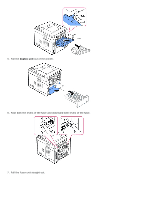
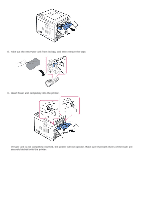
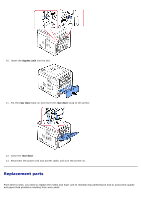
7. Hold the toner cartridge by the handle and slowly insert the cartridge into the opening in the printer. 8. Tabs on the sides of the cartridge and corresponding grooves within the printer will guide the cartridge into the correct position until it locks into place completely. NOTE: Do not use excessive force when inserting the cartridge into the printer. Ensure cartridge is placed correctly according to the tabs and grooves before applying any pressure.. 9. Close the top cover. Ensure that the cover is securely closed. NOTE: When a new cartridge is in its first use, wait about 15 seconds before the first comes printed paper out. Replacing the Fuser unit At this stage, the toner cartridge needs to be replaced. See "Ordering Supplies" to order toner cartridges. CAUTION: To avoid burns, do not replace the fuser immediately after printing; as the fuser gets very hot during this the printing process. 1. Turn off the printer and wait 30 minutes for the fuser to cool down before removal. 2. Open the rear door by pulling it. 3. Pull the rear door strap. 4. Pull the rear door out of the printer.
-
 1
1 -
2
-
3
-
4
-
5
-
6
-
7
-
8
-
9
-
10
-
11
-
12
-
13
-
14
-
15
-
16
-
17
-
18
-
19
-
20
-
21
-
22
-
23
-
24
-
25
-
26
-
27
-
28
-
29
-
30
-
31
-
32
-
33
-
34
-
35
-
36
-
37
-
38
-
39
-
40
-
41
-
42
-
43
-
44
-
45
-
46
-
47
-
48
-
49
-
50
-
51
-
52
-
53
-
54
-
55
-
56
-
57
-
58
-
59
-
60
-
61
-
62
-
63
-
64
-
65
-
66
-
67
-
68
-
69
-
70
-
71
-
72
-
73
-
74
-
75
-
76
-
77
-
78
-
 79
79 -
 80
80 -
 81
81 -
 82
82 -
 83
83 -
 84
84 -
 85
85 -
 86
86 -
 87
87 -
 88
88 -
 89
89 -
90
-
91
-
92
-
93
-
94
-
95
-
96
-
97
-
98
-
99
-
100
-
101
-
102
-
103
-
104
-
105
-
106
-
107
-
108
-
109
-
110
-
111
-
112
-
113
-
114
-
115
-
116
-
117
-
118
-
119
-
120
-
121
-
122
-
123
-
124
-
125
-
126
-
127
-
128
-
129
-
130
-
131
-
132
-
133
-
134
-
135
-
136
-
137
-
138
-
139
-
140
-
141
-
142
-
143
-
144
-
145
-
146
-
147
-
148
-
149
-
150
-
151
-
152
-
153
-
154
-
155
-
156
-
157
-
158
-
159
-
160
-
161
-
162
-
163
-
164
-
165
-
166
-
167
-
168
-
169
-
170
-
171
-
172
-
173
-
174
-
175
-
176
-
177
-
178
-
179
-
180
 |
 |
