Dell PowerConnect Brocade M6505 Brocade 7.1.0 Fabric Watch Administrator's Gui - Page 91
Port fencing configuration using BNA, Enabling port fencing
 |
View all Dell PowerConnect Brocade M6505 manuals
Add to My Manuals
Save this manual to your list of manuals |
Page 91 highlights
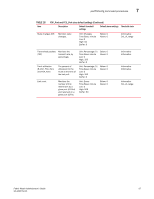
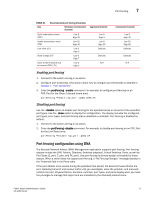
Port fencing 7 TABLE 21 Area Recommended port fencing thresholds Moderate/recommended threshold Cyclic redundancy check (CRC) Invalid transmission word (ITW) Link reset (LR) State change (ST) Class 3 frame discard due to timeout (C3TX_TO) Low 5 High 20 Low 25 High 40 Low 0 High 5 Low 0 High 7 Low 0 High 5 Aggressive threshold Low 0 High 2 Low 0 High 25 Defaults Defaults N/A Conservative threshold Low 5 High 40 Low 25 High 80 Defaults Defaults N/A Enabling port fencing 1. Connect to the switch and log in as admin. 2. Configure port thresholds. Information about how to configure port thresholds is detailed in Chapter 7, "Port Monitoring". 3. Enter the portFencing --enable command. For example, to configure port fencing on an FOP_Port for the Class 3 discard frame area: portFencing --enable fop-port -area C3TX_TO Disabling port fencing Use the --disable option to disable port fencing for the specified areas on all ports of the specified port types. Use the --show option to display the configuration. The display includes the configured port types, error types, and port fencing status (disabled or enabled). Port fencing is disabled by default. 1. Connect to the switch and log in as admin. 2. Enter the portFencing --disable command. For example, to disable port fencing on an FOP_Port for the Link Reset area: portFencing --disable fop_port -area LR Port fencing configuration using BNA The Brocade Network Advisor (BNA) Management application supports port fencing. Port fencing objects include the SAN, Fabrics, Directors, Switches (physical), Virtual Switches, Ports, as well as Port Types (E_port, F_port, and FX_port). Use port fencing to directly assign a threshold to these objects. When a switch does not support port fencing, a "No Fencing Changes" message displays in the Threshold field in the Ports table. If the port detects more events during the specified time period, the device firmware blocks the port, disabling transmit and receive traffic until you investigate, solve the problem, and manually unblock the port. Physical fabrics, directors, switches, port types, and ports display when you have the privileges to manage that object and are indicated by the standard product icons. Fabric Watch Administrator's Guide 71 53-1002752-01
-
 1
1 -
2
-
3
-
4
-
5
-
6
-
7
-
8
-
9
-
10
-
11
-
12
-
13
-
14
-
15
-
16
-
17
-
18
-
19
-
20
-
21
-
22
-
23
-
24
-
25
-
26
-
27
-
28
-
29
-
30
-
31
-
32
-
33
-
34
-
35
-
36
-
37
-
38
-
39
-
40
-
41
-
42
-
43
-
44
-
45
-
46
-
47
-
48
-
49
-
50
-
51
-
52
-
53
-
54
-
55
-
56
-
57
-
58
-
59
-
60
-
61
-
62
-
63
-
64
-
65
-
66
-
67
-
68
-
69
-
70
-
71
-
72
-
73
-
74
-
75
-
76
-
77
-
78
-
79
-
80
-
81
-
82
-
83
-
84
-
85
-
 86
86 -
 87
87 -
 88
88 -
 89
89 -
 90
90 -
 91
91 -
 92
92 -
 93
93 -
 94
94 -
 95
95 -
 96
96 -
97
-
98
-
99
-
100
-
101
-
102
-
103
-
104
-
105
-
106
-
107
-
108
-
109
-
110
-
111
-
112
-
113
-
114
-
115
-
116
-
117
-
118
-
119
-
120
-
121
-
122
-
123
-
124
-
125
-
126
 |
 |