Epson PowerLite 84 User's Guide - Page 106
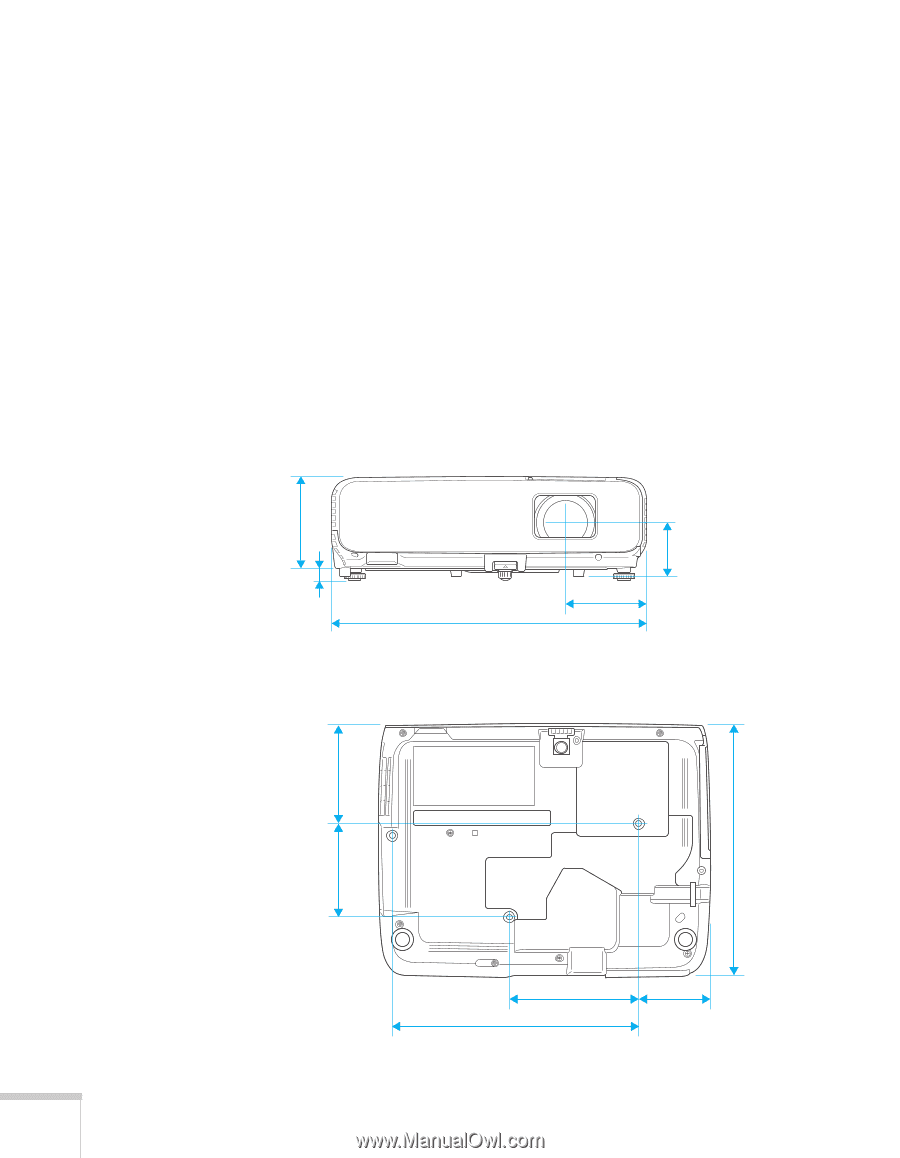
you'll have to tilt the projector upward if you want to fill the whole, bottom of the screen
 |
View all Epson PowerLite 84 manuals
Add to My Manuals
Save this manual to your list of manuals |
Page 106 highlights
If you're mounting the projector on the ceiling and you place it above screen level, you'll have to tilt the projector down to position the image on the screen. This causes the image to lose its square shape. You can correct the distortion using the Keystone function in the projector's menu system (see page 67). If you place the projector so that the base of the lens is level with the bottom of the screen, the image should be square and you won't have to adjust it. If you place the lens lower than the bottom of the screen, you'll have to tilt the projector upward if you want to fill the whole screen with the image. The following illustrations provide measurements you can use when installing the projector: 3.7 in. (95 mm) .5 in. (13 mm) 3.3 in. (85 mm) 12.8 in. (327 mm) 2.2 in. 57 mm Distance from center of lens to suspension bracket mounting point 3.9 in. (98 mm) 3.6 in. (92 mm) 9.8 in. (250 mm) 106 Projector Installation 5 in. (127 mm) 9.5 in. (242 mm) 2.8 in. (71 mm)
-
 1
1 -
2
-
3
-
4
-
5
-
6
-
7
-
8
-
9
-
10
-
11
-
12
-
13
-
14
-
15
-
16
-
17
-
18
-
19
-
20
-
21
-
22
-
23
-
24
-
25
-
26
-
27
-
28
-
29
-
30
-
31
-
32
-
33
-
34
-
35
-
36
-
37
-
38
-
39
-
40
-
41
-
42
-
43
-
44
-
45
-
46
-
47
-
48
-
49
-
50
-
51
-
52
-
53
-
54
-
55
-
56
-
57
-
58
-
59
-
60
-
61
-
62
-
63
-
64
-
65
-
66
-
67
-
68
-
69
-
70
-
71
-
72
-
73
-
74
-
75
-
76
-
77
-
78
-
79
-
80
-
81
-
82
-
83
-
84
-
85
-
86
-
87
-
88
-
89
-
90
-
91
-
92
-
93
-
94
-
95
-
96
-
97
-
98
-
99
-
100
-
 101
101 -
 102
102 -
 103
103 -
 104
104 -
 105
105 -
 106
106 -
 107
107 -
 108
108 -
 109
109 -
 110
110 -
 111
111 -
112
-
113
-
114
-
115
-
116
-
117
-
118
-
119
-
120
-
121
-
122
-
123
 |
 |