HTC S310 User Manual - Page 99
Using MMS Messages, Edit MMS settings
 |
View all HTC S310 manuals
Add to My Manuals
Save this manual to your list of manuals |
Page 99 highlights
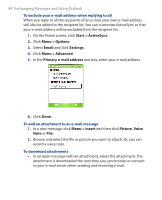
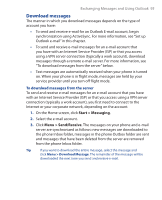
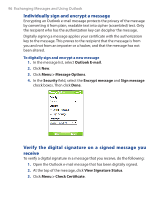
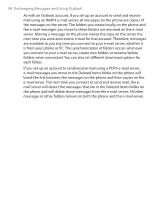
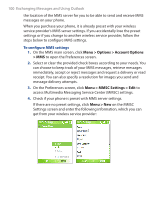
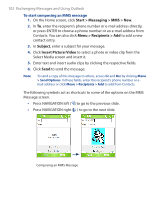
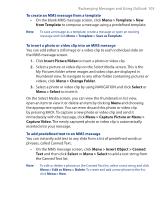
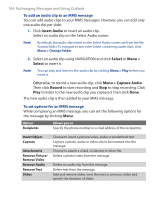
Exchanging Messages and Using Outlook 99 6.2 Using MMS Messages Creating and sending Multimedia Message Service (MMS) messages to your friends and family is fun and easy. You can include or capture photos or video clips, include or record audio, add text, then send them along with your MMS message. To access MMS Do any of the following: • On the Home screen, click Start > Messaging > MMS. • From the Pictures & Videos program, select a picture in My Pictures and click Menu > Send. Select MMS as the messaging account to send the picture along with the message. • From the Camera program, capture a photo and then click the Send icon ( ), select Send via MMS and click Send; or record an MMS video clip and then click the Send icon ( ). To access MMS message folders • Click Start > Messaging > MMS, then click Menu > Folders. MMS Message Folders Edit MMS settings When you send an MMS message, an SMS notification message will first be sent to the recipient, while your MMS message will be temporarily stored on an MMS server of your wireless service provider. Similarly, when others send you an MMS message, the MMS message will be stored on the MMS server, waiting for you to retrieve it. Hence, your phone must be configured with
-
 1
1 -
2
-
3
-
4
-
5
-
6
-
7
-
8
-
9
-
10
-
11
-
12
-
13
-
14
-
15
-
16
-
17
-
18
-
19
-
20
-
21
-
22
-
23
-
24
-
25
-
26
-
27
-
28
-
29
-
30
-
31
-
32
-
33
-
34
-
35
-
36
-
37
-
38
-
39
-
40
-
41
-
42
-
43
-
44
-
45
-
46
-
47
-
48
-
49
-
50
-
51
-
52
-
53
-
54
-
55
-
56
-
57
-
58
-
59
-
60
-
61
-
62
-
63
-
64
-
65
-
66
-
67
-
68
-
69
-
70
-
71
-
72
-
73
-
74
-
75
-
76
-
77
-
78
-
79
-
80
-
81
-
82
-
83
-
84
-
85
-
86
-
87
-
88
-
89
-
90
-
91
-
92
-
93
-
 94
94 -
 95
95 -
 96
96 -
 97
97 -
 98
98 -
 99
99 -
 100
100 -
 101
101 -
 102
102 -
 103
103 -
 104
104 -
105
-
106
-
107
-
108
-
109
-
110
-
111
-
112
-
113
-
114
-
115
-
116
-
117
-
118
-
119
-
120
-
121
-
122
-
123
-
124
-
125
-
126
-
127
-
128
-
129
-
130
-
131
-
132
-
133
-
134
-
135
-
136
-
137
-
138
-
139
-
140
-
141
-
142
-
143
-
144
-
145
-
146
-
147
-
148
-
149
-
150
-
151
-
152
-
153
-
154
-
155
-
156
-
157
-
158
-
159
-
160
-
161
-
162
-
163
-
164
-
165
-
166
-
167
-
168
-
169
-
170
-
171
-
172
-
173
-
174
 |
 |
