HP 1250 User Guide - Page 78
The HP Fax is having problems sending a manual fax
 |
UPC - 882780494893
View all HP 1250 manuals
Add to My Manuals
Save this manual to your list of manuals |
Page 78 highlights
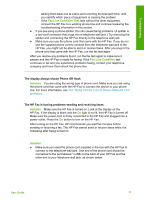
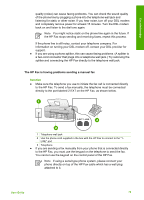
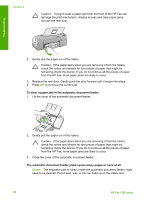
Troubleshooting quality (noise) can cause faxing problems. You can check the sound quality of the phone line by plugging a phone into the telephone wall jack and listening for static or other noise. If you hear noise, turn off your DSL modem and completely remove power for at least 15 minutes. Turn the DSL modem back on and listen to the dial tone again. Note You might notice static on the phone line again in the future. If the HP Fax stops sending and receiving faxes, repeat this process. If the phone line is still noisy, contact your telephone company. For information on turning your DSL modem off, contact your DSL provider for support. ● If you are using a phone splitter, this can cause faxing problems. (A splitter is a two-cord connector that plugs into a telephone wall jack.) Try removing the splitter and connecting the HP Fax directly to the telephone wall jack. The HP Fax is having problems sending a manual fax Solution ● Make sure the telephone you use to initiate the fax call is connected directly to the HP Fax. To send a fax manually, the telephone must be connected directly to the port labeled 2-EXT on the HP Fax, as shown below. 1 Telephone wall jack 2 Use the phone cord supplied in the box with the HP Fax to connect to the "1- LINE" port 3 Telephone ● If you are sending a fax manually from your phone that is connected directly to the HP Fax, you must use the keypad on the telephone to send the fax. You cannot use the keypad on the control panel of the HP Fax. Note If using a serial-type phone system, please connect your phone directly on top of the HP Fax cable which has a wall plug attached to it. User Guide 75
-
 1
1 -
2
-
3
-
4
-
5
-
6
-
7
-
8
-
9
-
10
-
11
-
12
-
13
-
14
-
15
-
16
-
17
-
18
-
19
-
20
-
21
-
22
-
23
-
24
-
25
-
26
-
27
-
28
-
29
-
30
-
31
-
32
-
33
-
34
-
35
-
36
-
37
-
38
-
39
-
40
-
41
-
42
-
43
-
44
-
45
-
46
-
47
-
48
-
49
-
50
-
51
-
52
-
53
-
54
-
55
-
56
-
57
-
58
-
59
-
60
-
61
-
62
-
63
-
64
-
65
-
66
-
67
-
68
-
69
-
70
-
71
-
72
-
 73
73 -
 74
74 -
 75
75 -
 76
76 -
 77
77 -
 78
78 -
 79
79 -
 80
80 -
 81
81 -
 82
82 -
 83
83 -
84
-
85
-
86
-
87
-
88
-
89
-
90
-
91
-
92
-
93
-
94
-
95
-
96
-
97
-
98
-
99
-
100
-
101
-
102
-
103
-
104
-
105
 |
 |
