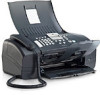
HP 1250 User Guide - Page 89
Call in North America during warranty, Prepare the HP Fax for shipment
 |
UPC - 882780494893
View all HP 1250 manuals
Add to My Manuals
Save this manual to your list of manuals |
Page 89 highlights
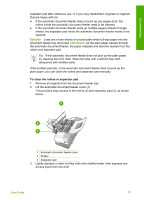
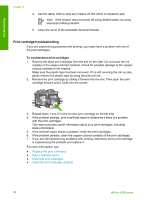
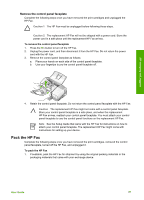
HP warranty and support Chapter 10 To access your serial number and service ID 1. Press and hold OK. While holding OK, press 4. This displays the Information Menu. 2. Press until Model Number appears and then press OK. This displays the service ID. Write down the complete service ID. 3. Press Cancel, and then press until Serial Number appears. 4. Press OK. This displays the serial number. Write down the complete serial number. 5. Press Cancel until you to exit the Information Menu. Call in North America during warranty Call 1-800-474-6836 (1-800-HP invent). U.S. phone support is available in both English and Spanish languages 24 hours a day, 7 days a week (days and hours of support may change without notice). This service is free during the warranty period. A fee may apply outside the warranty period. Prepare the HP Fax for shipment If after contacting HP Customer Support or returning to the point of purchase, you are requested to send the HP Fax in for service, make sure you remove and keep the following items before returning your device: ● The print cartridges ● The control panel faceplate ● The power cord, USB cable, and any other cable connected to the HP Fax ● Any paper loaded in the input tray ● Remove any originals you might have loaded in the HP Fax ● Remove the print cartridges before shipment ● Remove the control panel faceplate Remove the print cartridges before shipment Before you return the HP Fax, make sure you remove your print cartridges. To remove print cartridges before shipment 1. Turn on the HP Fax and wait until the print carriage is idle and silent. If the HP Fax will not turn on, skip this step and go to step 2. 2. Open the print cartridge door. 3. Remove the print cartridges from their slots. Note If the HP Fax does not turn on, you can unplug the power cord and then manually slide the print carriage to the far right side to remove the print cartridges. 4. Place the print cartridges in an airtight plastic container so they will not dry out, and put them aside. Do not send them with the HP Fax unless the HP customer support call agent instructs you to. 5. Close the print cartridge door and wait a few minutes for the print carriage to move back to its home position (on the left side). Note Make sure the scanner is idle and has returned to its parked position before turning off the HP Fax. 6. Press the On button to turn off the HP Fax. 86 HP Fax 1250 series
-
 1
1 -
2
-
3
-
4
-
5
-
6
-
7
-
8
-
9
-
10
-
11
-
12
-
13
-
14
-
15
-
16
-
17
-
18
-
19
-
20
-
21
-
22
-
23
-
24
-
25
-
26
-
27
-
28
-
29
-
30
-
31
-
32
-
33
-
34
-
35
-
36
-
37
-
38
-
39
-
40
-
41
-
42
-
43
-
44
-
45
-
46
-
47
-
48
-
49
-
50
-
51
-
52
-
53
-
54
-
55
-
56
-
57
-
58
-
59
-
60
-
61
-
62
-
63
-
64
-
65
-
66
-
67
-
68
-
69
-
70
-
71
-
72
-
73
-
74
-
75
-
76
-
77
-
78
-
79
-
80
-
81
-
82
-
83
-
 84
84 -
 85
85 -
 86
86 -
 87
87 -
 88
88 -
 89
89 -
 90
90 -
 91
91 -
 92
92 -
 93
93 -
 94
94 -
95
-
96
-
97
-
98
-
99
-
100
-
101
-
102
-
103
-
104
-
105
 |
 |
