HP 5200tn HP LaserJet 5200 Series Printer - User Guide - Page 88
Printing on transparencies, Guidelines for printing on transparencies, Printing on rotated media - laser printers
 |
UPC - 882780123762
View all HP 5200tn manuals
Add to My Manuals
Save this manual to your list of manuals |
Page 88 highlights
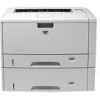
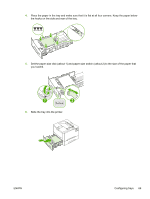
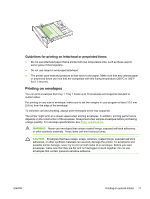
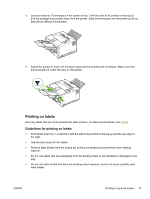
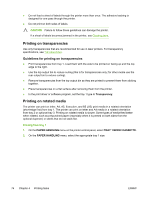
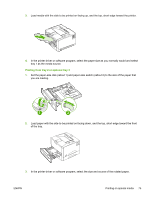
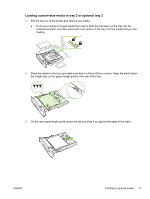
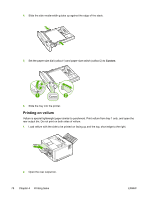
● Do not feed a sheet of labels through the printer more than once. The adhesive backing is designed for one pass through the printer. ● Do not print on both sides of labels. CAUTION Failure to follow these guidelines can damage the printer. If a sheet of labels becomes jammed in the printer, see Clearing jams. Printing on transparencies Use only transparencies that are recommended for use in laser printers. For transparency specifications, see Transparencies. Guidelines for printing on transparencies ● Print transparencies from tray 1. Load them with the side to be printed on facing up and the top edge to the right. ● Use the top output bin to reduce curling (this is for transparencies only; for other media use the rear output bin to reduce curling). ● Remove transparencies from the top output bin as they are printed to prevent them from sticking together. ● Place transparencies on a flat surface after removing them from the printer. ● In the print driver or software program, set the tray 1 type to Transparency. Printing on rotated media The printer can print on letter, A4, A5, Executive, and B5 (JIS) print media in a rotated orientation (short-edge first) from tray 1. The printer can print on letter and A4 media in a rotated orientation from tray 2 or optional tray 3. Printing on rotated media is slower. Some types of media feed better when rotated, such as prepunched paper (especially when it is printed on both sides from the optional duplexer) or labels that do not stack flat. Printing from tray 1 1. On the PAPER HANDLING menu on the printer control panel, select TRAY 1 MODE=CASSETTE. 2. On the PAPER HANDLING menu, select the appropriate tray 1 size. 74 Chapter 4 Printing tasks ENWW
-
 1
1 -
2
-
3
-
4
-
5
-
6
-
7
-
8
-
9
-
10
-
11
-
12
-
13
-
14
-
15
-
16
-
17
-
18
-
19
-
20
-
21
-
22
-
23
-
24
-
25
-
26
-
27
-
28
-
29
-
30
-
31
-
32
-
33
-
34
-
35
-
36
-
37
-
38
-
39
-
40
-
41
-
42
-
43
-
44
-
45
-
46
-
47
-
48
-
49
-
50
-
51
-
52
-
53
-
54
-
55
-
56
-
57
-
58
-
59
-
60
-
61
-
62
-
63
-
64
-
65
-
66
-
67
-
68
-
69
-
70
-
71
-
72
-
73
-
74
-
75
-
76
-
77
-
78
-
79
-
80
-
81
-
82
-
 83
83 -
 84
84 -
 85
85 -
 86
86 -
 87
87 -
 88
88 -
 89
89 -
 90
90 -
 91
91 -
 92
92 -
 93
93 -
94
-
95
-
96
-
97
-
98
-
99
-
100
-
101
-
102
-
103
-
104
-
105
-
106
-
107
-
108
-
109
-
110
-
111
-
112
-
113
-
114
-
115
-
116
-
117
-
118
-
119
-
120
-
121
-
122
-
123
-
124
-
125
-
126
-
127
-
128
-
129
-
130
-
131
-
132
-
133
-
134
-
135
-
136
-
137
-
138
-
139
-
140
-
141
-
142
-
143
-
144
-
145
-
146
-
147
-
148
-
149
-
150
-
151
-
152
-
153
-
154
-
155
-
156
-
157
-
158
-
159
-
160
-
161
-
162
-
163
-
164
-
165
-
166
-
167
-
168
-
169
-
170
-
171
-
172
-
173
-
174
-
175
-
176
-
177
-
178
-
179
-
180
-
181
-
182
-
183
-
184
-
185
-
186
-
187
-
188
-
189
-
190
-
191
-
192
-
193
-
194
-
195
-
196
-
197
-
198
-
199
-
200
-
201
-
202
-
203
-
204
-
205
-
206
-
207
-
208
-
209
-
210
-
211
-
212
-
213
-
214
-
215
-
216
-
217
-
218
-
219
-
220
-
221
-
222
-
223
-
224
-
225
-
226
-
227
-
228
-
229
-
230
-
231
-
232
-
233
-
234
-
235
-
236
-
237
-
238
-
239
-
240
-
241
-
242
-
243
-
244
-
245
-
246
-
247
-
248
 |
 |