HP 5200tn HP LaserJet 5200 Series Printer - User Guide - Page 98
To print on both sides manually, Finishing, Print on Both Sides
 |
UPC - 882780123762
View all HP 5200tn manuals
Add to My Manuals
Save this manual to your list of manuals |
Page 98 highlights
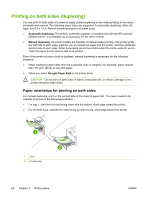
4. Click OK. 5. Send the print job to the printer. NOTE The paper you are printing on will partially come out of the top output bin during the duplexing. Do not pull on the paper until duplexing is complete. During duplexing, the duplexer will not function if the rear output bin is open. To print on both sides manually 1. Insert enough paper into one of the trays to accommodate the print job. If you are loading special paper such as letterhead, load it in one of the following ways: ● For tray 1, load the letterhead paper with the front side down, bottom-edge first. ● For all other trays, load the letterhead paper with first side up, top edge toward the back of the tray. 2. Open the printer driver (see Gaining access to printer driver settings). 3. On the Finishing tab, select Print on Both Sides. 4. Click OK. 5. Send the print job to the printer. 6. Go to the printer. Remove any blank paper that is in tray 1. Insert the printed stack with the blank side up, with the top-edge feeding into the printer first. You must print the second side from tray 1. 7. If prompted by a message at the control panel-display, press . NOTE If the number of total sheets exceeds the tray 1 capacity for manual duplex jobs, you must repeat steps 6 and 7 each time that paper is inserted, until the duplexing job is complete. CAUTION Hewlett-Packard recommends manually reusing sheets only through tray 1. Do not reuse sheets through tray 2 or tray 3, as this can cause jams and print-quality problems. 84 Chapter 4 Printing tasks ENWW
-
 1
1 -
2
-
3
-
4
-
5
-
6
-
7
-
8
-
9
-
10
-
11
-
12
-
13
-
14
-
15
-
16
-
17
-
18
-
19
-
20
-
21
-
22
-
23
-
24
-
25
-
26
-
27
-
28
-
29
-
30
-
31
-
32
-
33
-
34
-
35
-
36
-
37
-
38
-
39
-
40
-
41
-
42
-
43
-
44
-
45
-
46
-
47
-
48
-
49
-
50
-
51
-
52
-
53
-
54
-
55
-
56
-
57
-
58
-
59
-
60
-
61
-
62
-
63
-
64
-
65
-
66
-
67
-
68
-
69
-
70
-
71
-
72
-
73
-
74
-
75
-
76
-
77
-
78
-
79
-
80
-
81
-
82
-
83
-
84
-
85
-
86
-
87
-
88
-
89
-
90
-
91
-
92
-
 93
93 -
 94
94 -
 95
95 -
 96
96 -
 97
97 -
 98
98 -
 99
99 -
 100
100 -
 101
101 -
 102
102 -
 103
103 -
104
-
105
-
106
-
107
-
108
-
109
-
110
-
111
-
112
-
113
-
114
-
115
-
116
-
117
-
118
-
119
-
120
-
121
-
122
-
123
-
124
-
125
-
126
-
127
-
128
-
129
-
130
-
131
-
132
-
133
-
134
-
135
-
136
-
137
-
138
-
139
-
140
-
141
-
142
-
143
-
144
-
145
-
146
-
147
-
148
-
149
-
150
-
151
-
152
-
153
-
154
-
155
-
156
-
157
-
158
-
159
-
160
-
161
-
162
-
163
-
164
-
165
-
166
-
167
-
168
-
169
-
170
-
171
-
172
-
173
-
174
-
175
-
176
-
177
-
178
-
179
-
180
-
181
-
182
-
183
-
184
-
185
-
186
-
187
-
188
-
189
-
190
-
191
-
192
-
193
-
194
-
195
-
196
-
197
-
198
-
199
-
200
-
201
-
202
-
203
-
204
-
205
-
206
-
207
-
208
-
209
-
210
-
211
-
212
-
213
-
214
-
215
-
216
-
217
-
218
-
219
-
220
-
221
-
222
-
223
-
224
-
225
-
226
-
227
-
228
-
229
-
230
-
231
-
232
-
233
-
234
-
235
-
236
-
237
-
238
-
239
-
240
-
241
-
242
-
243
-
244
-
245
-
246
-
247
-
248
 |
 |