HP Brio ba200 hp brio ba200, user guide - Page 55
Installing a New System Board
 |
View all HP Brio ba200 manuals
Add to My Manuals
Save this manual to your list of manuals |
Page 55 highlights
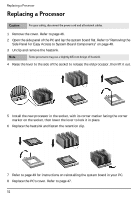
Accessing or Replacing the System Board 7 Place the system board on a flat surface beside the PC. 8 Refer to the appropriate section in this chapter for instructions on removing individual components. 9 Refer below for instructions on reinstalling the system board in the PC. Installing a New System Board 1 Follow the instructions on page 48 before continuing with the following steps. 2 Remove all cables from the board. If you can't remember how to reconnect them, refer to page 51. 3 Remove the six retaining screws circled below. 4 Lift the system board off the side panel. 5 Remove any components you want to reuse such as the processor or memory modules. Refer to the appropriate section for instructions on removing the individual components. 6 Make sure that the replacement board has the same jumper or switch settings as the old system board. 7 Install any components removed from the old system board in the new board. Refer to the appropriate section for instructions on inserting the individual components. 8 Place the system board on top of the side panel and replace the six screws. 9 Reconnect connectors and cables in the following order: status panel connector, floppy drive cable, CD-ROM cable, hard drive cable, power cable and CD audio cable, if you have a CD-ROM or DVD drive. 49
-
 1
1 -
2
-
3
-
4
-
5
-
6
-
7
-
8
-
9
-
10
-
11
-
12
-
13
-
14
-
15
-
16
-
17
-
18
-
19
-
20
-
21
-
22
-
23
-
24
-
25
-
26
-
27
-
28
-
29
-
30
-
31
-
32
-
33
-
34
-
35
-
36
-
37
-
38
-
39
-
40
-
41
-
42
-
43
-
44
-
45
-
46
-
47
-
48
-
49
-
 50
50 -
 51
51 -
 52
52 -
 53
53 -
 54
54 -
 55
55 -
 56
56 -
 57
57 -
 58
58 -
 59
59 -
 60
60 -
61
-
62
-
63
-
64
-
65
-
66
-
67
-
68
-
69
-
70
-
71
-
72
-
73
-
74
-
75
-
76
-
77
-
78
-
79
-
80
-
81
-
82
-
83
-
84
-
85
-
86
-
87
-
88
-
89
-
90
-
91
-
92
-
93
-
94
-
95
-
96
 |
 |
