HP DesignJet D5800 Using Your Printer - Page 119
Clean the exterior of the printer, Clean the platen
 |
View all HP DesignJet D5800 manuals
Add to My Manuals
Save this manual to your list of manuals |
Page 119 highlights
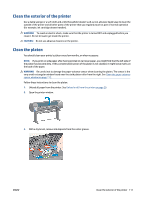
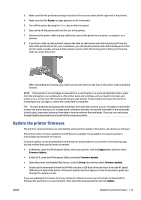
Clean the exterior of the printer Use a damp sponge or a soft cloth and a mild household cleaner such as non-abrasive liquid soap to clean the outside of the printer and all other parts of the printer that you regularly touch as part of normal operation (for example, ink cartridge drawer handles). WARNING! To avoid an electric shock, make sure that the printer is turned OFF and unplugged before you clean it. Do not let water get inside the printer. CAUTION: Do not use abrasive cleaners on the printer. Clean the platen You should clean your printer's platen every few months, or when necessary. NOTE: If you print on wide paper after having printed on narrower paper, you might find that the left side of the platen has become dirty. If this contaminated section of the platen is not cleaned, it might leave marks on the back of the paper. WARNING! Be careful not to damage the paper-advance sensor when cleaning the platen. The sensor is the very small rectangular window found near the sixth platen roller from the right. See Clean the paper-advance sensor window on page 112. Follow these instructions to clean the platen. 1. Unload all paper from the printer. See Unload a roll from the printer on page 29. 2. Open the printer window. 3. With a dry brush, remove ink deposits from the cutter groove. ENWW Clean the exterior of the printer 111
-
 1
1 -
2
-
3
-
4
-
5
-
6
-
7
-
8
-
9
-
10
-
11
-
12
-
13
-
14
-
15
-
16
-
17
-
18
-
19
-
20
-
21
-
22
-
23
-
24
-
25
-
26
-
27
-
28
-
29
-
30
-
31
-
32
-
33
-
34
-
35
-
36
-
37
-
38
-
39
-
40
-
41
-
42
-
43
-
44
-
45
-
46
-
47
-
48
-
49
-
50
-
51
-
52
-
53
-
54
-
55
-
56
-
57
-
58
-
59
-
60
-
61
-
62
-
63
-
64
-
65
-
66
-
67
-
68
-
69
-
70
-
71
-
72
-
73
-
74
-
75
-
76
-
77
-
78
-
79
-
80
-
81
-
82
-
83
-
84
-
85
-
86
-
87
-
88
-
89
-
90
-
91
-
92
-
93
-
94
-
95
-
96
-
97
-
98
-
99
-
100
-
101
-
102
-
103
-
104
-
105
-
106
-
107
-
108
-
109
-
110
-
111
-
112
-
113
-
 114
114 -
 115
115 -
 116
116 -
 117
117 -
 118
118 -
 119
119 -
 120
120 -
 121
121 -
 122
122 -
 123
123 -
 124
124 -
125
-
126
-
127
-
128
-
129
-
130
-
131
-
132
-
133
-
134
-
135
-
136
-
137
-
138
-
139
-
140
-
141
-
142
-
143
-
144
-
145
-
146
-
147
-
148
-
149
-
150
-
151
-
152
-
153
-
154
-
155
-
156
-
157
-
158
-
159
-
160
-
161
-
162
-
163
-
164
-
165
-
166
-
167
-
168
-
169
-
170
-
171
-
172
-
173
-
174
-
175
-
176
-
177
-
178
-
179
-
180
-
181
-
182
-
183
-
184
-
185
-
186
-
187
-
188
-
189
 |
 |
