HP DesignJet D5800 Using Your Printer - Page 132
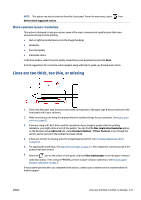
Lines are slightly warped, Dark or light horizontal lines across the image (horizontal banding)
 |
View all HP DesignJet D5800 manuals
Add to My Manuals
Save this manual to your list of manuals |
Page 132 highlights
3. Try changing to a heavier paper type, such as HP Heavyweight Coated Paper, HP Super Heavyweight Coated Paper, or Digital Fine Art paper. 4. If you are using glossy paper, try changing to a different type of glossy paper. 5. Align the printheads. See Align the printheads on page 57. Lines are slightly warped The paper itself might be warped. This can happen if it has been used or stored in an extreme environment. See Environmental specifications on page 174. Dark or light horizontal lines across the image (horizontal banding) Try the following remedies if your printed image suffers from added horizontal lines as shown (the color may vary): 1. Make sure that the paper type you have loaded corresponds to the paper type that you select on the front panel and in your software. 2. Make sure that you are using appropriate print-quality settings for your purposes. See Select print quality on page 67. In some cases, you can overcome a print-quality problem merely by selecting a higher print-quality level. For instance, if you have set the print-quality slider to Fast, try setting it to Best. If you change the print-quality settings, reprint your job if the problem has been solved. 3. Print the Image Diagnostics Print. See The Image Diagnostics Print on page 58. 4. Check the paper-advance calibration status on the front panel. If the status is PENDING, you should perform paper-advance calibration. See Perform paper advance calibration on page 37. 5. Try aligning the printheads. See Align the printheads on page 57. After alignment, reprint your job if the problem has been solved. If the problem persists, contact your customer service representative for further support. Dark or light vertical lines across the image (vertical banding) Make sure that the paper type you have loaded corresponds to the paper type that you select on the front panel and in your software. If you are using non-HP paper, be sure to select the non-HP version of the specific paper type. HP paper presets have been specifically tuned for the HP version of this paper. Other equivalent non-HP paper could behave very differently. 124 Chapter 13 Troubleshoot print-quality issues ENWW
-
 1
1 -
2
-
3
-
4
-
5
-
6
-
7
-
8
-
9
-
10
-
11
-
12
-
13
-
14
-
15
-
16
-
17
-
18
-
19
-
20
-
21
-
22
-
23
-
24
-
25
-
26
-
27
-
28
-
29
-
30
-
31
-
32
-
33
-
34
-
35
-
36
-
37
-
38
-
39
-
40
-
41
-
42
-
43
-
44
-
45
-
46
-
47
-
48
-
49
-
50
-
51
-
52
-
53
-
54
-
55
-
56
-
57
-
58
-
59
-
60
-
61
-
62
-
63
-
64
-
65
-
66
-
67
-
68
-
69
-
70
-
71
-
72
-
73
-
74
-
75
-
76
-
77
-
78
-
79
-
80
-
81
-
82
-
83
-
84
-
85
-
86
-
87
-
88
-
89
-
90
-
91
-
92
-
93
-
94
-
95
-
96
-
97
-
98
-
99
-
100
-
101
-
102
-
103
-
104
-
105
-
106
-
107
-
108
-
109
-
110
-
111
-
112
-
113
-
114
-
115
-
116
-
117
-
118
-
119
-
120
-
121
-
122
-
123
-
124
-
125
-
126
-
 127
127 -
 128
128 -
 129
129 -
 130
130 -
 131
131 -
 132
132 -
 133
133 -
 134
134 -
 135
135 -
 136
136 -
 137
137 -
138
-
139
-
140
-
141
-
142
-
143
-
144
-
145
-
146
-
147
-
148
-
149
-
150
-
151
-
152
-
153
-
154
-
155
-
156
-
157
-
158
-
159
-
160
-
161
-
162
-
163
-
164
-
165
-
166
-
167
-
168
-
169
-
170
-
171
-
172
-
173
-
174
-
175
-
176
-
177
-
178
-
179
-
180
-
181
-
182
-
183
-
184
-
185
-
186
-
187
-
188
-
189
 |
 |
