HP DesignJet D5800 Using Your Printer - Page 123
Update the printer firmware, Ready, Support, Firmware Update, Setup, Update
 |
View all HP DesignJet D5800 manuals
Add to My Manuals
Save this manual to your list of manuals |
Page 123 highlights
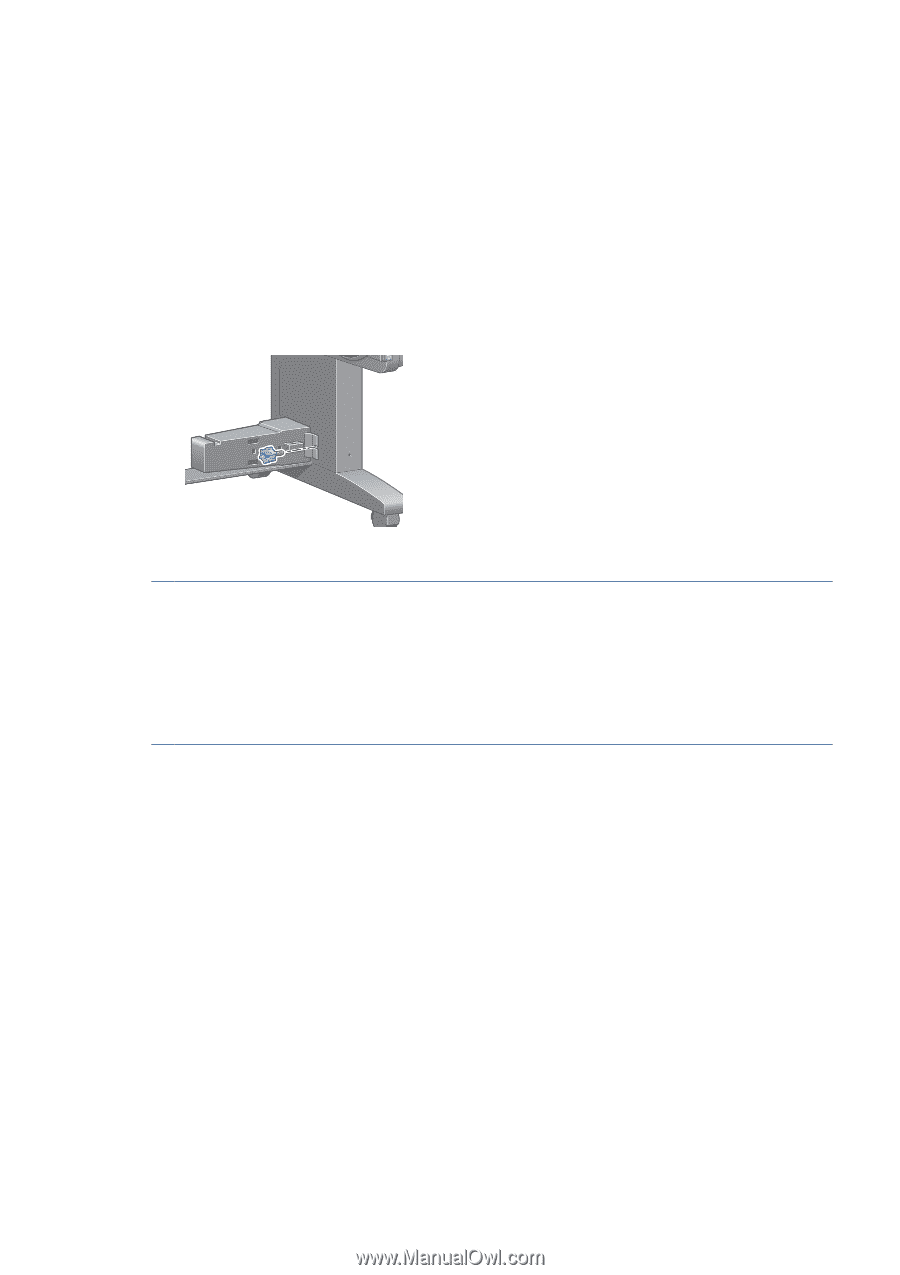
3. Make sure that the printhead carriage is located in the service station (at the right end of the printer). 4. Make sure that the Ready message appears on the front panel. 5. Turn off the power by using the Power key on the front panel. 6. Also switch off the power switch at the rear of the printer. 7. Disconnect the power cable and any cables that connect the printer to a network, a computer, or a scanner. 8. If you have a take-up reel installed, remove the take-up reel sensor and cable-housing unit from the foot of the printer stand. For your convenience, you can place the sensor and cable-housing unit on the printer-stand crossbar and use the blue plastic screw to affix the housing unit to the leg of the stand, while you move the printer. When reinstalling the housing unit, make sure that the wheel on the foot of the printer stand is pointing forward. NOTE: If the printer or ink cartridges are moved from a cold location to a warm and humid location, water from the atmosphere can condensate on the printer parts and cartridges and can result in ink leaks and printer errors. In this case, HP recommends that you wait at least 3 hours before turning on the printer or installing the ink cartridges, to allow the condensate to evaporate. TIP: Because preparing and purging the printheads uses both time and ink, you are strongly recommended to leave the printer always on or in sleep mode, whenever possible, to maintain the health of the printheads. In both cases, the printer wakes up from time to time to maintain the printheads. Thus you can avoid going through lengthy preparation processes before using your printer. Update the printer firmware The printer's various functions are controlled by software that resides in the printer, also known as firmware. From time to time, firmware updates from HP become available. These updates increase the printer's functionality and enhance its features. Firmware updates can be downloaded from the Internet and installed in your printer in the following ways. Use the method that you find most convenient. ● In Windows, open the HP DesignJet Utility, select your printer, click the Support tab, and then select Firmware Update. ● In Mac OS X, open the HP DesignJet Utility and select Firmware Update. ● Using the printer's Embedded Web Server, click the Setup tab and then select Firmware update. ● Download the firmware file from the HP Web site into a USB flash drive and insert it into the Hi-Speed USB host port behind the printer. A firmware update assistant appears on the front panel to guide you through the update process. If you are updating the firmware from your computer, follow the onscreen instructions to download the firmware file and store it on your hard disk. Then select the downloaded file and click Update. ENWW Update the printer firmware 115
-
 1
1 -
2
-
3
-
4
-
5
-
6
-
7
-
8
-
9
-
10
-
11
-
12
-
13
-
14
-
15
-
16
-
17
-
18
-
19
-
20
-
21
-
22
-
23
-
24
-
25
-
26
-
27
-
28
-
29
-
30
-
31
-
32
-
33
-
34
-
35
-
36
-
37
-
38
-
39
-
40
-
41
-
42
-
43
-
44
-
45
-
46
-
47
-
48
-
49
-
50
-
51
-
52
-
53
-
54
-
55
-
56
-
57
-
58
-
59
-
60
-
61
-
62
-
63
-
64
-
65
-
66
-
67
-
68
-
69
-
70
-
71
-
72
-
73
-
74
-
75
-
76
-
77
-
78
-
79
-
80
-
81
-
82
-
83
-
84
-
85
-
86
-
87
-
88
-
89
-
90
-
91
-
92
-
93
-
94
-
95
-
96
-
97
-
98
-
99
-
100
-
101
-
102
-
103
-
104
-
105
-
106
-
107
-
108
-
109
-
110
-
111
-
112
-
113
-
114
-
115
-
116
-
117
-
 118
118 -
 119
119 -
 120
120 -
 121
121 -
 122
122 -
 123
123 -
 124
124 -
 125
125 -
 126
126 -
 127
127 -
 128
128 -
129
-
130
-
131
-
132
-
133
-
134
-
135
-
136
-
137
-
138
-
139
-
140
-
141
-
142
-
143
-
144
-
145
-
146
-
147
-
148
-
149
-
150
-
151
-
152
-
153
-
154
-
155
-
156
-
157
-
158
-
159
-
160
-
161
-
162
-
163
-
164
-
165
-
166
-
167
-
168
-
169
-
170
-
171
-
172
-
173
-
174
-
175
-
176
-
177
-
178
-
179
-
180
-
181
-
182
-
183
-
184
-
185
-
186
-
187
-
188
-
189
 |
 |