HP DesignJet D5800 Using Your Printer - Page 129
Most-common issues resolution, Lines are too thick, too thin, or missing
 |
View all HP DesignJet D5800 manuals
Add to My Manuals
Save this manual to your list of manuals |
Page 129 highlights
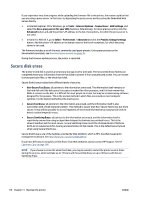
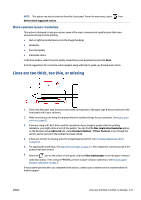
NOTE: This option can also be selected from the front panel. From the main menu, select Optimization suggested actions. , then Most-common issues resolution This option is designed to help you resolve some of the most common print-quality issues that users encounter in large-format printing: ● Dark or light horizontal lines across the image (banding) ● Graininess ● Poor line quality ● Inaccurate colors In the first window, select the print-quality issue that you are experiencing and click Next. A list of suggestions for corrective action appears along with help to guide you through each action. Lines are too thick, too thin, or missing 1. Check that the paper type that you have loaded corresponds to the paper type that you selected on the front panel and in your software. 2. Make sure that you are using the appropriate print-quality settings for your purposes. See Select print quality on page 67. 3. If you are using a HP-GL/2 driver and the resolution of your image is greater than the printing resolution, you might notice a loss of line quality. You can find the Max. Application Resolution option on the Windows driver Advanced tab, under Document Options > Printer Features. If you change this option, reprint your job if the problem has been solved. 4. If lines are too thin or missing, print the Image Diagnostics Print. See The Image Diagnostics Print on page 58. 5. Try aligning the printheads. See Align the printheads on page 57. After alignment, reprint your job if the problem has been solved. 6. Select the icon on the printer's front panel, and then View loaded paper to see the paper-advance calibration status. If the status is PENDING, perform a paper-advance calibration. See Perform paper advance calibration on page 37. If the problem persists after you complete these actions, contact your customer service representative for further support. ENWW Lines are too thick, too thin, or missing 121
-
 1
1 -
2
-
3
-
4
-
5
-
6
-
7
-
8
-
9
-
10
-
11
-
12
-
13
-
14
-
15
-
16
-
17
-
18
-
19
-
20
-
21
-
22
-
23
-
24
-
25
-
26
-
27
-
28
-
29
-
30
-
31
-
32
-
33
-
34
-
35
-
36
-
37
-
38
-
39
-
40
-
41
-
42
-
43
-
44
-
45
-
46
-
47
-
48
-
49
-
50
-
51
-
52
-
53
-
54
-
55
-
56
-
57
-
58
-
59
-
60
-
61
-
62
-
63
-
64
-
65
-
66
-
67
-
68
-
69
-
70
-
71
-
72
-
73
-
74
-
75
-
76
-
77
-
78
-
79
-
80
-
81
-
82
-
83
-
84
-
85
-
86
-
87
-
88
-
89
-
90
-
91
-
92
-
93
-
94
-
95
-
96
-
97
-
98
-
99
-
100
-
101
-
102
-
103
-
104
-
105
-
106
-
107
-
108
-
109
-
110
-
111
-
112
-
113
-
114
-
115
-
116
-
117
-
118
-
119
-
120
-
121
-
122
-
123
-
 124
124 -
 125
125 -
 126
126 -
 127
127 -
 128
128 -
 129
129 -
 130
130 -
 131
131 -
 132
132 -
 133
133 -
 134
134 -
135
-
136
-
137
-
138
-
139
-
140
-
141
-
142
-
143
-
144
-
145
-
146
-
147
-
148
-
149
-
150
-
151
-
152
-
153
-
154
-
155
-
156
-
157
-
158
-
159
-
160
-
161
-
162
-
163
-
164
-
165
-
166
-
167
-
168
-
169
-
170
-
171
-
172
-
173
-
174
-
175
-
176
-
177
-
178
-
179
-
180
-
181
-
182
-
183
-
184
-
185
-
186
-
187
-
188
-
189
 |
 |
