HP DesignJet D5800 Using Your Printer - Page 128
General advice, Troubleshooting tools, Optimize print quality, Optimization suggested actions
 |
View all HP DesignJet D5800 manuals
Add to My Manuals
Save this manual to your list of manuals |
Page 128 highlights
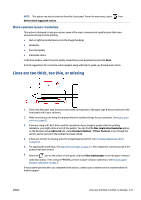
General advice Use the following approach when you have any print-quality problem: ● To achieve the best performance from your printer, use only genuine HP supplies and accessories, whose reliability and performance have been thoroughly tested to give trouble-free performance and best-quality prints. For details of recommended papers, see Order paper on page 41. ● Make sure that the paper type that you select on the front panel is the same as the paper type that is loaded in the printer. Make sure that the paper type has been calibrated. Also make sure that the paper type that you select in your software is the same as the paper type that you loaded in the printer. CAUTION: If you have the wrong paper type selected, you might experience poor print quality and incorrect colors, and damage to the printheads might occur. ● Make sure that you are using the most appropriate print-quality settings for your purposes. See Select print quality on page 67. You are likely to see lower print quality if you have moved the print-quality slider to the Fast end of the scale, or set the custom quality level to Fast. ● Make sure that your environmental conditions (temperature, humidity) are in the recommended range. See Environmental specifications on page 174. ● Make sure that your ink cartridges and printheads have not passed their expiration dates. See Maintain the ink cartridges on page 114. ● Avoid touching the paper while printing is in progress. Troubleshooting tools To access the troubleshooting tools in the Embedded Web Server, select the Support tab. The first two tools can also be accessed from the front panel's Image quality maintenance menu. Optimize print quality This option ensures that printer and supplies are adjusted to deliver optimum print quality. Click Next to execute all calibration and recovery routines automatically. The whole process consumes 80 cm (31.5 in) of paper and may take up to 20 minutes. NOTE: This option can also be selected from the front panel. From the main menu, select Optimize print quality. , then Optimization suggested actions This option suggests a series of recommended actions to improve print quality, based on the results of internal checks. These actions may include reseating a printhead, changing paper to run a specific calibration, cleaning some printer component, etc. Execute them in the proposed order. TIP: Use this option if you want to save time by acting directly on the causes of your problem, or if your problem persists after the automatic Optimize print quality process. 120 Chapter 13 Troubleshoot print-quality issues ENWW
-
 1
1 -
2
-
3
-
4
-
5
-
6
-
7
-
8
-
9
-
10
-
11
-
12
-
13
-
14
-
15
-
16
-
17
-
18
-
19
-
20
-
21
-
22
-
23
-
24
-
25
-
26
-
27
-
28
-
29
-
30
-
31
-
32
-
33
-
34
-
35
-
36
-
37
-
38
-
39
-
40
-
41
-
42
-
43
-
44
-
45
-
46
-
47
-
48
-
49
-
50
-
51
-
52
-
53
-
54
-
55
-
56
-
57
-
58
-
59
-
60
-
61
-
62
-
63
-
64
-
65
-
66
-
67
-
68
-
69
-
70
-
71
-
72
-
73
-
74
-
75
-
76
-
77
-
78
-
79
-
80
-
81
-
82
-
83
-
84
-
85
-
86
-
87
-
88
-
89
-
90
-
91
-
92
-
93
-
94
-
95
-
96
-
97
-
98
-
99
-
100
-
101
-
102
-
103
-
104
-
105
-
106
-
107
-
108
-
109
-
110
-
111
-
112
-
113
-
114
-
115
-
116
-
117
-
118
-
119
-
120
-
121
-
122
-
 123
123 -
 124
124 -
 125
125 -
 126
126 -
 127
127 -
 128
128 -
 129
129 -
 130
130 -
 131
131 -
 132
132 -
 133
133 -
134
-
135
-
136
-
137
-
138
-
139
-
140
-
141
-
142
-
143
-
144
-
145
-
146
-
147
-
148
-
149
-
150
-
151
-
152
-
153
-
154
-
155
-
156
-
157
-
158
-
159
-
160
-
161
-
162
-
163
-
164
-
165
-
166
-
167
-
168
-
169
-
170
-
171
-
172
-
173
-
174
-
175
-
176
-
177
-
178
-
179
-
180
-
181
-
182
-
183
-
184
-
185
-
186
-
187
-
188
-
189
 |
 |
