HP DesignJet D5800 Using Your Printer - Page 164
Task 4: Handle the ink system, Task 5: Adjust printed images
 |
View all HP DesignJet D5800 manuals
Add to My Manuals
Save this manual to your list of manuals |
Page 164 highlights
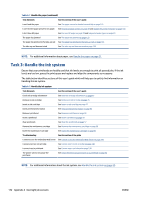
Task 4: Handle the ink system Ensure that your printheads are healthy and that ink levels are enough to print all queued jobs. If the ink levels are too low, pause the print queue and replace and align the components as necessary. The table below identifies sections of this user's guide which will help you to quickly find information on handling the ink system. Table B-3 Handle the ink system Task Elements See this section of the user's guide Check ink cartridge information See View ink cartridge information on page 62 Remove an ink cartridge See Remove an ink cartridge on page 45 Insert an ink cartridge See Insert an ink cartridge on page 47 Check printhead information See View printhead information on page 63 Remove a printhead See Remove a printhead on page 48 Insert a printhead See Insert a printhead on page 50 Align printheads See Align the printheads on page 57 Remove the maintenance cartridge See Remove the maintenance cartridge on page 59 Insert the maintenance cartridge See Insert the maintenance cartridge on page 61 Troubleshooting See this section of the guide I cannot access the Embedded Web Server See Cannot access the Embedded Web Server on page 143 I cannot insert an ink cartridge See Cannot insert an ink cartridge on page 138 I cannot insert a printhead See Cannot insert a printhead on page 138 The printer will not recognize the printhead See Clean the electrical connections on a printhead on page 53 NOTE: For additional information about the ink system, see Handle the ink system on page 42. Task 5: Adjust printed images Check the quality of the prints. The table below identifies sections of this user's guide which will help you to quickly find information on adjusting printed images. Table B-4 Handle the ink system Task Elements See this section of the user's guide Select print quality See Select print quality on page 67 Select paper size See Select paper size on page 69 Select margins options See Select margins options on page 70 Rescale a print See Rescale a print on page 70 Change the treatment of overlapping lines See Change the treatment of overlapping lines on page 72 Print in grayscale See Print in gray shades on page 74 Print crop lines See Print crop lines on page 72 Rotate or autorotate an image See Rotate an image on page 72 and Autorotate on page 73 156 Appendix B Urgent walk-in job scenario ENWW
-
 1
1 -
2
-
3
-
4
-
5
-
6
-
7
-
8
-
9
-
10
-
11
-
12
-
13
-
14
-
15
-
16
-
17
-
18
-
19
-
20
-
21
-
22
-
23
-
24
-
25
-
26
-
27
-
28
-
29
-
30
-
31
-
32
-
33
-
34
-
35
-
36
-
37
-
38
-
39
-
40
-
41
-
42
-
43
-
44
-
45
-
46
-
47
-
48
-
49
-
50
-
51
-
52
-
53
-
54
-
55
-
56
-
57
-
58
-
59
-
60
-
61
-
62
-
63
-
64
-
65
-
66
-
67
-
68
-
69
-
70
-
71
-
72
-
73
-
74
-
75
-
76
-
77
-
78
-
79
-
80
-
81
-
82
-
83
-
84
-
85
-
86
-
87
-
88
-
89
-
90
-
91
-
92
-
93
-
94
-
95
-
96
-
97
-
98
-
99
-
100
-
101
-
102
-
103
-
104
-
105
-
106
-
107
-
108
-
109
-
110
-
111
-
112
-
113
-
114
-
115
-
116
-
117
-
118
-
119
-
120
-
121
-
122
-
123
-
124
-
125
-
126
-
127
-
128
-
129
-
130
-
131
-
132
-
133
-
134
-
135
-
136
-
137
-
138
-
139
-
140
-
141
-
142
-
143
-
144
-
145
-
146
-
147
-
148
-
149
-
150
-
151
-
152
-
153
-
154
-
155
-
156
-
157
-
158
-
 159
159 -
 160
160 -
 161
161 -
 162
162 -
 163
163 -
 164
164 -
 165
165 -
 166
166 -
 167
167 -
 168
168 -
 169
169 -
170
-
171
-
172
-
173
-
174
-
175
-
176
-
177
-
178
-
179
-
180
-
181
-
182
-
183
-
184
-
185
-
186
-
187
-
188
-
189
 |
 |
