HP Integrity rx2800 HP Smart Update Manager User Guide - Page 21
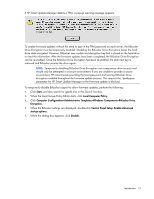
When the Local Group Policy Editor starts, click
 |
View all HP Integrity rx2800 manuals
Add to My Manuals
Save this manual to your list of manuals |
Page 21 highlights
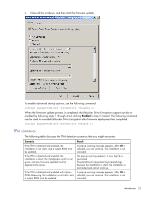
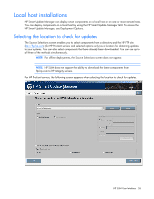
If HP Smart Update Manager detects a TPM, a pop-up warning message appears. To enable firmware updates without the need to type in the TPM password on each server, the BitLocker Drive Encryption must be temporarily disabled. Disabling the BitLocker Drive Encryption keeps the hard drive data encrypted. However, BitLocker uses a plain text decryption key that is stored on the hard drive to read the information. After the firmware updates have been completed, the BitLocker Drive Encryption can be re-enabled. Once the BitLocker Drive Encryption has been re-enabled, the plain text key is removed and BitLocker secures the drive again. NOTE: Temporarily disabling BitLocker Drive Encryption can compromise drive security and should only be attempted in a secure environment. If you are unable to provide a secure environment, HP recommends providing the boot password and leaving BitLocker Drive Encryption enabled throughout the firmware update process. This requires the /tpmbypass parameter for HP Smart Update Manager or the firmware update is blocked. To temporarily disable BitLocker support to allow firmware updates, perform the following: 1. Click Start, and then search for gpedit.msc in the Search Text box. 2. When the Local Group Policy Editor starts, click Local Computer Policy. 3. Click Computer Configuration>Administrative Templates>Windows Components>BitLocker Drive Encryption. 4. When the BitLocker settings are displayed, double-click Control Panel Setup: Enable Advanced startup options. 5. When the dialog box appears, click Disable. Introduction 21
-
 1
1 -
2
-
3
-
4
-
5
-
6
-
7
-
8
-
9
-
10
-
11
-
12
-
13
-
14
-
15
-
 16
16 -
 17
17 -
 18
18 -
 19
19 -
 20
20 -
 21
21 -
 22
22 -
 23
23 -
 24
24 -
 25
25 -
 26
26 -
27
-
28
-
29
-
30
-
31
-
32
-
33
-
34
-
35
-
36
-
37
-
38
-
39
-
40
-
41
-
42
-
43
-
44
-
45
-
46
-
47
-
48
-
49
-
50
-
51
-
52
-
53
-
54
-
55
-
56
-
57
-
58
-
59
-
60
-
61
-
62
-
63
-
64
-
65
-
66
-
67
-
68
-
69
-
70
-
71
-
72
-
73
-
74
-
75
-
76
-
77
-
78
-
79
-
80
-
81
-
82
-
83
-
84
-
85
-
86
-
87
-
88
-
89
-
90
-
91
-
92
-
93
-
94
-
95
-
96
-
97
-
98
-
99
-
100
-
101
-
102
-
103
-
104
-
105
-
106
-
107
-
108
-
109
-
110
-
111
-
112
-
113
-
114
-
115
-
116
-
117
-
118
-
119
-
120
-
121
-
122
-
123
-
124
 |
 |