HP Integrity rx2800 HP Smart Update Manager User Guide - Page 92
Configuring IPv6 for Windows Server 2003
 |
View all HP Integrity rx2800 manuals
Add to My Manuals
Save this manual to your list of manuals |
Page 92 highlights
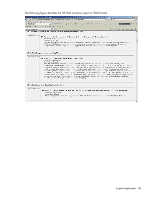
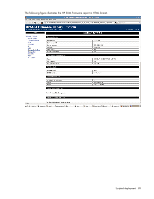
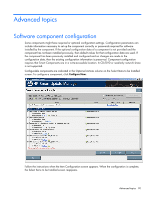
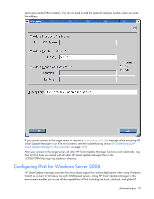
connects to the admin$ share, it copies a small service to the target server for the duration of the installation. After this service starts, HP Smart Update Manager uses this service to communicate between the local and remote target server. During this process, HP Smart Update Manager opens ports in the Windows® firewall to enable HP Smart Update Manager to use SOAP calls over SSL to pass data among local and remote systems. These ports are defined in Allowing ports in HP Smart Update Manager ("Enabling ports in HP Smart Update Manager" on page 103). After the installation is completed or canceled, HP Smart Update Manager stops the remote service, removes it from the target server, closes the port on the Windows® firewall, and then releases the share to the target server admin$ share. For Linux-based servers, to communicate to remote target servers, HP Smart Update Manager starts by using the user-provided user name and password to create a SSH connection to the target server. After the HP Smart Update Manager connects, copies a small service to the target server for the duration of the installation. After this service starts, HP Smart Update Manager uses this service to communicate between the local and remote target server. During this process, HP Smart Update Manager opens ports in the iptables firewall to enable HP Smart Update Manager to use SOAP calls over SSL to pass data between the local and remote systems. These ports are defined in Allowing ports in HP Smart Update Manager ("Enabling ports in HP Smart Update Manager" on page 103). When the installation is completed or canceled, HP Smart Update Manager stops the remote service, removes it from the target server, closes the port in the iptables firewall, and then closes the SSH connection to the target server. Configuring IPv6 for Windows Server 2003 For information on setting up a Windows Server® 2003 operating system within an IPv6 network, see the online Microsoft® Technet article Step-by-Step Guide for Setting Up IPv6 in a Test Lab (http://www.microsoft.com/downloads/details.aspx?FamilyID=fd7e1354-3a3b-43fd-955f11edd39551d7&displaylang=en). Before using HP Smart Update Manager to deploy software and firmware updates to remote Windows Server® 2003 servers, you must add a registry entry to enable file sharing connections over IPv6 networks. To make the registry entry: 1. Start the Registry Editor (Regedt32.exe). 2. Locate and click the following key in the registry: HKEY_LOCAL_MACHINE\System\CurrentControlSet\Services\LanmanServer\Para meters 3. On the Edit menu, click Add Value. 4. Add the following registry value: Value name: DisableStrictNameChecking Data type: REG_DWORD Radix: Decimal Value: 1 5. Quit the Registry Editor. For more information about these steps, see the Microsoft® Knowledge Base Item 281308 on the Microsoft® website (http://www.microsoft.com). IPv6 addresses can be passed to HP Smart Update Manager in command line arguments or using the HP Smart Update Manager user interface. In the HP Smart Update Manager user interface, you can add a remote host on an IPv6 network by either entering the DNS name of the IPv6 target server or by selecting the IPv6 address button and entering the IPv6 address. HP Smart Update Manager supports both the Advanced topics 92
-
 1
1 -
2
-
3
-
4
-
5
-
6
-
7
-
8
-
9
-
10
-
11
-
12
-
13
-
14
-
15
-
16
-
17
-
18
-
19
-
20
-
21
-
22
-
23
-
24
-
25
-
26
-
27
-
28
-
29
-
30
-
31
-
32
-
33
-
34
-
35
-
36
-
37
-
38
-
39
-
40
-
41
-
42
-
43
-
44
-
45
-
46
-
47
-
48
-
49
-
50
-
51
-
52
-
53
-
54
-
55
-
56
-
57
-
58
-
59
-
60
-
61
-
62
-
63
-
64
-
65
-
66
-
67
-
68
-
69
-
70
-
71
-
72
-
73
-
74
-
75
-
76
-
77
-
78
-
79
-
80
-
81
-
82
-
83
-
84
-
85
-
86
-
 87
87 -
 88
88 -
 89
89 -
 90
90 -
 91
91 -
 92
92 -
 93
93 -
 94
94 -
 95
95 -
 96
96 -
 97
97 -
98
-
99
-
100
-
101
-
102
-
103
-
104
-
105
-
106
-
107
-
108
-
109
-
110
-
111
-
112
-
113
-
114
-
115
-
116
-
117
-
118
-
119
-
120
-
121
-
122
-
123
-
124
 |
 |
