HP NetServer AA 4000 HP Netserver AA Solution Installation Guide v4.0 SP1 - Page 30
Installing the Adapters in the IOPs
 |
View all HP NetServer AA 4000 manuals
Add to My Manuals
Save this manual to your list of manuals |
Page 30 highlights
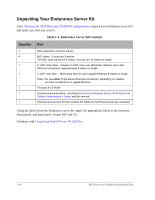
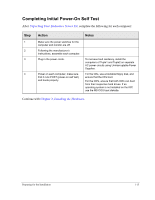
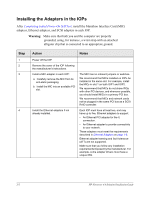
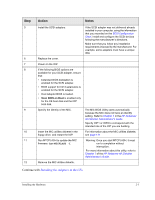
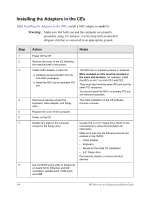
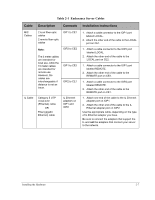
Installing the Adapters in the IOPs After Completing Initial Power-On Self Test, install the Marathon Interface Card (MIC) adapters, Ethernet adapters, and SCSI adapters in each IOP. Warning: Make sure that both you and the computer are properly grounded, using, for instance, a wrist strap with an attached alligator clip that is connected to an appropriate ground. Step 1 2 3 4 Action Notes Power off the IOP. Remove the cover of the IOP following the manufacturer's instructions. Install a MIC adapter in each IOP: a. Carefully remove the MIC from its anti-static packaging. b. Install the MIC into an available PCI slot. Install the Ethernet adapters if not already installed. The MIC has no onboard jumpers or switches. We recommend that MICs installed on IOPs be installed in the same slot. For example, install the MICs in slot 1 on both IOP1 and IOP2. We recommend that MICs do not share IRQs with other PCI devices, and whenever possible, you should install MICs in a primary PCI bus. We recommend that MICs and network cards not be plugged in the same PCI bus as a SCSI RAID controller. Each IOP must have at least two, and may have up to five, Ethernet adapters to support: • An Ethernet PCI adapter for the IL connection. • An Ethernet adapter to provide connectivity to your network. These adapters must meet the requirements described in Ethernet Adapters on page 1-8. Ethernet adapter teaming and fault tolerance (AFT) are not supported. Make sure that you follow any installation requirements imposed by the manufacturer. For example, some adapter drivers must have a unique IRQ. 2-2 HP Netserver AA Solution Installation Guide
-
 1
1 -
2
-
3
-
4
-
5
-
6
-
7
-
8
-
9
-
10
-
11
-
12
-
13
-
14
-
15
-
16
-
17
-
18
-
19
-
20
-
21
-
22
-
23
-
24
-
 25
25 -
 26
26 -
 27
27 -
 28
28 -
 29
29 -
 30
30 -
 31
31 -
 32
32 -
 33
33 -
 34
34 -
 35
35 -
36
-
37
-
38
-
39
-
40
-
41
-
42
-
43
-
44
-
45
-
46
-
47
-
48
-
49
-
50
-
51
-
52
-
53
-
54
-
55
-
56
-
57
-
58
-
59
-
60
-
61
-
62
-
63
-
64
-
65
-
66
-
67
-
68
-
69
-
70
-
71
-
72
-
73
-
74
-
75
-
76
-
77
-
78
-
79
-
80
-
81
-
82
 |
 |