HP Officejet Pro 1170c HP OfficeJet Pro 1175C - (English) User Guide - Page 35
Select/Resume
 |
View all HP Officejet Pro 1170c manuals
Add to My Manuals
Save this manual to your list of manuals |
Page 35 highlights
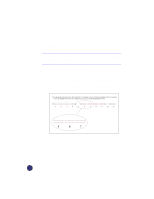
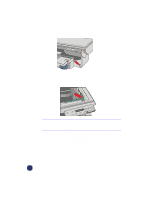
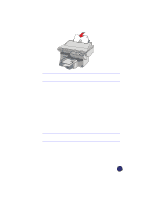
2 Look closely at the set of horizontal bars, and determine which set of black and color lines is aligned the best. 3 Select the number on the front panel display that represents the best horizontal alignment pattern, and press Select/Resume. If necessary, use the Plus (+) and Minus (-) buttons on the front panel to change the number on the display. The mid-range letter for vertical alignment appears on the front panel display. 4 Now look closely at the set of vertical bars and determine which set lines up the best. 5 Select the letter that represents the best vertical alignment on the page and press Select/Resume. If necessary, use the Plus (+) and Minus (-) buttons on the front panel to change the letter on the display. 6 The HP OfficeJet Pro then prints another page to confirm that the print cartridges are correctly aligned. 7 Match the alignment in Sample 2 to the alignment in Sample 1. 8 If the lines are straight, the Align Cartridges procedure is complete. If the lines are not straight, you may want to repeat the Align Cartridges procedure. To do this, press the Menu button until the message "Align Cartridges" is displayed, press Select/Resume, and then repeat steps 2-6. Congratulations! You have finished setting up your HP OfficeJet Pro. Now you are ready to start using it. HP OfficeJet Pro User's Guide 2-25
-
 1
1 -
2
-
3
-
4
-
5
-
6
-
7
-
8
-
9
-
10
-
11
-
12
-
13
-
14
-
15
-
16
-
17
-
18
-
19
-
20
-
21
-
22
-
23
-
24
-
25
-
26
-
27
-
28
-
29
-
 30
30 -
 31
31 -
 32
32 -
 33
33 -
 34
34 -
 35
35 -
 36
36 -
 37
37 -
 38
38 -
 39
39 -
 40
40 -
41
-
42
-
43
-
44
-
45
-
46
-
47
-
48
-
49
-
50
-
51
-
52
-
53
-
54
-
55
-
56
-
57
-
58
-
59
-
60
-
61
-
62
-
63
-
64
-
65
-
66
-
67
-
68
-
69
-
70
-
71
-
72
-
73
-
74
-
75
-
76
-
77
-
78
-
79
-
80
-
81
-
82
-
83
-
84
-
85
-
86
-
87
-
88
-
89
-
90
-
91
-
92
-
93
-
94
-
95
-
96
-
97
-
98
-
99
-
100
-
101
-
102
-
103
-
104
-
105
-
106
-
107
-
108
-
109
-
110
-
111
-
112
-
113
-
114
-
115
-
116
-
117
 |
 |