HP Photosmart 945 HP Photosmart 945 Digital Camera with HP Instant Share User - Page 19
Setting the Date and Time, Adjusting the Diopter Control, Image Info, Playback, Setup
 |
View all HP Photosmart 945 manuals
Add to My Manuals
Save this manual to your list of manuals |
Page 19 highlights
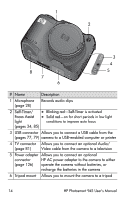
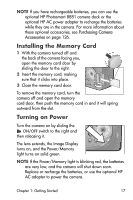
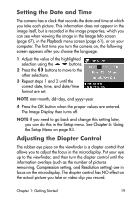
Setting the Date and Time The camera has a clock that records the date and time at which you take each picture. This information does not appear in the image itself, but is recorded in the image properties, which you can see when viewing the image in the Image Info screen (page 67), in the Playback menu screen (page 61), or on your computer. The first time you turn the camera on, the following screen appears after you choose the language. 1 Adjust the value of the highlighted selection using the buttons. 2 Press the buttons to move to the other selections. 3 Repeat steps 1 and 2 until the correct date, time, and date/time format are set. NOTE mm=month, dd=day, and yyyy=year 4 Press the OK button when the proper values are entered. The Image Display then turns off. NOTE If you need to go back and change this setting later, you can do this in the Setup menu. See Chapter 6: Using the Setup Menu on page 83. Adjusting the Diopter Control The rubber eye piece on the viewfinder is a diopter control that allows you to adjust the focus in the microdisplay. Put your eye up to the viewfinder, and then turn the diopter control until the information overlays (such as the number of pictures remaining, Compression setting, and Resolution setting) are in focus on the microdisplay. The diopter control has NO effect on the actual picture you take or video clip you record. Chapter 1: Getting Started 19
-
 1
1 -
2
-
3
-
4
-
5
-
6
-
7
-
8
-
9
-
10
-
11
-
12
-
13
-
 14
14 -
 15
15 -
 16
16 -
 17
17 -
 18
18 -
 19
19 -
 20
20 -
 21
21 -
 22
22 -
 23
23 -
 24
24 -
25
-
26
-
27
-
28
-
29
-
30
-
31
-
32
-
33
-
34
-
35
-
36
-
37
-
38
-
39
-
40
-
41
-
42
-
43
-
44
-
45
-
46
-
47
-
48
-
49
-
50
-
51
-
52
-
53
-
54
-
55
-
56
-
57
-
58
-
59
-
60
-
61
-
62
-
63
-
64
-
65
-
66
-
67
-
68
-
69
-
70
-
71
-
72
-
73
-
74
-
75
-
76
-
77
-
78
-
79
-
80
-
81
-
82
-
83
-
84
-
85
-
86
-
87
-
88
-
89
-
90
-
91
-
92
-
93
-
94
-
95
-
96
-
97
-
98
-
99
-
100
-
101
-
102
-
103
-
104
-
105
-
106
-
107
-
108
-
109
-
110
-
111
-
112
-
113
-
114
-
115
-
116
-
117
-
118
-
119
-
120
-
121
-
122
-
123
-
124
-
125
-
126
-
127
-
128
-
129
-
130
-
131
-
132
-
133
-
134
-
135
-
136
-
137
-
138
-
139
-
140
-
141
-
142
-
143
-
144
-
145
-
146
-
147
-
148
-
149
-
150
 |
 |
