HP Photosmart 945 HP Photosmart 945 Digital Camera with HP Instant Share User - Page 29
Recording Video Clips
 |
View all HP Photosmart 945 manuals
Add to My Manuals
Save this manual to your list of manuals |
Page 29 highlights
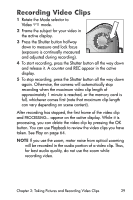
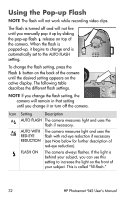
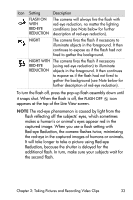
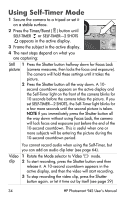
Recording Video Clips 1 Rotate the Mode selector to Video mode. 2 Frame the subject for your video in the active display. Tv Av 3 Press the Shutter button halfway down to measure and lock focus Tv AvAUTO AUTO (exposure is continually measured and adjusted during recording). 4 To start recording, press the Shutter button all the way down and release it. A counter and REC appear in the active display. 5 To stop recording, press the Shutter button all the way down again. Otherwise, the camera will automatically stop recording when the maximum video clip length of approximately 1 minute is reached, or the memory card is full, whichever comes first (note that maximum clip length can vary depending on scene content). After recording has stopped, the first frame of the video clip and PROCESSING... appear on the active display. While it is processing, you can delete the video clip by pressing the OK button. You can use Playback to review the video clips you have taken. See Play on page 64. NOTE If you use the zoom, motor noise from optical zooming will be recorded in the audio portion of a video clip. Thus, for best audio quality, do not use the zoom while recording video. Chapter 2: Taking Pictures and Recording Video Clips 29
-
 1
1 -
2
-
3
-
4
-
5
-
6
-
7
-
8
-
9
-
10
-
11
-
12
-
13
-
14
-
15
-
16
-
17
-
18
-
19
-
20
-
21
-
22
-
23
-
 24
24 -
 25
25 -
 26
26 -
 27
27 -
 28
28 -
 29
29 -
 30
30 -
 31
31 -
 32
32 -
 33
33 -
 34
34 -
35
-
36
-
37
-
38
-
39
-
40
-
41
-
42
-
43
-
44
-
45
-
46
-
47
-
48
-
49
-
50
-
51
-
52
-
53
-
54
-
55
-
56
-
57
-
58
-
59
-
60
-
61
-
62
-
63
-
64
-
65
-
66
-
67
-
68
-
69
-
70
-
71
-
72
-
73
-
74
-
75
-
76
-
77
-
78
-
79
-
80
-
81
-
82
-
83
-
84
-
85
-
86
-
87
-
88
-
89
-
90
-
91
-
92
-
93
-
94
-
95
-
96
-
97
-
98
-
99
-
100
-
101
-
102
-
103
-
104
-
105
-
106
-
107
-
108
-
109
-
110
-
111
-
112
-
113
-
114
-
115
-
116
-
117
-
118
-
119
-
120
-
121
-
122
-
123
-
124
-
125
-
126
-
127
-
128
-
129
-
130
-
131
-
132
-
133
-
134
-
135
-
136
-
137
-
138
-
139
-
140
-
141
-
142
-
143
-
144
-
145
-
146
-
147
-
148
-
149
-
150
 |
 |
