HP ProBook 630 Maintenance and Service Guide - Page 82
Burnt smell, POST, No video (with power), Table 7-13
 |
View all HP ProBook 630 manuals
Add to My Manuals
Save this manual to your list of manuals |
Page 82 highlights
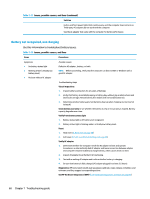
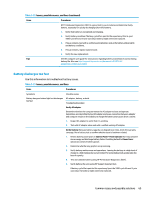
Table 7-13 Issues, possible causes, and fixes (continued) Items Procedures 6. Compare discharge time with a verified working battery (remove AC adapter) using Hardware Diagnostics (UEFI)>Hard Drive Tests>Extensive Test>Loop until error. Tips To conserve battery power, turn off Wireless On-Off button and other peripherals and USB devices, applications, processes (in Task Manager) when not in use; also, reduce screen brightness. Follow HP instructions about how to maintain battery and increase battery life. Also reference http://support.hp.com/us-en/document/c01297640? jumpid=hpr_r1002_usen_link3. Burnt smell Use this information to troubleshoot burnt-odor issues. Table 7-14 Issues, possible causes, and fixes Items Procedures Symptoms Emits smoke, burnt smell Possible causes Defective on-board components. Troubleshooting steps General visual inspection 1. Disconnect the computer from power source (AC adapter and battery). 2. Inspect for visual damage on AC adapter and battery. Test on a known working computer to isolate issue. If issue follows AC adapter or battery, replace it. 3. Inspect any sign of liquid spill on the computer (back of keyboard). The following steps are for authorized providers or technicians. Further inspection on components 1. Inspect further sources internally after disassembling chassis, such as burnt or damaged components. 2. If the issue persists, replace boards, AC adapter, and battery for safety concern, and report issues to HP. POST Use the following sections to troubleshoot Power-on Self Test issues. No video (with power) Use this information to troubleshoot video issues. Table 7-15 Issues, possible causes, and fixes Items Procedures Symptoms Possible causes Failed display 70 Chapter 7 Troubleshooting guide
-
 1
1 -
2
-
3
-
4
-
5
-
6
-
7
-
8
-
9
-
10
-
11
-
12
-
13
-
14
-
15
-
16
-
17
-
18
-
19
-
20
-
21
-
22
-
23
-
24
-
25
-
26
-
27
-
28
-
29
-
30
-
31
-
32
-
33
-
34
-
35
-
36
-
37
-
38
-
39
-
40
-
41
-
42
-
43
-
44
-
45
-
46
-
47
-
48
-
49
-
50
-
51
-
52
-
53
-
54
-
55
-
56
-
57
-
58
-
59
-
60
-
61
-
62
-
63
-
64
-
65
-
66
-
67
-
68
-
69
-
70
-
71
-
72
-
73
-
74
-
75
-
76
-
 77
77 -
 78
78 -
 79
79 -
 80
80 -
 81
81 -
 82
82 -
 83
83 -
 84
84 -
 85
85 -
 86
86 -
 87
87 -
88
-
89
-
90
-
91
-
92
-
93
-
94
-
95
-
96
-
97
-
98
-
99
-
100
-
101
-
102
-
103
-
104
-
105
-
106
-
107
-
108
-
109
-
110
-
111
-
112
-
113
-
114
-
115
-
116
-
117
-
118
-
119
-
120
-
121
-
122
-
123
-
124
-
125
-
126
-
127
-
128
-
129
-
130
-
131
-
132
-
133
-
134
-
135
-
136
-
137
-
138
-
139
-
140
-
141
-
142
-
143
-
144
-
145
-
146
 |
 |
