HP rp3440 HP Integrity and HP 9000 iLO MP Operations Guide, Fifth Edition - Page 37
Setting Security Access, Modifying User Accounts and Default, Password
 |
View all HP rp3440 manuals
Add to My Manuals
Save this manual to your list of manuals |
Page 37 highlights
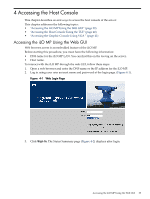
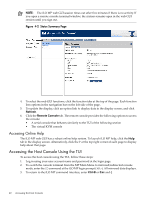
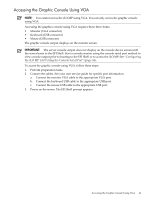
it also acts as the first line of defense against security attacks. A separate network enables you to physically control which workstations are connected to the network. Setting Security Access Determine the security access required and what user accounts and privileges are needed. The iLO MP provides options to control user access. Select one of the following options to prevent unauthorized access to the iLO MP: CAUTION: When DHCP is enabled, the system is vulnerable to security risks because anyone can access the iLO MP until you change the default user name and password. HP strongly recommends you assign user groups and rights before proceeding. • Change the default user name and password. See "Modifying User Accounts and Default Password" (page 36)). • Create local accounts. You can store up to 19 user names and passwords to manage iLO MP access. This is ideal for small environments such as labs and small-to-medium sized businesses. • Use the corporate directory services to manage iLO MP user access. This is ideal for environments with a large number of frequently changing users. If you plan to use directory services, HP recommends leaving at least one local account enabled as an alternate method of access. For more information on how to create local accounts and use directory services, see Chapter 7: "Installing and Configuring Directory Services" (page 91). Additional Setup 37
-
 1
1 -
2
-
3
-
4
-
5
-
6
-
7
-
8
-
9
-
10
-
11
-
12
-
13
-
14
-
15
-
16
-
17
-
18
-
19
-
20
-
21
-
22
-
23
-
24
-
25
-
26
-
27
-
28
-
29
-
30
-
31
-
 32
32 -
 33
33 -
 34
34 -
 35
35 -
 36
36 -
 37
37 -
 38
38 -
 39
39 -
 40
40 -
 41
41 -
 42
42 -
43
-
44
-
45
-
46
-
47
-
48
-
49
-
50
-
51
-
52
-
53
-
54
-
55
-
56
-
57
-
58
-
59
-
60
-
61
-
62
-
63
-
64
-
65
-
66
-
67
-
68
-
69
-
70
-
71
-
72
-
73
-
74
-
75
-
76
-
77
-
78
-
79
-
80
-
81
-
82
-
83
-
84
-
85
-
86
-
87
-
88
-
89
-
90
-
91
-
92
-
93
-
94
-
95
-
96
-
97
-
98
-
99
-
100
-
101
-
102
-
103
-
104
-
105
-
106
-
107
-
108
-
109
-
110
-
111
-
112
-
113
-
114
-
115
-
116
-
117
-
118
-
119
-
120
-
121
-
122
-
123
-
124
-
125
-
126
-
127
-
128
-
129
-
130
-
131
-
132
-
133
-
134
-
135
-
136
-
137
-
138
-
139
-
140
 |
 |