HP rp3440 HP Integrity and HP 9000 iLO MP Operations Guide, Fifth Edition - Page 92
Features Supported by Directory Integration, Directory Services Installation Prerequisites
 |
View all HP rp3440 manuals
Add to My Manuals
Save this manual to your list of manuals |
Page 92 highlights
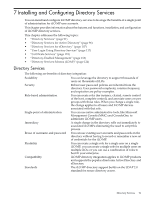
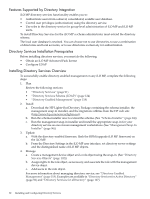
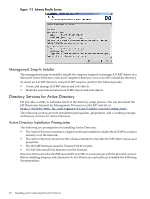
Features Supported by Directory Integration iLO MP directory services functionality enables you to: • Authenticate users from a shared, consolidated, scalable user database. • Control user privileges (authorization) using the directory service. • Use roles in the directory service for group-level administration of iLO MP and iLO MP users. To install Directory Services for the iLO MP a schema administrator must extend the directory schema. The local user database is retained. You can choose not to use directories, to use a combination of directories and local accounts, or to use directories exclusively for authentication. Directory Services Installation Prerequisites Before installing directory services, you must do the following: • Obtain an iLO MP Advanced Pack license • Configure LDAP Installing Directory Services Overview To successfully enable directory-enabled management on any iLO MP, complete the following steps: 1. Plan Review the following sections: • "Directory Services" (page 91) • "Directory Services Schema (LDAP)" (page 124) • "Directory-Enabled Management" (page 118) 2. Install a. Download the HP Lights-Out Directory Package containing the schema installer, the management snap-in installer, and the migrations utilities from the HP web site: (http://www.hp.com/servers/lights-out). b. Run the schema installer once to extend the schema. (See "Schema Installer" (page 94)) c. Run the management snap-in installer and install the appropriate snap-in for your directory service on one or more management workstations. (See "Management Snap-In Installer" (page 96)) 3. Update a. With the directory-enabled firmware, flash the ROM (upgrade iLO MP firmware) on the iLO MP. b. From the Directory Settings in the iLO MP user interface, set directory server settings and the distinguished name of iLO MP objects. 4. Manage a. Create a management device object and a role object using the snap-in. (See "Directory Services Objects" (page 102)) b. Assign rights to the role object, as necessary, and associate the role with the management device object. c. Add users to the role object. For more information about managing directory service, see "Directory-Enabled Management" (page 118). Examples are available in "Directory Services for Active Directory" (page 96) and "Directory Services for eDirectory" (page 107). 92 Installing and Configuring Directory Services
-
 1
1 -
2
-
3
-
4
-
5
-
6
-
7
-
8
-
9
-
10
-
11
-
12
-
13
-
14
-
15
-
16
-
17
-
18
-
19
-
20
-
21
-
22
-
23
-
24
-
25
-
26
-
27
-
28
-
29
-
30
-
31
-
32
-
33
-
34
-
35
-
36
-
37
-
38
-
39
-
40
-
41
-
42
-
43
-
44
-
45
-
46
-
47
-
48
-
49
-
50
-
51
-
52
-
53
-
54
-
55
-
56
-
57
-
58
-
59
-
60
-
61
-
62
-
63
-
64
-
65
-
66
-
67
-
68
-
69
-
70
-
71
-
72
-
73
-
74
-
75
-
76
-
77
-
78
-
79
-
80
-
81
-
82
-
83
-
84
-
85
-
86
-
 87
87 -
 88
88 -
 89
89 -
 90
90 -
 91
91 -
 92
92 -
 93
93 -
 94
94 -
 95
95 -
 96
96 -
 97
97 -
98
-
99
-
100
-
101
-
102
-
103
-
104
-
105
-
106
-
107
-
108
-
109
-
110
-
111
-
112
-
113
-
114
-
115
-
116
-
117
-
118
-
119
-
120
-
121
-
122
-
123
-
124
-
125
-
126
-
127
-
128
-
129
-
130
-
131
-
132
-
133
-
134
-
135
-
136
-
137
-
138
-
139
-
140
 |
 |