IBM 8651RM0 Hardware Maintenance Manual - Page 64
-Inch Removable-Media Drive
 |
UPC - 087944340508
View all IBM 8651RM0 manuals
Add to My Manuals
Save this manual to your list of manuals |
Page 64 highlights
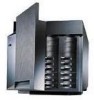
5.25-Inch Removable-Media Drive Note The server's EMI integrity and cooling are both protected by having the left front bays covered or occupied. When you install a drive, save the filler panel from the bay, in case you later remove the drive and do not replace it with another. 1 Screws 2 Filler panel with EMI shield 3 Slide rails 4 Drive To install a removable-media drive in one of the left front bays: 1. Power-off the server and peripheral devices and remove the top cover (see "Cover (Top)" on page 72). 2. Remove the media bay trim bezel, which covers the screws 1 on the bay filler panels 2 : a. Release the two tabs at the bottom edge of the bezel and pull the bottom of the bezel slightly away from the server. b. Pull the bezel down to release the two tabs at the top edge of the bezel. Set the bezel aside. 3. Remove the screws 1 and filler panel 2 from the bay opening. Save the panel and screws for later use. 4. Touch the static-protective bag containing the drive to any unpainted metal surface on the server; then, 56 Netfinity Server HMM
-
 1
1 -
2
-
3
-
4
-
5
-
6
-
7
-
8
-
9
-
10
-
11
-
12
-
13
-
14
-
15
-
16
-
17
-
18
-
19
-
20
-
21
-
22
-
23
-
24
-
25
-
26
-
27
-
28
-
29
-
30
-
31
-
32
-
33
-
34
-
35
-
36
-
37
-
38
-
39
-
40
-
41
-
42
-
43
-
44
-
45
-
46
-
47
-
48
-
49
-
50
-
51
-
52
-
53
-
54
-
55
-
56
-
57
-
58
-
 59
59 -
 60
60 -
 61
61 -
 62
62 -
 63
63 -
 64
64 -
 65
65 -
 66
66 -
 67
67 -
 68
68 -
 69
69 -
70
-
71
-
72
-
73
-
74
-
75
-
76
-
77
-
78
-
79
-
80
-
81
-
82
-
83
-
84
-
85
-
86
-
87
-
88
-
89
-
90
-
91
-
92
-
93
-
94
-
95
-
96
-
97
-
98
-
99
-
100
-
101
-
102
-
103
-
104
-
105
-
106
-
107
-
108
-
109
-
110
-
111
-
112
-
113
-
114
-
115
-
116
-
117
-
118
-
119
-
120
-
121
-
122
-
123
-
124
-
125
-
126
-
127
-
128
-
129
-
130
-
131
-
132
-
133
-
134
-
135
-
136
-
137
-
138
-
139
-
140
-
141
-
142
-
143
-
144
-
145
-
146
-
147
-
148
-
149
-
150
-
151
-
152
-
153
-
154
-
155
-
156
-
157
-
158
-
159
-
160
-
161
-
162
-
163
-
164
-
165
-
166
-
167
-
168
-
169
-
170
-
171
-
172
-
173
-
174
-
175
-
176
-
177
-
178
-
179
-
180
-
181
-
182
-
183
-
184
-
185
-
186
-
187
-
188
-
189
-
190
-
191
-
192
-
193
-
194
-
195
-
196
-
197
-
198
-
199
-
200
-
201
-
202
-
203
-
204
-
205
-
206
 |
 |
