IBM 8651RM0 Hardware Maintenance Manual - Page 89
attach the drive to the tray.
 |
UPC - 087944340508
View all IBM 8651RM0 manuals
Add to My Manuals
Save this manual to your list of manuals |
Page 89 highlights
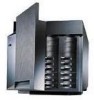
1 Hard disk drive 2 Drive tray handle (open position) 3. Remove the hard disk drive from the tray: a. If the drive is a half-high drive, remove the two screws 6 that hold the connector 5 to the hot-swap tray 3 ; then, remove the connector from the back of the drive. b. Remove the four screws 1 or 2 that attach the drive 4 to the hot-swap tray, and remove the drive from the tray. 4. Place the new hard disk drive on the hot-swap tray and attach the drive to the tray using four screws, as follows: a. If the drive is a half-high drive, use screws 1 to attach the drive to the tray. If the drive is a slim-high drive, use screws in holes 2 to attach the drive to the tray. b. As you tighten each screw, press on the metal spring nearest the screw at the point indicated by the arrow on the illustration. c. If the drive is a half-high drive, plug the connector 5 to the back of the drive and secure the connector to the drive with screws 6. IBM Netfinity 7000 - Type 8651 81
-
 1
1 -
2
-
3
-
4
-
5
-
6
-
7
-
8
-
9
-
10
-
11
-
12
-
13
-
14
-
15
-
16
-
17
-
18
-
19
-
20
-
21
-
22
-
23
-
24
-
25
-
26
-
27
-
28
-
29
-
30
-
31
-
32
-
33
-
34
-
35
-
36
-
37
-
38
-
39
-
40
-
41
-
42
-
43
-
44
-
45
-
46
-
47
-
48
-
49
-
50
-
51
-
52
-
53
-
54
-
55
-
56
-
57
-
58
-
59
-
60
-
61
-
62
-
63
-
64
-
65
-
66
-
67
-
68
-
69
-
70
-
71
-
72
-
73
-
74
-
75
-
76
-
77
-
78
-
79
-
80
-
81
-
82
-
83
-
 84
84 -
 85
85 -
 86
86 -
 87
87 -
 88
88 -
 89
89 -
 90
90 -
 91
91 -
 92
92 -
 93
93 -
 94
94 -
95
-
96
-
97
-
98
-
99
-
100
-
101
-
102
-
103
-
104
-
105
-
106
-
107
-
108
-
109
-
110
-
111
-
112
-
113
-
114
-
115
-
116
-
117
-
118
-
119
-
120
-
121
-
122
-
123
-
124
-
125
-
126
-
127
-
128
-
129
-
130
-
131
-
132
-
133
-
134
-
135
-
136
-
137
-
138
-
139
-
140
-
141
-
142
-
143
-
144
-
145
-
146
-
147
-
148
-
149
-
150
-
151
-
152
-
153
-
154
-
155
-
156
-
157
-
158
-
159
-
160
-
161
-
162
-
163
-
164
-
165
-
166
-
167
-
168
-
169
-
170
-
171
-
172
-
173
-
174
-
175
-
176
-
177
-
178
-
179
-
180
-
181
-
182
-
183
-
184
-
185
-
186
-
187
-
188
-
189
-
190
-
191
-
192
-
193
-
194
-
195
-
196
-
197
-
198
-
199
-
200
-
201
-
202
-
203
-
204
-
205
-
206
 |
 |
