IBM 8651RM0 Hardware Maintenance Manual - Page 88
Hot-Swap Drive Replacement
 |
UPC - 087944340508
View all IBM 8651RM0 manuals
Add to My Manuals
Save this manual to your list of manuals |
Page 88 highlights
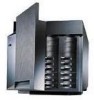
Hot-Swap Drive Replacement Note You do not have to power-off the server to remove a drive from the hot-swap bays. If the amber Hard Disk Status light for a drive is lit continuously, that individual drive is faulty and needs to be replaced. Attention Before you hot-swap a drive, make sure it is defective. If you partially or completely remove a good drive instead of a defective one, the server might lose valuable data. This situation is especially relevant if the server has a RAID adapter installed and you assigned RAID level 1 or 5 to the logical drives in the disk array. However, the RAID adapter can rebuild the data that you need, provided that certain conditions are met. Refer to the RAID adapter documentation for further details. To replace a drive in a hot-swap bay, do the following: 1. Unlock and open the server door. Attention To maintain proper system cooling, do not operate the server for more than two minutes without either a drive or a filler panel installed for each bay. 2. Remove the defective hard disk drive 1 by placing the handle 2 on the drive to the open position (perpendicular to the drive) and pulling the hot-swap tray from the bay. 80 Netfinity Server HMM
-
 1
1 -
2
-
3
-
4
-
5
-
6
-
7
-
8
-
9
-
10
-
11
-
12
-
13
-
14
-
15
-
16
-
17
-
18
-
19
-
20
-
21
-
22
-
23
-
24
-
25
-
26
-
27
-
28
-
29
-
30
-
31
-
32
-
33
-
34
-
35
-
36
-
37
-
38
-
39
-
40
-
41
-
42
-
43
-
44
-
45
-
46
-
47
-
48
-
49
-
50
-
51
-
52
-
53
-
54
-
55
-
56
-
57
-
58
-
59
-
60
-
61
-
62
-
63
-
64
-
65
-
66
-
67
-
68
-
69
-
70
-
71
-
72
-
73
-
74
-
75
-
76
-
77
-
78
-
79
-
80
-
81
-
82
-
 83
83 -
 84
84 -
 85
85 -
 86
86 -
 87
87 -
 88
88 -
 89
89 -
 90
90 -
 91
91 -
 92
92 -
 93
93 -
94
-
95
-
96
-
97
-
98
-
99
-
100
-
101
-
102
-
103
-
104
-
105
-
106
-
107
-
108
-
109
-
110
-
111
-
112
-
113
-
114
-
115
-
116
-
117
-
118
-
119
-
120
-
121
-
122
-
123
-
124
-
125
-
126
-
127
-
128
-
129
-
130
-
131
-
132
-
133
-
134
-
135
-
136
-
137
-
138
-
139
-
140
-
141
-
142
-
143
-
144
-
145
-
146
-
147
-
148
-
149
-
150
-
151
-
152
-
153
-
154
-
155
-
156
-
157
-
158
-
159
-
160
-
161
-
162
-
163
-
164
-
165
-
166
-
167
-
168
-
169
-
170
-
171
-
172
-
173
-
174
-
175
-
176
-
177
-
178
-
179
-
180
-
181
-
182
-
183
-
184
-
185
-
186
-
187
-
188
-
189
-
190
-
191
-
192
-
193
-
194
-
195
-
196
-
197
-
198
-
199
-
200
-
201
-
202
-
203
-
204
-
205
-
206
 |
 |
