IBM 8651RM0 Hardware Maintenance Manual - Page 65
SCSI ports A and B
 |
UPC - 087944340508
View all IBM 8651RM0 manuals
Add to My Manuals
Save this manual to your list of manuals |
Page 65 highlights
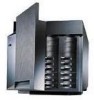
remove the drive from the bag and place it on a static-protective surface. 5. Set any jumpers or switches on the drive according to the documentation that comes with the drive. 6. Use screws of the appropriate size and length to attach a slide rail 3 to each side of the drive 4 . Note The slide rails and screws are included in the drive accessory kit that comes with the server. 7. Place the drive so that the slide rails engage in the bay guide rails. Push the drive into the bay and attach it with the two screws 1 from the filler panel. 1 Air baffle 2 Shuttle-support rail 3 Drive 4 Opening in shuttle 5 4-drop SCSI cable 6 SCSI ports A and B 7 Screws 8 Shuttle 8. Loosen the four screws 7 on the shuttle at the back of the server. 9. Pull the shuttle 8 toward the back of the server. 10. Observe the way the edges of the air baffle 1 fit inside the shuttle-support rails 2 ; then, slide the air baffle toward the rear of the server and lift it out of the server. 11. If you have not previously done so, install the 4-drop SCSI cable: a. Disconnect the SCSI cable from either SCSI port A or B 6 on the system board. (SCSI port A is connected to the hot-swap backplane for the IBM Netfinity 7000 - Type 8651 57
-
 1
1 -
2
-
3
-
4
-
5
-
6
-
7
-
8
-
9
-
10
-
11
-
12
-
13
-
14
-
15
-
16
-
17
-
18
-
19
-
20
-
21
-
22
-
23
-
24
-
25
-
26
-
27
-
28
-
29
-
30
-
31
-
32
-
33
-
34
-
35
-
36
-
37
-
38
-
39
-
40
-
41
-
42
-
43
-
44
-
45
-
46
-
47
-
48
-
49
-
50
-
51
-
52
-
53
-
54
-
55
-
56
-
57
-
58
-
59
-
 60
60 -
 61
61 -
 62
62 -
 63
63 -
 64
64 -
 65
65 -
 66
66 -
 67
67 -
 68
68 -
 69
69 -
 70
70 -
71
-
72
-
73
-
74
-
75
-
76
-
77
-
78
-
79
-
80
-
81
-
82
-
83
-
84
-
85
-
86
-
87
-
88
-
89
-
90
-
91
-
92
-
93
-
94
-
95
-
96
-
97
-
98
-
99
-
100
-
101
-
102
-
103
-
104
-
105
-
106
-
107
-
108
-
109
-
110
-
111
-
112
-
113
-
114
-
115
-
116
-
117
-
118
-
119
-
120
-
121
-
122
-
123
-
124
-
125
-
126
-
127
-
128
-
129
-
130
-
131
-
132
-
133
-
134
-
135
-
136
-
137
-
138
-
139
-
140
-
141
-
142
-
143
-
144
-
145
-
146
-
147
-
148
-
149
-
150
-
151
-
152
-
153
-
154
-
155
-
156
-
157
-
158
-
159
-
160
-
161
-
162
-
163
-
164
-
165
-
166
-
167
-
168
-
169
-
170
-
171
-
172
-
173
-
174
-
175
-
176
-
177
-
178
-
179
-
180
-
181
-
182
-
183
-
184
-
185
-
186
-
187
-
188
-
189
-
190
-
191
-
192
-
193
-
194
-
195
-
196
-
197
-
198
-
199
-
200
-
201
-
202
-
203
-
204
-
205
-
206
 |
 |
