IBM 8651RM0 Hardware Maintenance Manual - Page 87
configuration requirements.
 |
UPC - 087944340508
View all IBM 8651RM0 manuals
Add to My Manuals
Save this manual to your list of manuals |
Page 87 highlights
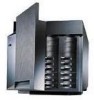
To install a drive in a hot-swap bay, do the following: 1. Unlock and open the server door. Attention To maintain proper system cooling, do not operate the server for more than two minutes without either a drive or a filler panel installed in each bay. 2. Remove the filler panel 1 from one of the empty hot-swap bays by inserting your finger into the depression at the left side of the filler panel and pulling it away from the server. 3. Install the hard disk drive 2 in the hot-swap bay: a. Ensure the tray handle 3 is open (that is, perpendicular to the drive). b. Align the drive/tray assembly so that it engages the guide rails in the bay. c. Gently push the drive assembly into the bay until the drive connects to the backplane. d. Push the tray handle to the right until it locks. 4. Check the hard disk drive status indicators to verify that the hard disk drives are operating properly. See "Status Indicators" on page 18 for details. 5. Close and lock the server door. 6. If the server has a RAID adapter installed, refer to the RAID adapter documentation for details about configuration requirements. IBM Netfinity 7000 - Type 8651 79
-
 1
1 -
2
-
3
-
4
-
5
-
6
-
7
-
8
-
9
-
10
-
11
-
12
-
13
-
14
-
15
-
16
-
17
-
18
-
19
-
20
-
21
-
22
-
23
-
24
-
25
-
26
-
27
-
28
-
29
-
30
-
31
-
32
-
33
-
34
-
35
-
36
-
37
-
38
-
39
-
40
-
41
-
42
-
43
-
44
-
45
-
46
-
47
-
48
-
49
-
50
-
51
-
52
-
53
-
54
-
55
-
56
-
57
-
58
-
59
-
60
-
61
-
62
-
63
-
64
-
65
-
66
-
67
-
68
-
69
-
70
-
71
-
72
-
73
-
74
-
75
-
76
-
77
-
78
-
79
-
80
-
81
-
 82
82 -
 83
83 -
 84
84 -
 85
85 -
 86
86 -
 87
87 -
 88
88 -
 89
89 -
 90
90 -
 91
91 -
 92
92 -
93
-
94
-
95
-
96
-
97
-
98
-
99
-
100
-
101
-
102
-
103
-
104
-
105
-
106
-
107
-
108
-
109
-
110
-
111
-
112
-
113
-
114
-
115
-
116
-
117
-
118
-
119
-
120
-
121
-
122
-
123
-
124
-
125
-
126
-
127
-
128
-
129
-
130
-
131
-
132
-
133
-
134
-
135
-
136
-
137
-
138
-
139
-
140
-
141
-
142
-
143
-
144
-
145
-
146
-
147
-
148
-
149
-
150
-
151
-
152
-
153
-
154
-
155
-
156
-
157
-
158
-
159
-
160
-
161
-
162
-
163
-
164
-
165
-
166
-
167
-
168
-
169
-
170
-
171
-
172
-
173
-
174
-
175
-
176
-
177
-
178
-
179
-
180
-
181
-
182
-
183
-
184
-
185
-
186
-
187
-
188
-
189
-
190
-
191
-
192
-
193
-
194
-
195
-
196
-
197
-
198
-
199
-
200
-
201
-
202
-
203
-
204
-
205
-
206
 |
 |
