IBM 8651RM0 Hardware Maintenance Manual - Page 98
Hot-Swap Power Supply Removal
 |
UPC - 087944340508
View all IBM 8651RM0 manuals
Add to My Manuals
Save this manual to your list of manuals |
Page 98 highlights
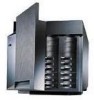
Hot-Swap Power Supply Removal: The server comes with two power supplies. You can add a third power supply to provide redundant power. Each power supply has two status indicators; refer to "Power Supply Status Indicators" on page 18 for information about the status indicators. Refer to the illustration in "Hot-Swap Power Supply Installation" on page 86 while performing the steps in this procedure. To remove a hot-swap power supply: 1. Locate the power supply 1 that you want to remove. Attention Do not remove a power supply without first turning the Power switch on the power supply to the Off position. . 2. Set the Power switch 3 on the power supply you are removing to the Off position. Attention When you remove a power supply, first, loosen completely the bottom screw that attaches the power supply to the server; then, loosen the top screw. Failure to do so can damage the power supply. For proper system cooling, do not operate the server for more than two minutes without a power supply or a filler panel installed for each of the power-supply bays. 3. Loosen completely the bottom screw 2 on the the back of the power supply; then, loosen the top screw 6. Caution Never remove the cover on a power supply. Hazardous voltage, current, and energy levels are present inside the power supplies. There are no serviceable parts inside the power supplies. 4. Grasp the handle on the power supply; then, slide the power supply out of the chassis. 5. If you are not installing a replacement power supply, install a power-supply filler panel. If you are replacing the power supply: 90 Netfinity Server HMM
-
 1
1 -
2
-
3
-
4
-
5
-
6
-
7
-
8
-
9
-
10
-
11
-
12
-
13
-
14
-
15
-
16
-
17
-
18
-
19
-
20
-
21
-
22
-
23
-
24
-
25
-
26
-
27
-
28
-
29
-
30
-
31
-
32
-
33
-
34
-
35
-
36
-
37
-
38
-
39
-
40
-
41
-
42
-
43
-
44
-
45
-
46
-
47
-
48
-
49
-
50
-
51
-
52
-
53
-
54
-
55
-
56
-
57
-
58
-
59
-
60
-
61
-
62
-
63
-
64
-
65
-
66
-
67
-
68
-
69
-
70
-
71
-
72
-
73
-
74
-
75
-
76
-
77
-
78
-
79
-
80
-
81
-
82
-
83
-
84
-
85
-
86
-
87
-
88
-
89
-
90
-
91
-
92
-
 93
93 -
 94
94 -
 95
95 -
 96
96 -
 97
97 -
 98
98 -
 99
99 -
 100
100 -
 101
101 -
 102
102 -
 103
103 -
104
-
105
-
106
-
107
-
108
-
109
-
110
-
111
-
112
-
113
-
114
-
115
-
116
-
117
-
118
-
119
-
120
-
121
-
122
-
123
-
124
-
125
-
126
-
127
-
128
-
129
-
130
-
131
-
132
-
133
-
134
-
135
-
136
-
137
-
138
-
139
-
140
-
141
-
142
-
143
-
144
-
145
-
146
-
147
-
148
-
149
-
150
-
151
-
152
-
153
-
154
-
155
-
156
-
157
-
158
-
159
-
160
-
161
-
162
-
163
-
164
-
165
-
166
-
167
-
168
-
169
-
170
-
171
-
172
-
173
-
174
-
175
-
176
-
177
-
178
-
179
-
180
-
181
-
182
-
183
-
184
-
185
-
186
-
187
-
188
-
189
-
190
-
191
-
192
-
193
-
194
-
195
-
196
-
197
-
198
-
199
-
200
-
201
-
202
-
203
-
204
-
205
-
206
 |
 |
