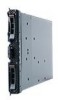
IBM HS22 User Guide - Page 42
Removing a hot-swap storage drive - hard drive
 |
UPC - 883436054232
View all IBM HS22 manuals
Add to My Manuals
Save this manual to your list of manuals |
Page 42 highlights
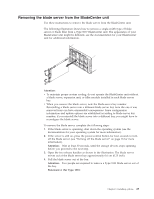
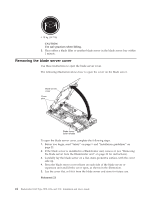
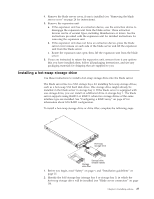
3. If a storage-bay filler is installed, remove it from the blade server by pulling the release lever and sliding the filler away from the blade server (see "Removing a hot-swap storage drive"). 4. Touch the static-protective package that contains the hot-swap storage drive to any unpainted metal surface on the BladeCenter unit or any unpainted metal surface on any other grounded rack component; then, remove the hard disk drive from the package. 5. Open the release lever on the hot-swap storage drive and slide the drive into the storage bay until it is firmly seated in the connector. 6. Lock the hot-swap storage drive into place by closing the release lever. If you have other devices to install or remove, do so now; otherwise, go to "Completing the installation" on page 54. Removing a hot-swap storage drive Use this information to remove a hot-swap storage drive. The blade server has two SAS hot-swap storage bays for installing or removing hot-swap storage devices, such as a SAS storage drive. To remove a hot-swap hard disk drive or drive filler, complete the following steps. 1. Before you begin, read "Safety" on page v and "Installation guidelines" on page 21. 2. Press the release latch (orange) on the storage drive to release the drive handle. 3. Pull the release handle to remove the drive from the storage bay. 28 BladeCenter HS22 Type 7870, 1936, and 1911: Installation and User's Guide
-
 1
1 -
2
-
3
-
4
-
5
-
6
-
7
-
8
-
9
-
10
-
11
-
12
-
13
-
14
-
15
-
16
-
17
-
18
-
19
-
20
-
21
-
22
-
23
-
24
-
25
-
26
-
27
-
28
-
29
-
30
-
31
-
32
-
33
-
34
-
35
-
36
-
 37
37 -
 38
38 -
 39
39 -
 40
40 -
 41
41 -
 42
42 -
 43
43 -
 44
44 -
 45
45 -
 46
46 -
 47
47 -
48
-
49
-
50
-
51
-
52
-
53
-
54
-
55
-
56
-
57
-
58
-
59
-
60
-
61
-
62
-
63
-
64
-
65
-
66
-
67
-
68
-
69
-
70
-
71
-
72
-
73
-
74
-
75
-
76
-
77
-
78
-
79
-
80
-
81
-
82
-
83
-
84
-
85
-
86
-
87
-
88
-
89
-
90
-
91
-
92
-
93
-
94
-
95
-
96
-
97
-
98
-
99
-
100
-
101
-
102
-
103
-
104
-
105
-
106
-
107
-
108
-
109
-
110
 |
 |
