IBM HS22 User Guide - Page 56
Thermal grease, Installing a memory module on for more information on installing
 |
UPC - 883436054232
View all IBM HS22 manuals
Add to My Manuals
Save this manual to your list of manuals |
Page 56 highlights
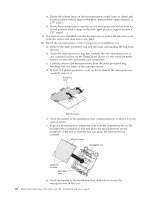
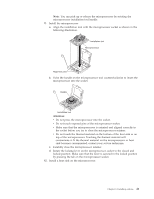
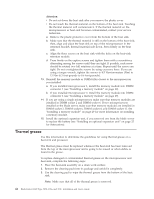
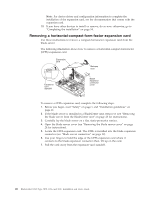
Attention: v Do not set down the heat sink after you remove the plastic cover. v Do not touch the thermal material on the bottom of the heat sink. Touching the thermal material will contaminate it. If the thermal material on the microprocessor or heat sink becomes contaminated, contact your service technician. a. Remove the plastic protective cover from the bottom of the heat sink. b. Make sure that the thermal material is still on the bottom of the heat sink; then, align and place the heat sink on top of the microprocessor in the retention bracket, thermal material side down. Press firmly on the heat sink. c. Align the three screws on the heat sink with the holes on the heat-sink retention module. d. Press firmly on the captive screws and tighten them with a screwdriver, alternating among the screws until they are tight. If possible, each screw should be rotated two full rotations at a time. Repeat until the screws are tight. Do not overtighten the screws by using excessive force. If you are using a torque wrench, tighten the screws to 8.5 Newton-meters (Nm) to 13 Nm (6.3 foot-pounds to 9.6 foot-pounds). 13. Reinstall the memory module or DIMM filler closest to the microprocessor you installed. a. If you installed microprocessor 1, install the memory module into DIMM connector 1 (see "Installing a memory module" on page 29). b. If you installed microprocessor 2, install the memory module into DIMM connector 6 (see "Installing a memory module" on page 29). 14. If you are using a single microprocessor, make sure that memory modules are installed in DIMM socket 2 and DIMM socket 6. If two microprocessors installed in the blade server, make sure that memory modules are installed in DIMM socket 2, DIMM socket 6, DIMM socket 8, and DIMM socket 12. See "Installing a memory module" on page 29 for more information on installing a memory module. 15. Install the optional expansion unit, if you removed one from the blade server to replace the battery (see "Installing an optional expansion unit" on page 25 for instructions). Thermal grease Use this information to determine the guidelines for using thermal grease on a heat sink and processor. The thermal grease must be replaced whenever the heat sink has been removed from the top of the microprocessor and is going to be reused or when debris is found in the grease. To replace damaged or contaminated thermal grease on the microprocessor and heat sink, complete the following steps: 1. Place the heat-sink assembly on a clean work surface. 2. Remove the cleaning pad from its package and unfold it completely. 3. Use the cleaning pad to wipe the thermal grease from the bottom of the heat sink. Note: Make sure that all of the thermal grease is removed. 42 BladeCenter HS22 Type 7870, 1936, and 1911: Installation and User's Guide
-
 1
1 -
2
-
3
-
4
-
5
-
6
-
7
-
8
-
9
-
10
-
11
-
12
-
13
-
14
-
15
-
16
-
17
-
18
-
19
-
20
-
21
-
22
-
23
-
24
-
25
-
26
-
27
-
28
-
29
-
30
-
31
-
32
-
33
-
34
-
35
-
36
-
37
-
38
-
39
-
40
-
41
-
42
-
43
-
44
-
45
-
46
-
47
-
48
-
49
-
50
-
 51
51 -
 52
52 -
 53
53 -
 54
54 -
 55
55 -
 56
56 -
 57
57 -
 58
58 -
 59
59 -
 60
60 -
 61
61 -
62
-
63
-
64
-
65
-
66
-
67
-
68
-
69
-
70
-
71
-
72
-
73
-
74
-
75
-
76
-
77
-
78
-
79
-
80
-
81
-
82
-
83
-
84
-
85
-
86
-
87
-
88
-
89
-
90
-
91
-
92
-
93
-
94
-
95
-
96
-
97
-
98
-
99
-
100
-
101
-
102
-
103
-
104
-
105
-
106
-
107
-
108
-
109
-
110
 |
 |
