IBM HS22 User Guide - Page 63
Installing a storage interface card
 |
UPC - 883436054232
View all IBM HS22 manuals
Add to My Manuals
Save this manual to your list of manuals |
Page 63 highlights
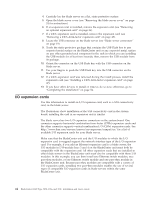
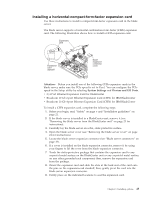
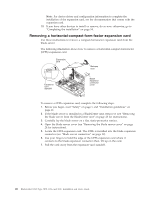
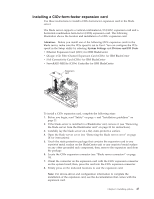
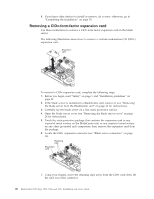
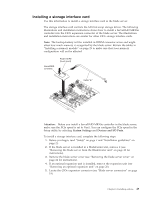
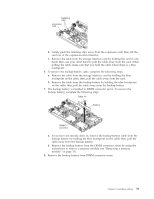
Installing a storage interface card Use this information to install a storage interface card in the blade server. The storage interface card controls the SAS hot-swap storage drives. The following illustrations and installation instructions shows how to install a ServeRAID-MR10ie controller into the CIOv expansion connector of the blade server. The illustrations and installation instructions are similar for other CIOv storage interface cards. Note: The backup-battery will be installed in DIMM connector seven and might affect how much memory is recognized by the blade server. Review the tables in "Installing a memory module" on page 29 to make sure that your memory configuration will not be affected. Attention: Before you install a ServeRAID-MR10ie controller in the blade server, make sure the PCIe speed is set to Gen1. You can configure the PCIe speed in the Setup utility by selecting System Settings and Devices and I/O Ports. To install a storage interface card, complete the following steps. 1. Before you begin, read "Safety" on page v and "Installation guidelines" on page 21. 2. If the blade server is installed in a BladeCenter unit, remove it (see "Removing the blade server from the BladeCenter unit" on page 23 for instructions). 3. Remove the blade server cover (see "Removing the blade server cover" on page 24 for instructions). 4. If an optional expansion unit is installed, remove the expansion unit (see "Removing an optional expansion unit" on page 26). 5. Locate the CIOv expansion connector (see "Blade server connectors" on page 19). Chapter 3. Installing options 49
-
 1
1 -
2
-
3
-
4
-
5
-
6
-
7
-
8
-
9
-
10
-
11
-
12
-
13
-
14
-
15
-
16
-
17
-
18
-
19
-
20
-
21
-
22
-
23
-
24
-
25
-
26
-
27
-
28
-
29
-
30
-
31
-
32
-
33
-
34
-
35
-
36
-
37
-
38
-
39
-
40
-
41
-
42
-
43
-
44
-
45
-
46
-
47
-
48
-
49
-
50
-
51
-
52
-
53
-
54
-
55
-
56
-
57
-
 58
58 -
 59
59 -
 60
60 -
 61
61 -
 62
62 -
 63
63 -
 64
64 -
 65
65 -
 66
66 -
 67
67 -
 68
68 -
69
-
70
-
71
-
72
-
73
-
74
-
75
-
76
-
77
-
78
-
79
-
80
-
81
-
82
-
83
-
84
-
85
-
86
-
87
-
88
-
89
-
90
-
91
-
92
-
93
-
94
-
95
-
96
-
97
-
98
-
99
-
100
-
101
-
102
-
103
-
104
-
105
-
106
-
107
-
108
-
109
-
110
 |
 |
