IBM HS22 User Guide - Page 54
touching only the edges of the microprocessor. - chassis
 |
UPC - 883436054232
View all IBM HS22 manuals
Add to My Manuals
Save this manual to your list of manuals |
Page 54 highlights
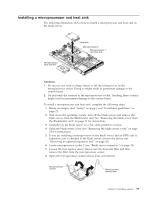
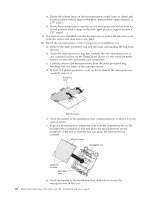
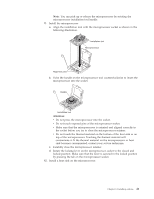
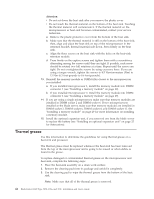
a. Rotate the release lever on the microprocessor socket from its closed and locked position until it stops in the fully open position (approximately a 135° angle). b. Rotate the microprocessor retainer on the microprocessor socket from its closed position until it stops in the fully open position (approximately a 135° angle). 9. If a dust cover is installed over the microprocessor socket, lift the dust cover from the socket and store it in a safe place. 10. Install the microprocessor in the microprocessor installation tool. a. Remove the static-protective bag and the foam surrounding the bag from the box. b. Touch the static-protective bag that contains the new microprocessor to any unpainted surface on the BladeCenter chassis or any unpainted metal surface on any other grounded rack component. c. Carefully remove the microprocessor from the static-protective bag, touching only the edges of the microprocessor. d. If there is a plastic protective cover on the bottom of the microprocessor, carefully remove it. Protective cover Microprocessor e. Twist the handle of the installation tool counterclockwise so that it is in the open position. f. Align the microprocessor alignment slots with the alignment pins on the microprocessor installation tool and place the microprocessor on the underside of the tool so that the tool can grasp the microprocessor correctly. Microprocessor Installation tool Alignment pin slots Alignment pins g. Twist the handle of the installation tool clockwise to secure the microprocessor in the tool. 40 BladeCenter HS22 Type 7870, 1936, and 1911: Installation and User's Guide
-
 1
1 -
2
-
3
-
4
-
5
-
6
-
7
-
8
-
9
-
10
-
11
-
12
-
13
-
14
-
15
-
16
-
17
-
18
-
19
-
20
-
21
-
22
-
23
-
24
-
25
-
26
-
27
-
28
-
29
-
30
-
31
-
32
-
33
-
34
-
35
-
36
-
37
-
38
-
39
-
40
-
41
-
42
-
43
-
44
-
45
-
46
-
47
-
48
-
 49
49 -
 50
50 -
 51
51 -
 52
52 -
 53
53 -
 54
54 -
 55
55 -
 56
56 -
 57
57 -
 58
58 -
 59
59 -
60
-
61
-
62
-
63
-
64
-
65
-
66
-
67
-
68
-
69
-
70
-
71
-
72
-
73
-
74
-
75
-
76
-
77
-
78
-
79
-
80
-
81
-
82
-
83
-
84
-
85
-
86
-
87
-
88
-
89
-
90
-
91
-
92
-
93
-
94
-
95
-
96
-
97
-
98
-
99
-
100
-
101
-
102
-
103
-
104
-
105
-
106
-
107
-
108
-
109
-
110
 |
 |
