IBM HS22 User Guide - Page 55
Attention, sink becomes contaminated, contact your service technician.
 |
UPC - 883436054232
View all IBM HS22 manuals
Add to My Manuals
Save this manual to your list of manuals |
Page 55 highlights
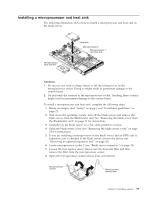
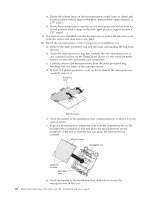
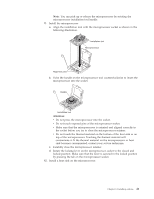
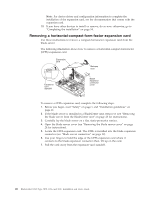
Note: You can pick up or release the microprocessor by twisting the microprocessor installation tool handle. 11. Install the microprocessor. a. Align the installation tool with the microprocessor socket as shown in the following illustration. Installation tool Microprocessor Alignment pins b. Twist the handle on the microprocessor tool counterclockwise to insert the microprocessor into the socket. Handle Installation tool Attention: v Do not press the microprocessor into the socket. v Do not touch exposed pins of the microprocessor socket. v Make sure that the microprocessor is oriented and aligned correctly in the socket before you try to close the microprocessor retainer. v Do not touch the thermal material on the bottom of the heat sink or on top of the microprocessor. Touching the thermal material will contaminate it. If the thermal material on the microprocessor or heat sink becomes contaminated, contact your service technician. c. Carefully close the microprocessor retainer. d. Rotate the locking lever on the microprocessor socket to the closed and locked position. Make sure that the lever is secured in the locked position by pressing the tab on the microprocessor socket. 12. Install a heat sink on the microprocessor. Chapter 3. Installing options 41
-
 1
1 -
2
-
3
-
4
-
5
-
6
-
7
-
8
-
9
-
10
-
11
-
12
-
13
-
14
-
15
-
16
-
17
-
18
-
19
-
20
-
21
-
22
-
23
-
24
-
25
-
26
-
27
-
28
-
29
-
30
-
31
-
32
-
33
-
34
-
35
-
36
-
37
-
38
-
39
-
40
-
41
-
42
-
43
-
44
-
45
-
46
-
47
-
48
-
49
-
 50
50 -
 51
51 -
 52
52 -
 53
53 -
 54
54 -
 55
55 -
 56
56 -
 57
57 -
 58
58 -
 59
59 -
 60
60 -
61
-
62
-
63
-
64
-
65
-
66
-
67
-
68
-
69
-
70
-
71
-
72
-
73
-
74
-
75
-
76
-
77
-
78
-
79
-
80
-
81
-
82
-
83
-
84
-
85
-
86
-
87
-
88
-
89
-
90
-
91
-
92
-
93
-
94
-
95
-
96
-
97
-
98
-
99
-
100
-
101
-
102
-
103
-
104
-
105
-
106
-
107
-
108
-
109
-
110
 |
 |
