IBM HS22 User Guide - Page 59
Installing a horizontal-compact-form-factor expansion card, Attention, System Settings - end of support
 |
UPC - 883436054232
View all IBM HS22 manuals
Add to My Manuals
Save this manual to your list of manuals |
Page 59 highlights
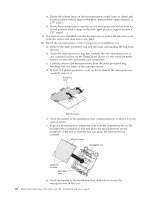
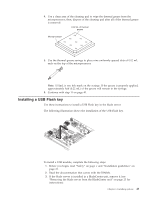
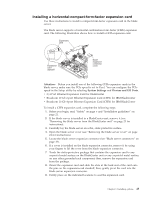
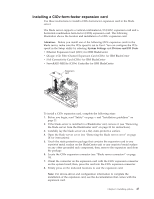
Installing a horizontal-compact-form-factor expansion card Use these instructions to install a compact-form-factor expansion card in the blade server. The blade server supports a horizontal-combination-form-factor (CFFh) expansion card. The following illustration shows how to install a CFFh expansion card. Expansion card Expansion card standoff Blade expansion connector cover Attention: Before you install one of the following CFFh expansion cards in the blade server, make sure the PCIe speed is set to Gen1. You can configure the PCIe speed in the Setup utility by selecting System Settings and Devices and I/O Ports. v 2/4 Port Ethernet Expansion Card for BladeCenter v Broadcom 10 Gb 2-port Ethernet Expansion Card (CFFh) for IBM BladeCenter v Broadcom 10 Gb 4-port Ethernet Expansion Card (CFFh) for IBM BladeCenter To install a CFFh expansion card, complete the following steps: 1. Before you begin, read "Safety" on page v and "Installation guidelines" on page 21. 2. If the blade server is installed in a BladeCenter unit, remove it (see "Removing the blade server from the BladeCenter unit" on page 23 for instructions). 3. Carefully lay the blade server on a flat, static-protective surface. 4. Open the blade server cover (see "Removing the blade server cover" on page 24 for instructions). 5. Locate the blade server expansion connector (see "Blade server connectors" on page 19). 6. If a cover is installed on the blade expansion connector, remove it by using your fingers to lift the cover from the blade expansion connector. 7. Touch the static-protective package that contains the expansion card to any unpainted metal surface on the BladeCenter unit or any unpainted metal surface on any other grounded rack component; then, remove the expansion card from the package. 8. Orient the expansion card and slide the slots at the back end of the card onto the pins on the expansion-card standoff; then, gently pivot the card into the blade server expansion connector. 9. Firmly press on the indicated locations to seat the expansion card. Chapter 3. Installing options 45
-
 1
1 -
2
-
3
-
4
-
5
-
6
-
7
-
8
-
9
-
10
-
11
-
12
-
13
-
14
-
15
-
16
-
17
-
18
-
19
-
20
-
21
-
22
-
23
-
24
-
25
-
26
-
27
-
28
-
29
-
30
-
31
-
32
-
33
-
34
-
35
-
36
-
37
-
38
-
39
-
40
-
41
-
42
-
43
-
44
-
45
-
46
-
47
-
48
-
49
-
50
-
51
-
52
-
53
-
 54
54 -
 55
55 -
 56
56 -
 57
57 -
 58
58 -
 59
59 -
 60
60 -
 61
61 -
 62
62 -
 63
63 -
 64
64 -
65
-
66
-
67
-
68
-
69
-
70
-
71
-
72
-
73
-
74
-
75
-
76
-
77
-
78
-
79
-
80
-
81
-
82
-
83
-
84
-
85
-
86
-
87
-
88
-
89
-
90
-
91
-
92
-
93
-
94
-
95
-
96
-
97
-
98
-
99
-
100
-
101
-
102
-
103
-
104
-
105
-
106
-
107
-
108
-
109
-
110
 |
 |
