IBM HS22 User Guide - Page 64
If you are installing a ServeRAID-MR10ie controller, select cable B from, the packaging.
 |
UPC - 883436054232
View all IBM HS22 manuals
Add to My Manuals
Save this manual to your list of manuals |
Page 64 highlights
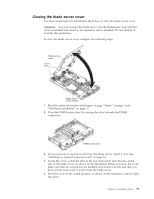
6. Touch the static-protective package that contains the storage interface card to any unpainted metal surface on the BladeCenter unit or any unpainted metal surface on any other grounded rack component; then, remove the storage interface card from the package. 7. If an interposer card is installed on the storage interface card, remove it. a. If the interposer has a pull strap, move the pull strap away from the storage interface card. If the pull strap surrounds the storage interface card, the pull strap will interfere with the removal of the interposer card. b. Press out on the plastic latch that holds the interposer card to the storage interface card and simultaneously lift up on the controller, as shown. c. Separate the interposer card from the storage interface card and store the interposer card in a safe place. 8. Install the backup-battery cable to the storage interface card. a. If you are installing a ServeRAID-MR10ie controller, select cable "B" from the packaging. b. Locate the end of the cable marked "EXPANSION CARD"; then, with the blue side of the cable end facing up, carefully insert the cable end into the cable connector on the ServeRAID controller. 9. Orient the connector on the storage interface card with the CIOv expansion connector on the system board; then, press the storage interface card into the CIOv expansion connector. 10. Firmly press on the indicated locations to seat the storage interface card. 50 BladeCenter HS22 Type 7870, 1936, and 1911: Installation and User's Guide
-
 1
1 -
2
-
3
-
4
-
5
-
6
-
7
-
8
-
9
-
10
-
11
-
12
-
13
-
14
-
15
-
16
-
17
-
18
-
19
-
20
-
21
-
22
-
23
-
24
-
25
-
26
-
27
-
28
-
29
-
30
-
31
-
32
-
33
-
34
-
35
-
36
-
37
-
38
-
39
-
40
-
41
-
42
-
43
-
44
-
45
-
46
-
47
-
48
-
49
-
50
-
51
-
52
-
53
-
54
-
55
-
56
-
57
-
58
-
 59
59 -
 60
60 -
 61
61 -
 62
62 -
 63
63 -
 64
64 -
 65
65 -
 66
66 -
 67
67 -
 68
68 -
 69
69 -
70
-
71
-
72
-
73
-
74
-
75
-
76
-
77
-
78
-
79
-
80
-
81
-
82
-
83
-
84
-
85
-
86
-
87
-
88
-
89
-
90
-
91
-
92
-
93
-
94
-
95
-
96
-
97
-
98
-
99
-
100
-
101
-
102
-
103
-
104
-
105
-
106
-
107
-
108
-
109
-
110
 |
 |
