IBM HS22 User Guide - Page 53
Installing a microprocessor and heat sink
 |
UPC - 883436054232
View all IBM HS22 manuals
Add to My Manuals
Save this manual to your list of manuals |
Page 53 highlights
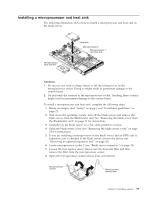
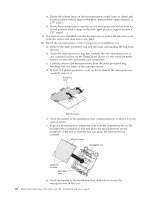
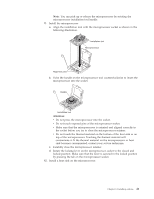
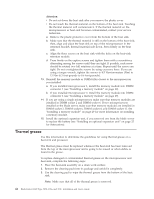
Installing a microprocessor and heat sink The following illustration shows how to install a microprocessor and heat sink in the blade server. Microprocessor heat sink filler Heat sink Microprocessor 2 Microprocessor 1 and heat sink Attention: 1. Do not use any tools or sharp objects to lift the locking lever on the microprocessor socket. Doing so might result in permanent damage to the system board. 2. Do not touch the contacts in the microprocessor socket. Touching these contacts might result in permanent damage to the system board. To install a microprocessor and heat sink, complete the following steps: 1. Before you begin, read "Safety" on page v and "Installation guidelines" on page 21. 2. Shut down the operating system, turn off the blade server, and remove the blade server from the BladeCenter unit. See "Removing the blade server from the BladeCenter unit" on page 23 for instructions. 3. Carefully lay the blade server on a flat, static-protective surface. 4. Open the blade server cover (see "Removing the blade server cover" on page 24 for instructions). 5. If you are installing a microprocessor in the blade server and an MPE unit or expansion unit is attached to the blade server, remove the device (see "Removing an optional expansion unit" on page 26). 6. Locate microprocessor socket 2 (see "Blade server connectors" on page 19). 7. Loosen the four captive screws that secure the heat-sink filler and then remove the filler from the microprocessor socket. 8. Open the microprocessor socket release lever and retainer. Microprocessor retainer Microprocessor release lever Chapter 3. Installing options 39
-
 1
1 -
2
-
3
-
4
-
5
-
6
-
7
-
8
-
9
-
10
-
11
-
12
-
13
-
14
-
15
-
16
-
17
-
18
-
19
-
20
-
21
-
22
-
23
-
24
-
25
-
26
-
27
-
28
-
29
-
30
-
31
-
32
-
33
-
34
-
35
-
36
-
37
-
38
-
39
-
40
-
41
-
42
-
43
-
44
-
45
-
46
-
47
-
 48
48 -
 49
49 -
 50
50 -
 51
51 -
 52
52 -
 53
53 -
 54
54 -
 55
55 -
 56
56 -
 57
57 -
 58
58 -
59
-
60
-
61
-
62
-
63
-
64
-
65
-
66
-
67
-
68
-
69
-
70
-
71
-
72
-
73
-
74
-
75
-
76
-
77
-
78
-
79
-
80
-
81
-
82
-
83
-
84
-
85
-
86
-
87
-
88
-
89
-
90
-
91
-
92
-
93
-
94
-
95
-
96
-
97
-
98
-
99
-
100
-
101
-
102
-
103
-
104
-
105
-
106
-
107
-
108
-
109
-
110
 |
 |
