Konica Minolta AccurioPrint 2100 GBC Binder G1 User Manual - Page 11
Bypass Transfer or Stacking
 |
View all Konica Minolta AccurioPrint 2100 manuals
Add to My Manuals
Save this manual to your list of manuals |
Page 11 highlights
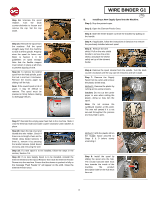
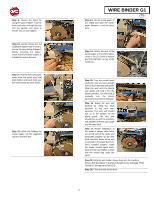
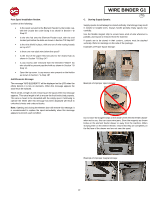
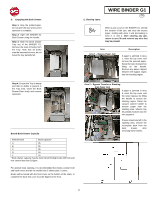
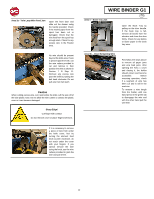
D. Emptying the Book Drawer: Step 1: Stop the printer/copier. Do not open the door until current operation is complete. Step 2: Open the BINDER G1 Book Drawer using the handle. Step 3: Slide the Book Drawer Tray out of the BINDER G1. Remove the stack of books from the Tray. Note that all books must be removed at once, do not leave the tray partially full. Step 4: Ensure the Tray is empty and that no debris is present in the Tray area. Close the Book Drawer Door firmly and resume operation. Bound Book Drawer Capacity Element Size Book capacity* A 35 B 35 C 35 D 30 E 25 * Book drawer capacity may be lower when binding books with front and rear covers less than 216gsm. For optimal book stacking, it is recommended that books contain front and back covers and be no smaller than 5 sheets plus 2 covers. Books will be bound with the front cover on the bottom of the stack, to complete the book this cover must be flipped to the front. E. Clearing Jams: WIRE BINDER G1 GB When a jam occurs in the BINDER G1, identify the location of the jam, and clear the excess paper, starting with Area 1 and proceeding to Area 2, 3, and 4. After clearing any jam, return to area 3b and remove any wire that may be present Area Area 1 - Bypass Paper Jam Description If paper is jammed in Area 1, raise the top cover and remove the jammed paper. Raise the lower transport by lifting on the handle. Remove any paper trapped between the bypass region and the stacking region. Area 2 - Bypass Transfer or Stacking Area Paper Jam If paper is jammed in Area 2, raise the top cover and the lower bypass by lifting the handle to access the stacking region. Raise the vacuum stacker handle to remove paper from the stacking area. Sheets may be partially hooked onto the wire segment. If loose sheets are left in the stacking area, remove the incomplete book from the book drawer, after removing these sheets. 11
-
 1
1 -
2
-
3
-
4
-
5
-
 6
6 -
 7
7 -
 8
8 -
 9
9 -
 10
10 -
 11
11 -
 12
12 -
 13
13 -
 14
14 -
 15
15 -
 16
16 -
17
-
18
-
19
-
20
-
21
-
22
-
23
-
24
-
25
-
26
-
27
-
28
-
29
-
30
-
31
-
32
-
33
-
34
-
35
-
36
-
37
-
38
-
39
-
40
-
41
-
42
-
43
-
44
-
45
-
46
-
47
-
48
-
49
-
50
-
51
-
52
-
53
-
54
-
55
-
56
-
57
-
58
-
59
-
60
-
61
-
62
-
63
-
64
-
65
-
66
-
67
-
68
-
69
-
70
-
71
-
72
-
73
-
74
-
75
-
76
-
77
-
78
-
79
-
80
-
81
-
82
-
83
-
84
-
85
-
86
-
87
-
88
-
89
-
90
-
91
-
92
-
93
-
94
-
95
-
96
-
97
-
98
-
99
-
100
-
101
-
102
-
103
-
104
-
105
-
106
-
107
-
108
-
109
-
110
-
111
-
112
-
113
-
114
-
115
-
116
-
117
-
118
-
119
-
120
-
121
-
122
-
123
-
124
-
125
-
126
-
127
-
128
-
129
-
130
-
131
-
132
-
133
-
134
-
135
-
136
-
137
-
138
-
139
-
140
-
141
-
142
-
143
-
144
-
145
-
146
-
147
-
148
-
149
-
150
-
151
-
152
-
153
-
154
-
155
-
156
-
157
-
158
-
159
-
160
 |
 |
