Konica Minolta AccurioPrint 2100 GBC Binder G1 User Manual - Page 17
E. BINDER G1 Deflector and Alignment Adjustment, Alignment Adjustment
 |
View all Konica Minolta AccurioPrint 2100 manuals
Add to My Manuals
Save this manual to your list of manuals |
Page 17 highlights
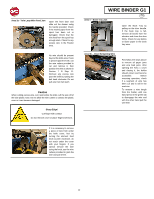
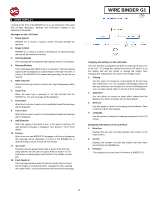
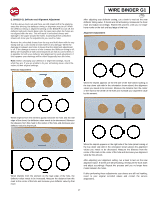
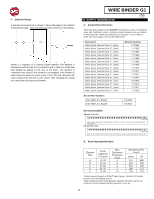
E. BINDER G1 Deflector and Alignment Adjustment If all the above check out and there are still sheets left in the stacking area after binding, the deflector timing or alignment may be off. When the deflector timing or alignment setting on the BINDER G1 are off, the deflector will push sheets down onto the open wire when the holes are not aligned with the wire. This will result in unhooked sheets and damage to the paper around the holes. Examining these unhooked sheets will show you the adjustments you need to make. Remove the unhooked sheets from the tray and hold them with the tray facing side up. Look closely at each hole for any damage. When the damage is between two holes it means that the alignment adjustment is off. If the damage is next to a hole it means the deflector timing is off. Below are examples of both and instructions on how to correct them. It is possible for both your deflector and alignment to need adjustment, if this happens your markings will be offset diagonally from the holes. Note: Before changing your deflector or alignment settings, record what they are. If you are unable to fix your unhooking issue, return the values to their original settings. Deflector Adjustment WIRE BINDER G1 GB After adjusting your deflector setting, run a book to test out the new deflector timing value. If sheets are still unhooking, remeasure the hook mark and adjust accordingly. Repeat this process until you no longer have marks on the trail and lead edge of the hole. Alignment Adjustment When the imprint appears on the left side of the hole (when looking at the tray down side with in the orientation shown above) the alignment values you needs to be increase. Measure the distance from the center of the mark to the center of the hole and increase your alignment value by this amount. When imprints from the element appear between the hole and the trail edge of the sheet, the deflector value needs to be decreased. Measure the distance from this mark to the center of the hole and decrease your deflector value by that much. When imprints from the element on the lead edge of the hole, the deflector value needs to be increased. Measure the distance from this mark to the center of the hole and increase your deflector value by that much. When the imprint appears on the right side of the hole (when looking at the tray down side with in the orientation shown above) the alignment values you needs to be decreased. Measure the distance from the center of the mark to the center of the hole and decrease your alignment value by this amount. After adjusting your alignment setting, run a book to test out the new alignment value. If sheets are still unhooking, remeasure the hook mark and adjust accordingly. Repeat this process until you no longer have marks between the holes. If after performing these adjustments your sheets are still not hooking, revert to your original recorded values and contact the service department. 17
-
 1
1 -
2
-
3
-
4
-
5
-
6
-
7
-
8
-
9
-
10
-
11
-
 12
12 -
 13
13 -
 14
14 -
 15
15 -
 16
16 -
 17
17 -
 18
18 -
 19
19 -
 20
20 -
 21
21 -
 22
22 -
23
-
24
-
25
-
26
-
27
-
28
-
29
-
30
-
31
-
32
-
33
-
34
-
35
-
36
-
37
-
38
-
39
-
40
-
41
-
42
-
43
-
44
-
45
-
46
-
47
-
48
-
49
-
50
-
51
-
52
-
53
-
54
-
55
-
56
-
57
-
58
-
59
-
60
-
61
-
62
-
63
-
64
-
65
-
66
-
67
-
68
-
69
-
70
-
71
-
72
-
73
-
74
-
75
-
76
-
77
-
78
-
79
-
80
-
81
-
82
-
83
-
84
-
85
-
86
-
87
-
88
-
89
-
90
-
91
-
92
-
93
-
94
-
95
-
96
-
97
-
98
-
99
-
100
-
101
-
102
-
103
-
104
-
105
-
106
-
107
-
108
-
109
-
110
-
111
-
112
-
113
-
114
-
115
-
116
-
117
-
118
-
119
-
120
-
121
-
122
-
123
-
124
-
125
-
126
-
127
-
128
-
129
-
130
-
131
-
132
-
133
-
134
-
135
-
136
-
137
-
138
-
139
-
140
-
141
-
142
-
143
-
144
-
145
-
146
-
147
-
148
-
149
-
150
-
151
-
152
-
153
-
154
-
155
-
156
-
157
-
158
-
159
-
160
 |
 |
