Konica Minolta AccurioPrint 2100 GBC Binder G1 User Manual - Page 13
User Display
 |
View all Konica Minolta AccurioPrint 2100 manuals
Add to My Manuals
Save this manual to your list of manuals |
Page 13 highlights
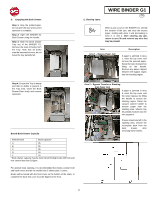
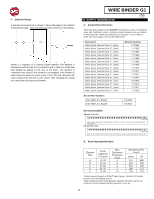
8. USER DISPLAY Located on the front of the BINDER G1 is a user interactive LCD panel that provides Messages, Settings and Information relating to the functions of the binder. Messages on the LCD Panel 1. Ready Bypass BINDER G1 is ready to bypass, sheets will pass through the machine. 2. Ready to Bind BINDER G1 is ready to process a binding job, all sheets through the unit will be stacked and bound. 3. Running Bypass This message will be displayed when Bypass mode is in operation. 4. Running Binding This is displayed when Bind mode is in operation. The book drawer capacity will be displayed as a percentage on the right of screen. If a door of the BINDER G1 is opened during binding, the job will not resume. 5. Book Tray Full When the book tray is full or near full, the Tray Full message will be shown. 6. Close Tray When the book tray is removed or not fully inserted into the BINDER G1 unit, this message will be displayed. 7. Close Door When the Front door is open or not completely closed this message will be displayed. 8. Close Cover When the top cover is open or not completely closed this message will be displayed. 9. Add Elements When the supply of elements is low, or the spool is missing, the add elements message is displayed. See Section 7 B for more details. 10. Paused When there is a non-BINDER G1 stoppage in the line of equipment this message will be displayed. If a door of the BINDER G1 is opened during a pause, the job will not resume. 11. Jam Code The jam code will appear when there is a jam in the machine along with the area the jam is located. Refer to Section 7 E for instructions on clearing jams and Section 11 for details on each jam 12. Push Feeder In This message appears when the element feeder door is closed but the drawer is not fully pushed in. Opening the door, pushing the drawer fully in, and closing the door will remove this message. WIRE BINDER G1 GB Changing the Settings on the LCD panel The User Interface is navigated using the Up and Down arrows next to the LCD. To change any setting below press OK while it is on the display and use the arrows to change the setting. After changing any setting press OK and exit the settings mode. 1. Closing Use this option to change the closing depth for the twin loop wire. Offset from -5 to +5 is available and will apply only to the wire size selected. Use this option to correct for binding that is over- or under-closed. Refer to Section 9 F for more details. 2. Alignment Use this option to correct for sheet offset coming into the BINDER G1. Refer to Section 9 E for more details. 3. Deflector Use this option to correct for the timing of the deflector. Refer to Section 9 E for more details. 4. Language Use this option to change the language displayed on the LCD screen. Displaying Information on the LCD Panel 1. Wire Size Displays the wire size currently selected. Also shown on the home screen. 2. Counts Displays the number of books and sheets that have been processed by the BINDER G1. 3. Firmware This displays the current level of firmware of BINDER G1. 13
-
 1
1 -
2
-
3
-
4
-
5
-
6
-
7
-
 8
8 -
 9
9 -
 10
10 -
 11
11 -
 12
12 -
 13
13 -
 14
14 -
 15
15 -
 16
16 -
 17
17 -
 18
18 -
19
-
20
-
21
-
22
-
23
-
24
-
25
-
26
-
27
-
28
-
29
-
30
-
31
-
32
-
33
-
34
-
35
-
36
-
37
-
38
-
39
-
40
-
41
-
42
-
43
-
44
-
45
-
46
-
47
-
48
-
49
-
50
-
51
-
52
-
53
-
54
-
55
-
56
-
57
-
58
-
59
-
60
-
61
-
62
-
63
-
64
-
65
-
66
-
67
-
68
-
69
-
70
-
71
-
72
-
73
-
74
-
75
-
76
-
77
-
78
-
79
-
80
-
81
-
82
-
83
-
84
-
85
-
86
-
87
-
88
-
89
-
90
-
91
-
92
-
93
-
94
-
95
-
96
-
97
-
98
-
99
-
100
-
101
-
102
-
103
-
104
-
105
-
106
-
107
-
108
-
109
-
110
-
111
-
112
-
113
-
114
-
115
-
116
-
117
-
118
-
119
-
120
-
121
-
122
-
123
-
124
-
125
-
126
-
127
-
128
-
129
-
130
-
131
-
132
-
133
-
134
-
135
-
136
-
137
-
138
-
139
-
140
-
141
-
142
-
143
-
144
-
145
-
146
-
147
-
148
-
149
-
150
-
151
-
152
-
153
-
154
-
155
-
156
-
157
-
158
-
159
-
160
 |
 |
