Konica Minolta AccurioPrint 2100 GBC Binder G1 User Manual - Page 12
Bwire Binder G1
 |
View all Konica Minolta AccurioPrint 2100 manuals
Add to My Manuals
Save this manual to your list of manuals |
Page 12 highlights
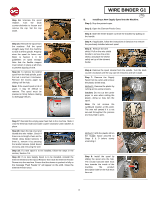
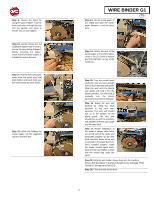
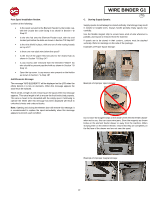
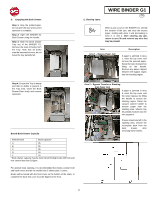
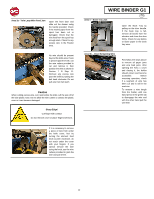
Area 3a- Twin Loop Wire Feed Jam Open the front door and slide out the drawer using the handle provided. Check if the rewind paper from the spool has been cut or damaged. Check that the wire feed from the spool has enough slack. Check for any excess wire in the Feeder area. No wire should be present beyond the knife area. If wire is present past the knife, use the wire cutters provided to cut and remove it, then position the wire as shown in Section 7 B Step 11. Remove any excess wire past the knife by turning the belt knob clockwise. Do not pull wire from belt teeth Caution When cutting excess wire, cut it just before the knife. Lift the wire off of the blue plastic nose. Do not allow the wire cutters to contact the plastic nose or it can become damaged. Sharp Edge! Cut finger with contact Do not remove cover or place fingers behind it. If it is necessary to remove a piece of wire from under the knife cover, first try turning the element feed knob counter clockwise, do not reach under the cover with your fingers. If you cannot remove the wire using the knob, use the wire cutters provided to grab the wire and pull it free. WIRE BINDER G1 GB Area 4 - Book Tray Jam Open the Book Tray by pulling on the door handle. If the book tray is full, remove all books from the elevator and close the door firmly. Check for any debris or loose paper in the book tray area. Area 3b - Clear Remaining Wire First follow the steps above to remove all paper jams and wire feed jams. After opening the Area 1 cover and closing it, the holder should retract and become accessible. Before resuming operation, check if a segment of wire has been cut and is still in the machine. To remove a wire length from the holder, with one hand press in the green tab to disengage the wire and with the other hand pull the wire free. 12
-
 1
1 -
2
-
3
-
4
-
5
-
6
-
 7
7 -
 8
8 -
 9
9 -
 10
10 -
 11
11 -
 12
12 -
 13
13 -
 14
14 -
 15
15 -
 16
16 -
 17
17 -
18
-
19
-
20
-
21
-
22
-
23
-
24
-
25
-
26
-
27
-
28
-
29
-
30
-
31
-
32
-
33
-
34
-
35
-
36
-
37
-
38
-
39
-
40
-
41
-
42
-
43
-
44
-
45
-
46
-
47
-
48
-
49
-
50
-
51
-
52
-
53
-
54
-
55
-
56
-
57
-
58
-
59
-
60
-
61
-
62
-
63
-
64
-
65
-
66
-
67
-
68
-
69
-
70
-
71
-
72
-
73
-
74
-
75
-
76
-
77
-
78
-
79
-
80
-
81
-
82
-
83
-
84
-
85
-
86
-
87
-
88
-
89
-
90
-
91
-
92
-
93
-
94
-
95
-
96
-
97
-
98
-
99
-
100
-
101
-
102
-
103
-
104
-
105
-
106
-
107
-
108
-
109
-
110
-
111
-
112
-
113
-
114
-
115
-
116
-
117
-
118
-
119
-
120
-
121
-
122
-
123
-
124
-
125
-
126
-
127
-
128
-
129
-
130
-
131
-
132
-
133
-
134
-
135
-
136
-
137
-
138
-
139
-
140
-
141
-
142
-
143
-
144
-
145
-
146
-
147
-
148
-
149
-
150
-
151
-
152
-
153
-
154
-
155
-
156
-
157
-
158
-
159
-
160
 |
 |
