Konica Minolta AccurioPrint 2100 GBC Binder G1 User Manual - Page 16
Double Loop, C. Troubleshooting, D. Punch Hole Quality
 |
View all Konica Minolta AccurioPrint 2100 manuals
Add to My Manuals
Save this manual to your list of manuals |
Page 16 highlights
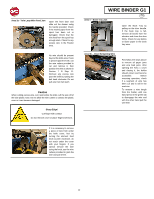
Double Loop A double loop occurs when a row of wire other than the one being fed has slack in it. This will result in a J320 wire jam code. C. Troubleshooting: WIRE BINDER G1 GB This section will lay out the troubleshooting steps for when sheets are not being hooked on the twin loop wire tips. In some cases, it will also create a Jam code. J202, J203 and J244 are the most likely Jam to be caused as a result of poor hooking. Before changing any settings on the BINDER G1 or Punch, review each trouble shooting step below. Verify that the BINDER G1 is properly docked to the upstream device and confirm that there is no misalignment between the devices. Check that printed sheets do not have excess curl. Flat paper will hook more reliably when binding books. Make efforts to reduce curl to the minimum possible. Review the printer manual to reduce this if present. Example of curled sheet below. To resolve this, follow the slack wire to the top of the spool and gently pull the slack clockwise. This will transfer the slack to the next row of wire, repeat this until the all the slack is in the last row being fed. Inspect the element spool for damage, if the wire is damaged removed the damaged length of wire or replace the spool with one of the same size. Verify the proper element size is being used for the amount of sheets in the book being run. Refer to the chart in Section 10 Examine your unhooked sheet for damage around the holes, this can manifest as tears or imprints. If any is present, proceed to the Deflector and Alignment Adjustment When binding with paper of 300 gsm with grain orientation in the direction of paper flow, paper jams may occur depending on the stiffness of the media. Using a different, less rigid, cover media may remove the problem. D. Punch Hole Quality: If the punch upstream of the BINDER G1 is not punching holes within specification, the binding capabilities of the BINDER G1 will be reduced, resulting in jams and unhooked sheets. 1. Using the Hole Position Tool provided, confirm the backgage depth and alignment of a single punched sheet. To use the tool, take a punched, unbound sheet of paper and align it with the either the "LTR" or "A4" corner, depending on the paper size. The black lines should faintly visible behind the sheet, when the punch is properly aligned, the black circles will be evenly visible around all of the punch holes. 2. If the holes do not align with the outlines on the tool, refer to the PUNCH G2 user manual to make adjustments to the hole position. 16
-
 1
1 -
2
-
3
-
4
-
5
-
6
-
7
-
8
-
9
-
10
-
 11
11 -
 12
12 -
 13
13 -
 14
14 -
 15
15 -
 16
16 -
 17
17 -
 18
18 -
 19
19 -
 20
20 -
 21
21 -
22
-
23
-
24
-
25
-
26
-
27
-
28
-
29
-
30
-
31
-
32
-
33
-
34
-
35
-
36
-
37
-
38
-
39
-
40
-
41
-
42
-
43
-
44
-
45
-
46
-
47
-
48
-
49
-
50
-
51
-
52
-
53
-
54
-
55
-
56
-
57
-
58
-
59
-
60
-
61
-
62
-
63
-
64
-
65
-
66
-
67
-
68
-
69
-
70
-
71
-
72
-
73
-
74
-
75
-
76
-
77
-
78
-
79
-
80
-
81
-
82
-
83
-
84
-
85
-
86
-
87
-
88
-
89
-
90
-
91
-
92
-
93
-
94
-
95
-
96
-
97
-
98
-
99
-
100
-
101
-
102
-
103
-
104
-
105
-
106
-
107
-
108
-
109
-
110
-
111
-
112
-
113
-
114
-
115
-
116
-
117
-
118
-
119
-
120
-
121
-
122
-
123
-
124
-
125
-
126
-
127
-
128
-
129
-
130
-
131
-
132
-
133
-
134
-
135
-
136
-
137
-
138
-
139
-
140
-
141
-
142
-
143
-
144
-
145
-
146
-
147
-
148
-
149
-
150
-
151
-
152
-
153
-
154
-
155
-
156
-
157
-
158
-
159
-
160
 |
 |
